# Advanced UI features
> A gentle introduction into advanced UI features: adaptive layouts, slivers, scrolling, navigation.
Preview the Rolodex app you'll build and set up a Cupertino-based project with data models.
title: What you'll accomplish
items:
- title: Preview the Rolodex app you'll build
icon: preview
- title: Set up a project with Cupertino widgets
icon: phone_iphone
- title: Create data models for contacts and groups
icon: data_object
---
### Introduction
In this third installment of the Flutter tutorial series,
you'll use Flutter's Cupertino library to build a
partial clone of the iOS Contacts app.
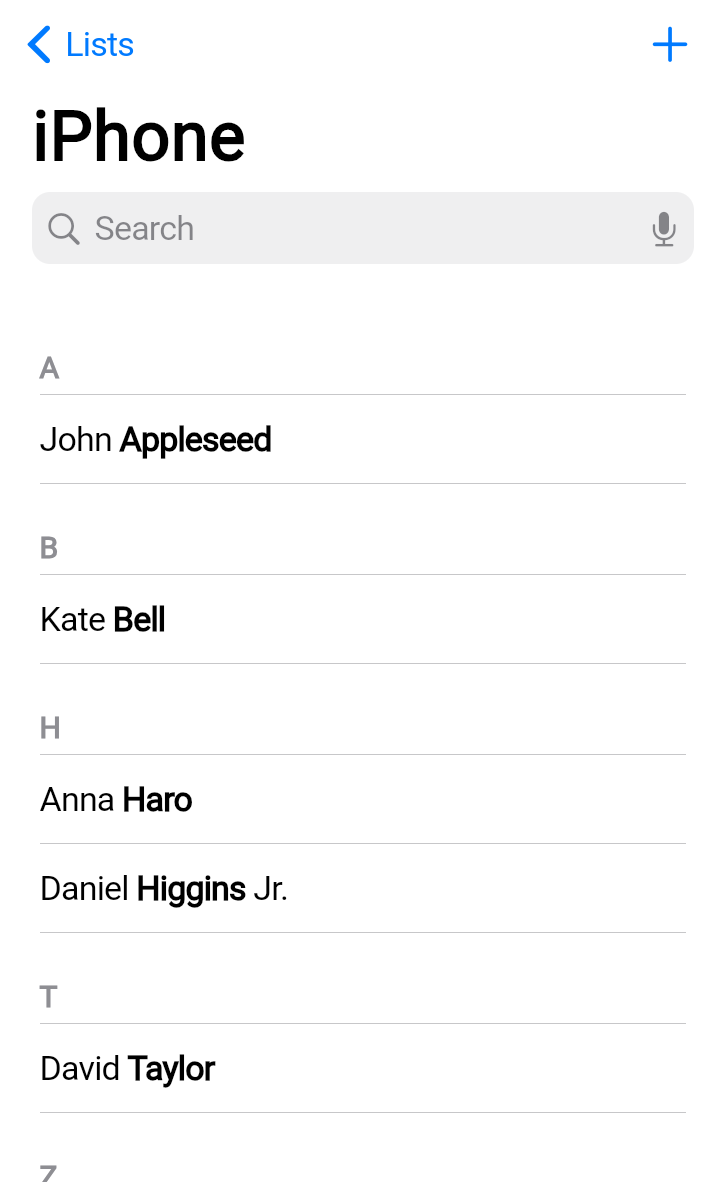 By the end of this tutorial, you'll have learned how to create
adaptive layouts, implement comprehensive theming, build navigation
patterns, and use advanced scrolling techniques.
#### What you'll learn
This tutorial explores the following topics:
* Building responsive layouts with `LayoutBuilder`.
* Using advanced scrolling with slivers and search.
* Implementing stack-based navigation patterns.
* Creating comprehensive themes with `CupertinoThemeData`.
* Supporting both light and dark themes.
* Creating an iOS-style UI using Cupertino widgets.
This tutorial assumes that you've completed the previous Flutter tutorials
and are comfortable with basic widget composition, state management,
and the Flutter project structure.
### Create a new Flutter project
To build a Flutter app, you first need a Flutter project.
You can create a new app with the [Flutter CLI tool][],
which is installed as part of the Flutter SDK.
Open your preferred terminal and run
the following command to create a new Flutter project:
```console
$ flutter create rolodex --empty
$ cd rolodex
```
This command creates a new Flutter project that
uses the minimal "empty" template.
[Flutter CLI tool]: /reference/flutter-cli
### Add the Cupertino Icons dependency
This project uses the [`cupertino_icons` package][],
an official Flutter package.
Add it as a dependency by running the following command:
```console
$ flutter pub add cupertino_icons
```
### Set up the project structure
First, create the basic directory structure for your app.
In your project's `lib` directory, create the following folders:
```console
$ mkdir lib/data lib/screens lib/theme
```
This command creates folders to organize your code into logical sections:
data models, screen widgets, and theme configuration.
### Replace the starter code
In your IDE, open the `lib/main.dart` file, and replace its entire
contents with the following starter code:
```dart
import 'package:flutter/cupertino.dart';
void main() {
runApp(const RolodexApp());
}
class RolodexApp extends StatelessWidget {
const RolodexApp({super.key});
@override
Widget build(BuildContext context) {
return const CupertinoApp(
title: 'Rolodex',
theme: CupertinoThemeData(
barBackgroundColor: CupertinoDynamicColor.withBrightness(
color: Color(0xFFF9F9F9),
darkColor: Color(0xFF1D1D1D),
),
),
home: CupertinoPageScaffold(child: Center(child: Text('Hello Rolodex!'))),
);
}
}
```
Unlike the previous two tutorials,
this app uses `CupertinoApp` instead of `MaterialApp`.
The Cupertino design system provides iOS-style widgets and styling,
which is perfect for building apps that feel native on Apple devices.
### Run your app
In your terminal at the root of your Flutter app, run the following command:
```console
$ flutter run -d chrome
```
The app builds and launches in a new instance of Chrome.
It displays "Hello Rolodex!" in the center of the screen.
### Create the data models
Before building the UI,
create the data structures and sample data that the app will use.
This section is lightly explained because it's not the focus of this tutorial.
#### Contact data
Create a new file, `lib/data/contact.dart`, and add the basic `Contact` class:
```dart foldable
class Contact {
Contact({
required this.id,
required this.firstName,
this.middleName,
required this.lastName,
this.suffix,
});
final int id;
final String firstName;
final String lastName;
final String? middleName;
final String? suffix;
}
[* -
final johnAppleseed = Contact(id: 0, firstName: 'John', lastName: 'Appleseed');
final kateBell = Contact(id: 1, firstName: 'Kate', lastName: 'Bell');
final annaHaro = Contact(id: 2, firstName: 'Anna', lastName: 'Haro');
final danielHiggins = Contact(
id: 3,
firstName: 'Daniel',
lastName: 'Higgins',
suffix: 'Jr.',
);
final davidTaylor = Contact(id: 4, firstName: 'David', lastName: 'Taylor');
final hankZakroff = Contact(
id: 5,
firstName: 'Hank',
middleName: 'M.',
lastName: 'Zakroff',
);
final alexAnderson = Contact(id: 6, firstName: 'Alex', lastName: 'Anderson');
final benBrown = Contact(id: 7, firstName: 'Ben', lastName: 'Brown');
final carolCarter = Contact(id: 8, firstName: 'Carol', lastName: 'Carter');
final dianaDevito = Contact(id: 9, firstName: 'Diana', lastName: 'Devito');
final emilyEvans = Contact(id: 10, firstName: 'Emily', lastName: 'Evans');
final frankFisher = Contact(id: 11, firstName: 'Frank', lastName: 'Fisher');
final graceGreen = Contact(id: 12, firstName: 'Grace', lastName: 'Green');
final henryHall = Contact(id: 13, firstName: 'Henry', lastName: 'Hall');
final isaacIngram = Contact(id: 14, firstName: 'Isaac', lastName: 'Ingram');
final juliaJackson = Contact(id: 15, firstName: 'Julia', lastName: 'Jackson');
final kevinKelly = Contact(id: 16, firstName: 'Kevin', lastName: 'Kelly');
final lindaLewis = Contact(id: 17, firstName: 'Linda', lastName: 'Lewis');
final michaelMiller = Contact(id: 18, firstName: 'Michael', lastName: 'Miller');
final nancyNewman = Contact(id: 19, firstName: 'Nancy', lastName: 'Newman');
final oliverOwens = Contact(id: 20, firstName: 'Oliver', lastName: 'Owens');
final penelopeParker = Contact(
id: 21,
firstName: 'Penelope',
lastName: 'Parker',
);
final quentinQuinn = Contact(id: 22, firstName: 'Quentin', lastName: 'Quinn');
final rachelReed = Contact(id: 23, firstName: 'Rachel', lastName: 'Reed');
final samuelSmith = Contact(id: 24, firstName: 'Samuel', lastName: 'Smith');
final tessaTurner = Contact(id: 25, firstName: 'Tessa', lastName: 'Turner');
final umbertoUpton = Contact(id: 26, firstName: 'Umberto', lastName: 'Upton');
final victoriaVance = Contact(id: 27, firstName: 'Victoria', lastName: 'Vance');
final williamWilson = Contact(id: 28, firstName: 'William', lastName: 'Wilson');
final xavierXu = Contact(id: 29, firstName: 'Xavier', lastName: 'Xu');
final yasmineYoung = Contact(id: 30, firstName: 'Yasmine', lastName: 'Young');
final zacharyZimmerman = Contact(
id: 31,
firstName: 'Zachary',
lastName: 'Zimmerman',
);
final elizabethMJohnson = Contact(
id: 32,
firstName: 'Elizabeth',
middleName: 'M.',
lastName: 'Johnson',
);
final robertLWilliamsSr = Contact(
id: 33,
firstName: 'Robert',
middleName: 'L.',
lastName: 'Williams',
suffix: 'Sr.',
);
final margaretAnneDavis = Contact(
id: 34,
firstName: 'Margaret',
middleName: 'Anne',
lastName: 'Davis',
);
final williamJamesBrownIII = Contact(
id: 35,
firstName: 'William',
middleName: 'James',
lastName: 'Brown',
suffix: 'III',
);
final maryElizabethClark = Contact(
id: 36,
firstName: 'Mary',
middleName: 'Elizabeth',
lastName: 'Clark',
);
final drSarahWatson = Contact(
id: 37,
firstName: 'Dr. Sarah',
lastName: 'Watson',
);
final jamesRSmithEsq = Contact(
id: 38,
firstName: 'James',
middleName: 'R.',
lastName: 'Smith',
suffix: 'Esq.',
);
final mariaCruz = Contact(id: 39, firstName: 'Maria', lastName: 'Cruz');
final pierreMartin = Contact(id: 40, firstName: 'Pierre', lastName: 'Martin');
final yukiTanaka = Contact(id: 41, firstName: 'Yuki', lastName: 'Tanaka');
final hansSchmidt = Contact(id: 42, firstName: 'Hans', lastName: 'Schmidt');
final priyaPatel = Contact(id: 43, firstName: 'Priya', lastName: 'Patel');
final carlosGarcia = Contact(id: 44, firstName: 'Carlos', lastName: 'Garcia');
final ninaVolkova = Contact(id: 45, firstName: 'Nina', lastName: 'Volkova');
final jenniferAdams = Contact(id: 46, firstName: 'Jennifer', lastName: 'Adams');
final michaelBaker = Contact(id: 47, firstName: 'Michael', lastName: 'Baker');
final sarahCooper = Contact(id: 48, firstName: 'Sarah', lastName: 'Cooper');
final christopherDaniel = Contact(
id: 49,
firstName: 'Christopher',
lastName: 'Daniel',
);
final jessicaEdwards = Contact(
id: 50,
firstName: 'Jessica',
lastName: 'Edwards',
);
*]
[* -
final Set allContacts = {
johnAppleseed,
kateBell,
annaHaro,
danielHiggins,
davidTaylor,
hankZakroff,
alexAnderson,
benBrown,
carolCarter,
dianaDevito,
emilyEvans,
frankFisher,
graceGreen,
henryHall,
isaacIngram,
juliaJackson,
kevinKelly,
lindaLewis,
michaelMiller,
nancyNewman,
oliverOwens,
penelopeParker,
quentinQuinn,
rachelReed,
samuelSmith,
tessaTurner,
umbertoUpton,
victoriaVance,
williamWilson,
xavierXu,
yasmineYoung,
zacharyZimmerman,
elizabethMJohnson,
robertLWilliamsSr,
margaretAnneDavis,
williamJamesBrownIII,
maryElizabethClark,
drSarahWatson,
jamesRSmithEsq,
mariaCruz,
pierreMartin,
yukiTanaka,
hansSchmidt,
priyaPatel,
carlosGarcia,
ninaVolkova,
jenniferAdams,
michaelBaker,
sarahCooper,
christopherDaniel,
jessicaEdwards,
};
*]
```
This sample data includes contacts with and without middle names and suffixes.
This gives you a variety of data to work with as you build the UI.
#### ContactGroup data
Now, create the contact groups that organize your contacts into lists.
Create a new `lib/data/contact_group.dart` file and
add the `ContactGroup` class:
```dart
import 'dart:collection';
import 'package:flutter/cupertino.dart';
import 'contact.dart';
class ContactGroup {
factory ContactGroup({
required int id,
required String label,
bool permanent = false,
String? title,
List? contacts,
}) {
final contactsCopy = contacts ?? [];
_sortContacts(contactsCopy);
return ContactGroup._internal(
id: id,
label: label,
permanent: permanent,
title: title,
contacts: contactsCopy,
);
}
ContactGroup._internal({
required this.id,
required this.label,
this.permanent = false,
String? title,
List? contacts,
}) : title = title ?? label,
_contacts = contacts ?? const [];
final int id;
final bool permanent;
final String label;
final String title;
final List _contacts;
List get contacts => _contacts;
AlphabetizedContactMap get alphabetizedContacts {
final contactsMap = AlphabetizedContactMap();
for (final contact in _contacts) {
final lastInitial = contact.lastName[0].toUpperCase();
if (contactsMap.containsKey(lastInitial)) {
contactsMap[lastInitial]!.add(contact);
} else {
contactsMap[lastInitial] = [contact];
}
}
return contactsMap;
}
}
```
A `ContactGroup` represents a collection of contacts,
such as "All Contacts" or "Favorites".
Add the following helper code and sample data to `lib/data/contact_group.dart`:
```dart
typedef AlphabetizedContactMap = SplayTreeMap>;
/// Sorts a list of [contacts] alphabetically by
/// last name, then first name, then middle name.
/// If names are identical, sorts by contact ID to ensure consistent ordering.
void _sortContacts(List contacts) {
contacts.sort((a, b) {
final checkLastName = a.lastName.compareTo(b.lastName);
if (checkLastName != 0) {
return checkLastName;
}
final checkFirstName = a.firstName.compareTo(b.firstName);
if (checkFirstName != 0) {
return checkFirstName;
}
if (a.middleName != null && b.middleName != null) {
final checkMiddleName = a.middleName!.compareTo(b.middleName!);
if (checkMiddleName != 0) {
return checkMiddleName;
}
} else if (a.middleName != null || b.middleName != null) {
return a.middleName != null ? 1 : -1;
}
// If both contacts have the exact same name, order by first created.
return a.id.compareTo(b.id);
});
}
final allPhone = ContactGroup(
id: 0,
permanent: true,
label: 'All iPhone',
title: 'iPhone',
contacts: allContacts.toList(),
);
final friends = ContactGroup(
id: 1,
label: 'Friends',
contacts: [allContacts.elementAt(3)],
);
final work = ContactGroup(id: 2, label: 'Work');
List generateSeedData() {
return [allPhone, friends, work];
}
```
This code creates three sample groups and a function to
generate the initial data for the app.
Finally, add a class that manages state changes to `lib/data/contact_group.dart`:
```dart
class ContactGroupsModel {
ContactGroupsModel() : _listsNotifier = ValueNotifier(generateSeedData());
final ValueNotifier> _listsNotifier;
ValueNotifier> get listsNotifier => _listsNotifier;
List get lists => _listsNotifier.value;
ContactGroup findContactList(int id) {
return lists[id];
}
void dispose() {
_listsNotifier.dispose();
}
}
```
If you aren't familiar with `ValueNotifier`,
you should complete the [previous tutorial covering state][] before continuing,
which covers state management.
[previous tutorial covering state]: /learn/pathway/tutorial/set-up-state-project
### Connect the data to your app
Update your `main.dart` to include the global state and
import the new data file:
```dart
import 'package:flutter/cupertino.dart';
import 'data/contact_group.dart';
final contactGroupsModel = ContactGroupsModel();
void main() {
runApp(const RolodexApp());
}
class RolodexApp extends StatelessWidget {
const RolodexApp({super.key});
@override
Widget build(BuildContext context) {
return const CupertinoApp(
title: 'Rolodex',
theme: CupertinoThemeData(
barBackgroundColor: CupertinoDynamicColor.withBrightness(
color: Color(0xFFF9F9F9),
darkColor: Color(0xFF1D1D1D),
),
),
home: CupertinoPageScaffold(child: Center(child: Text('Hello Rolodex!'))),
);
}
}
```
With all the extraneous code out of the way, in the next lesson,
you'll start building the app in earnest.
[`cupertino_icons` package]: https://pub.dev/packages/cupertino_icons
### Review
title: What you accomplished
subtitle: Here's a summary of what you built and learned in this lesson.
completed: true
items:
- title: Previewed the Rolodex app
icon: preview
details: >-
You're starting a new tutorial section focused on advanced UI features.
To make your app feel polished and native on any device,
you'll learn adaptive layouts, slivers, navigation, and theming.
- title: Set up a project with Cupertino widgets
icon: phone_iphone
details: >-
Unlike the previous lessons,
this app uses `CupertinoApp` instead of `MaterialApp`.
The Cupertino design system provides iOS-style widgets that
feel native on Apple devices.
- title: Created data models for contacts and groups
icon: data_object
details: >-
You created `Contact` and `ContactGroup` classes with sample data,
plus a `ContactGroupsModel` for state management.
This foundation supports the UI you'll build in the coming lessons.
### Test yourself
- question: What is the main difference between CupertinoApp and MaterialApp?
options:
- text: CupertinoApp only works on iOS devices.
correct: false
explanation: CupertinoApp can run on any platform; it just provides iOS-style widgets.
- text: CupertinoApp provides iOS-style widgets and styling, while MaterialApp provides Material Design widgets.
correct: true
explanation: CupertinoApp uses Cupertino design system widgets that match the iOS look and feel.
- text: CupertinoApp is lighter and has better performance.
correct: false
explanation: Both have similar performance; they differ in visual style, not speed.
- text: MaterialApp requires more configuration to set up.
correct: false
explanation: Both have similar setup requirements; they just use different design systems.
- question: What is the purpose of a ValueNotifier in state management?
options:
- text: To validate user input values.
correct: false
explanation: ValueNotifier holds and notifies about value changes, not validation.
- text: To hold a single value and notify listeners when that value changes.
correct: true
explanation: ValueNotifier is a simple ChangeNotifier that wraps a single value and notifies listeners on change.
- text: To convert values between different data types.
correct: false
explanation: Type conversion is not the purpose of ValueNotifier.
- text: To store values permanently in local storage.
correct: false
explanation: ValueNotifier holds values in memory; persistence requires separate implementation.
By the end of this tutorial, you'll have learned how to create
adaptive layouts, implement comprehensive theming, build navigation
patterns, and use advanced scrolling techniques.
#### What you'll learn
This tutorial explores the following topics:
* Building responsive layouts with `LayoutBuilder`.
* Using advanced scrolling with slivers and search.
* Implementing stack-based navigation patterns.
* Creating comprehensive themes with `CupertinoThemeData`.
* Supporting both light and dark themes.
* Creating an iOS-style UI using Cupertino widgets.
This tutorial assumes that you've completed the previous Flutter tutorials
and are comfortable with basic widget composition, state management,
and the Flutter project structure.
### Create a new Flutter project
To build a Flutter app, you first need a Flutter project.
You can create a new app with the [Flutter CLI tool][],
which is installed as part of the Flutter SDK.
Open your preferred terminal and run
the following command to create a new Flutter project:
```console
$ flutter create rolodex --empty
$ cd rolodex
```
This command creates a new Flutter project that
uses the minimal "empty" template.
[Flutter CLI tool]: /reference/flutter-cli
### Add the Cupertino Icons dependency
This project uses the [`cupertino_icons` package][],
an official Flutter package.
Add it as a dependency by running the following command:
```console
$ flutter pub add cupertino_icons
```
### Set up the project structure
First, create the basic directory structure for your app.
In your project's `lib` directory, create the following folders:
```console
$ mkdir lib/data lib/screens lib/theme
```
This command creates folders to organize your code into logical sections:
data models, screen widgets, and theme configuration.
### Replace the starter code
In your IDE, open the `lib/main.dart` file, and replace its entire
contents with the following starter code:
```dart
import 'package:flutter/cupertino.dart';
void main() {
runApp(const RolodexApp());
}
class RolodexApp extends StatelessWidget {
const RolodexApp({super.key});
@override
Widget build(BuildContext context) {
return const CupertinoApp(
title: 'Rolodex',
theme: CupertinoThemeData(
barBackgroundColor: CupertinoDynamicColor.withBrightness(
color: Color(0xFFF9F9F9),
darkColor: Color(0xFF1D1D1D),
),
),
home: CupertinoPageScaffold(child: Center(child: Text('Hello Rolodex!'))),
);
}
}
```
Unlike the previous two tutorials,
this app uses `CupertinoApp` instead of `MaterialApp`.
The Cupertino design system provides iOS-style widgets and styling,
which is perfect for building apps that feel native on Apple devices.
### Run your app
In your terminal at the root of your Flutter app, run the following command:
```console
$ flutter run -d chrome
```
The app builds and launches in a new instance of Chrome.
It displays "Hello Rolodex!" in the center of the screen.
### Create the data models
Before building the UI,
create the data structures and sample data that the app will use.
This section is lightly explained because it's not the focus of this tutorial.
#### Contact data
Create a new file, `lib/data/contact.dart`, and add the basic `Contact` class:
```dart foldable
class Contact {
Contact({
required this.id,
required this.firstName,
this.middleName,
required this.lastName,
this.suffix,
});
final int id;
final String firstName;
final String lastName;
final String? middleName;
final String? suffix;
}
[* -
final johnAppleseed = Contact(id: 0, firstName: 'John', lastName: 'Appleseed');
final kateBell = Contact(id: 1, firstName: 'Kate', lastName: 'Bell');
final annaHaro = Contact(id: 2, firstName: 'Anna', lastName: 'Haro');
final danielHiggins = Contact(
id: 3,
firstName: 'Daniel',
lastName: 'Higgins',
suffix: 'Jr.',
);
final davidTaylor = Contact(id: 4, firstName: 'David', lastName: 'Taylor');
final hankZakroff = Contact(
id: 5,
firstName: 'Hank',
middleName: 'M.',
lastName: 'Zakroff',
);
final alexAnderson = Contact(id: 6, firstName: 'Alex', lastName: 'Anderson');
final benBrown = Contact(id: 7, firstName: 'Ben', lastName: 'Brown');
final carolCarter = Contact(id: 8, firstName: 'Carol', lastName: 'Carter');
final dianaDevito = Contact(id: 9, firstName: 'Diana', lastName: 'Devito');
final emilyEvans = Contact(id: 10, firstName: 'Emily', lastName: 'Evans');
final frankFisher = Contact(id: 11, firstName: 'Frank', lastName: 'Fisher');
final graceGreen = Contact(id: 12, firstName: 'Grace', lastName: 'Green');
final henryHall = Contact(id: 13, firstName: 'Henry', lastName: 'Hall');
final isaacIngram = Contact(id: 14, firstName: 'Isaac', lastName: 'Ingram');
final juliaJackson = Contact(id: 15, firstName: 'Julia', lastName: 'Jackson');
final kevinKelly = Contact(id: 16, firstName: 'Kevin', lastName: 'Kelly');
final lindaLewis = Contact(id: 17, firstName: 'Linda', lastName: 'Lewis');
final michaelMiller = Contact(id: 18, firstName: 'Michael', lastName: 'Miller');
final nancyNewman = Contact(id: 19, firstName: 'Nancy', lastName: 'Newman');
final oliverOwens = Contact(id: 20, firstName: 'Oliver', lastName: 'Owens');
final penelopeParker = Contact(
id: 21,
firstName: 'Penelope',
lastName: 'Parker',
);
final quentinQuinn = Contact(id: 22, firstName: 'Quentin', lastName: 'Quinn');
final rachelReed = Contact(id: 23, firstName: 'Rachel', lastName: 'Reed');
final samuelSmith = Contact(id: 24, firstName: 'Samuel', lastName: 'Smith');
final tessaTurner = Contact(id: 25, firstName: 'Tessa', lastName: 'Turner');
final umbertoUpton = Contact(id: 26, firstName: 'Umberto', lastName: 'Upton');
final victoriaVance = Contact(id: 27, firstName: 'Victoria', lastName: 'Vance');
final williamWilson = Contact(id: 28, firstName: 'William', lastName: 'Wilson');
final xavierXu = Contact(id: 29, firstName: 'Xavier', lastName: 'Xu');
final yasmineYoung = Contact(id: 30, firstName: 'Yasmine', lastName: 'Young');
final zacharyZimmerman = Contact(
id: 31,
firstName: 'Zachary',
lastName: 'Zimmerman',
);
final elizabethMJohnson = Contact(
id: 32,
firstName: 'Elizabeth',
middleName: 'M.',
lastName: 'Johnson',
);
final robertLWilliamsSr = Contact(
id: 33,
firstName: 'Robert',
middleName: 'L.',
lastName: 'Williams',
suffix: 'Sr.',
);
final margaretAnneDavis = Contact(
id: 34,
firstName: 'Margaret',
middleName: 'Anne',
lastName: 'Davis',
);
final williamJamesBrownIII = Contact(
id: 35,
firstName: 'William',
middleName: 'James',
lastName: 'Brown',
suffix: 'III',
);
final maryElizabethClark = Contact(
id: 36,
firstName: 'Mary',
middleName: 'Elizabeth',
lastName: 'Clark',
);
final drSarahWatson = Contact(
id: 37,
firstName: 'Dr. Sarah',
lastName: 'Watson',
);
final jamesRSmithEsq = Contact(
id: 38,
firstName: 'James',
middleName: 'R.',
lastName: 'Smith',
suffix: 'Esq.',
);
final mariaCruz = Contact(id: 39, firstName: 'Maria', lastName: 'Cruz');
final pierreMartin = Contact(id: 40, firstName: 'Pierre', lastName: 'Martin');
final yukiTanaka = Contact(id: 41, firstName: 'Yuki', lastName: 'Tanaka');
final hansSchmidt = Contact(id: 42, firstName: 'Hans', lastName: 'Schmidt');
final priyaPatel = Contact(id: 43, firstName: 'Priya', lastName: 'Patel');
final carlosGarcia = Contact(id: 44, firstName: 'Carlos', lastName: 'Garcia');
final ninaVolkova = Contact(id: 45, firstName: 'Nina', lastName: 'Volkova');
final jenniferAdams = Contact(id: 46, firstName: 'Jennifer', lastName: 'Adams');
final michaelBaker = Contact(id: 47, firstName: 'Michael', lastName: 'Baker');
final sarahCooper = Contact(id: 48, firstName: 'Sarah', lastName: 'Cooper');
final christopherDaniel = Contact(
id: 49,
firstName: 'Christopher',
lastName: 'Daniel',
);
final jessicaEdwards = Contact(
id: 50,
firstName: 'Jessica',
lastName: 'Edwards',
);
*]
[* -
final Set allContacts = {
johnAppleseed,
kateBell,
annaHaro,
danielHiggins,
davidTaylor,
hankZakroff,
alexAnderson,
benBrown,
carolCarter,
dianaDevito,
emilyEvans,
frankFisher,
graceGreen,
henryHall,
isaacIngram,
juliaJackson,
kevinKelly,
lindaLewis,
michaelMiller,
nancyNewman,
oliverOwens,
penelopeParker,
quentinQuinn,
rachelReed,
samuelSmith,
tessaTurner,
umbertoUpton,
victoriaVance,
williamWilson,
xavierXu,
yasmineYoung,
zacharyZimmerman,
elizabethMJohnson,
robertLWilliamsSr,
margaretAnneDavis,
williamJamesBrownIII,
maryElizabethClark,
drSarahWatson,
jamesRSmithEsq,
mariaCruz,
pierreMartin,
yukiTanaka,
hansSchmidt,
priyaPatel,
carlosGarcia,
ninaVolkova,
jenniferAdams,
michaelBaker,
sarahCooper,
christopherDaniel,
jessicaEdwards,
};
*]
```
This sample data includes contacts with and without middle names and suffixes.
This gives you a variety of data to work with as you build the UI.
#### ContactGroup data
Now, create the contact groups that organize your contacts into lists.
Create a new `lib/data/contact_group.dart` file and
add the `ContactGroup` class:
```dart
import 'dart:collection';
import 'package:flutter/cupertino.dart';
import 'contact.dart';
class ContactGroup {
factory ContactGroup({
required int id,
required String label,
bool permanent = false,
String? title,
List? contacts,
}) {
final contactsCopy = contacts ?? [];
_sortContacts(contactsCopy);
return ContactGroup._internal(
id: id,
label: label,
permanent: permanent,
title: title,
contacts: contactsCopy,
);
}
ContactGroup._internal({
required this.id,
required this.label,
this.permanent = false,
String? title,
List? contacts,
}) : title = title ?? label,
_contacts = contacts ?? const [];
final int id;
final bool permanent;
final String label;
final String title;
final List _contacts;
List get contacts => _contacts;
AlphabetizedContactMap get alphabetizedContacts {
final contactsMap = AlphabetizedContactMap();
for (final contact in _contacts) {
final lastInitial = contact.lastName[0].toUpperCase();
if (contactsMap.containsKey(lastInitial)) {
contactsMap[lastInitial]!.add(contact);
} else {
contactsMap[lastInitial] = [contact];
}
}
return contactsMap;
}
}
```
A `ContactGroup` represents a collection of contacts,
such as "All Contacts" or "Favorites".
Add the following helper code and sample data to `lib/data/contact_group.dart`:
```dart
typedef AlphabetizedContactMap = SplayTreeMap>;
/// Sorts a list of [contacts] alphabetically by
/// last name, then first name, then middle name.
/// If names are identical, sorts by contact ID to ensure consistent ordering.
void _sortContacts(List contacts) {
contacts.sort((a, b) {
final checkLastName = a.lastName.compareTo(b.lastName);
if (checkLastName != 0) {
return checkLastName;
}
final checkFirstName = a.firstName.compareTo(b.firstName);
if (checkFirstName != 0) {
return checkFirstName;
}
if (a.middleName != null && b.middleName != null) {
final checkMiddleName = a.middleName!.compareTo(b.middleName!);
if (checkMiddleName != 0) {
return checkMiddleName;
}
} else if (a.middleName != null || b.middleName != null) {
return a.middleName != null ? 1 : -1;
}
// If both contacts have the exact same name, order by first created.
return a.id.compareTo(b.id);
});
}
final allPhone = ContactGroup(
id: 0,
permanent: true,
label: 'All iPhone',
title: 'iPhone',
contacts: allContacts.toList(),
);
final friends = ContactGroup(
id: 1,
label: 'Friends',
contacts: [allContacts.elementAt(3)],
);
final work = ContactGroup(id: 2, label: 'Work');
List generateSeedData() {
return [allPhone, friends, work];
}
```
This code creates three sample groups and a function to
generate the initial data for the app.
Finally, add a class that manages state changes to `lib/data/contact_group.dart`:
```dart
class ContactGroupsModel {
ContactGroupsModel() : _listsNotifier = ValueNotifier(generateSeedData());
final ValueNotifier> _listsNotifier;
ValueNotifier> get listsNotifier => _listsNotifier;
List get lists => _listsNotifier.value;
ContactGroup findContactList(int id) {
return lists[id];
}
void dispose() {
_listsNotifier.dispose();
}
}
```
If you aren't familiar with `ValueNotifier`,
you should complete the [previous tutorial covering state][] before continuing,
which covers state management.
[previous tutorial covering state]: /learn/pathway/tutorial/set-up-state-project
### Connect the data to your app
Update your `main.dart` to include the global state and
import the new data file:
```dart
import 'package:flutter/cupertino.dart';
import 'data/contact_group.dart';
final contactGroupsModel = ContactGroupsModel();
void main() {
runApp(const RolodexApp());
}
class RolodexApp extends StatelessWidget {
const RolodexApp({super.key});
@override
Widget build(BuildContext context) {
return const CupertinoApp(
title: 'Rolodex',
theme: CupertinoThemeData(
barBackgroundColor: CupertinoDynamicColor.withBrightness(
color: Color(0xFFF9F9F9),
darkColor: Color(0xFF1D1D1D),
),
),
home: CupertinoPageScaffold(child: Center(child: Text('Hello Rolodex!'))),
);
}
}
```
With all the extraneous code out of the way, in the next lesson,
you'll start building the app in earnest.
[`cupertino_icons` package]: https://pub.dev/packages/cupertino_icons
### Review
title: What you accomplished
subtitle: Here's a summary of what you built and learned in this lesson.
completed: true
items:
- title: Previewed the Rolodex app
icon: preview
details: >-
You're starting a new tutorial section focused on advanced UI features.
To make your app feel polished and native on any device,
you'll learn adaptive layouts, slivers, navigation, and theming.
- title: Set up a project with Cupertino widgets
icon: phone_iphone
details: >-
Unlike the previous lessons,
this app uses `CupertinoApp` instead of `MaterialApp`.
The Cupertino design system provides iOS-style widgets that
feel native on Apple devices.
- title: Created data models for contacts and groups
icon: data_object
details: >-
You created `Contact` and `ContactGroup` classes with sample data,
plus a `ContactGroupsModel` for state management.
This foundation supports the UI you'll build in the coming lessons.
### Test yourself
- question: What is the main difference between CupertinoApp and MaterialApp?
options:
- text: CupertinoApp only works on iOS devices.
correct: false
explanation: CupertinoApp can run on any platform; it just provides iOS-style widgets.
- text: CupertinoApp provides iOS-style widgets and styling, while MaterialApp provides Material Design widgets.
correct: true
explanation: CupertinoApp uses Cupertino design system widgets that match the iOS look and feel.
- text: CupertinoApp is lighter and has better performance.
correct: false
explanation: Both have similar performance; they differ in visual style, not speed.
- text: MaterialApp requires more configuration to set up.
correct: false
explanation: Both have similar setup requirements; they just use different design systems.
- question: What is the purpose of a ValueNotifier in state management?
options:
- text: To validate user input values.
correct: false
explanation: ValueNotifier holds and notifies about value changes, not validation.
- text: To hold a single value and notify listeners when that value changes.
correct: true
explanation: ValueNotifier is a simple ChangeNotifier that wraps a single value and notifies listeners on change.
- text: To convert values between different data types.
correct: false
explanation: Type conversion is not the purpose of ValueNotifier.
- text: To store values permanently in local storage.
correct: false
explanation: ValueNotifier holds values in memory; persistence requires separate implementation.