# DevTools
> Learn to use the Dart DevTools when developing Flutter apps.
Learn to use the widget inspector and property editor to debug layout issues
and experiment with properties in real-time.
title: What you'll accomplish
items:
- title: Explore your app's widget tree with the widget inspector
icon: account_tree
- title: Learn to debug layout issues like unbounded constraints
icon: bug_report
- title: Experiment with properties in real-time
icon: tune
---
### Introduction
As your Flutter app grows in complexity, it becomes more important
to understand how each of the widget properties affects the UI.
The [Dart and Flutter DevTools][] provide you with
two particularly useful features:
the **widget inspector** and the **property editor**.
First, launch DevTools by running the following commands while
your app is running in debug mode.
Run this command in a **separate terminal window**
from where your app is running:
```console
$ dart devtools
```
Running this command starts the DevTools server and
opens the interface in a browser.
To connect DevTools to your running app:
1. Find the DevTools URL printed in the terminal
where your app is running (for example:
`Serving DevTools at http://127.0.0.1:9101`).
2. Copy this URL.
3. Paste it into the connect bar in the DevTools browser page.
:::note Run in your IDE
Provided you have the appropriate Flutter plugin installed,
you can also run DevTools directly inside
Code OSS-based editors such as [VS Code][] as well as
[IntelliJ and Android Studio][].
The screenshots in this lesson are from VS Code.
:::
[Dart and Flutter DevTools]: /tools/devtools
[VS Code]: /tools/vs-code
[IntelliJ and Android Studio]: /tools/android-studio
### The widget inspector
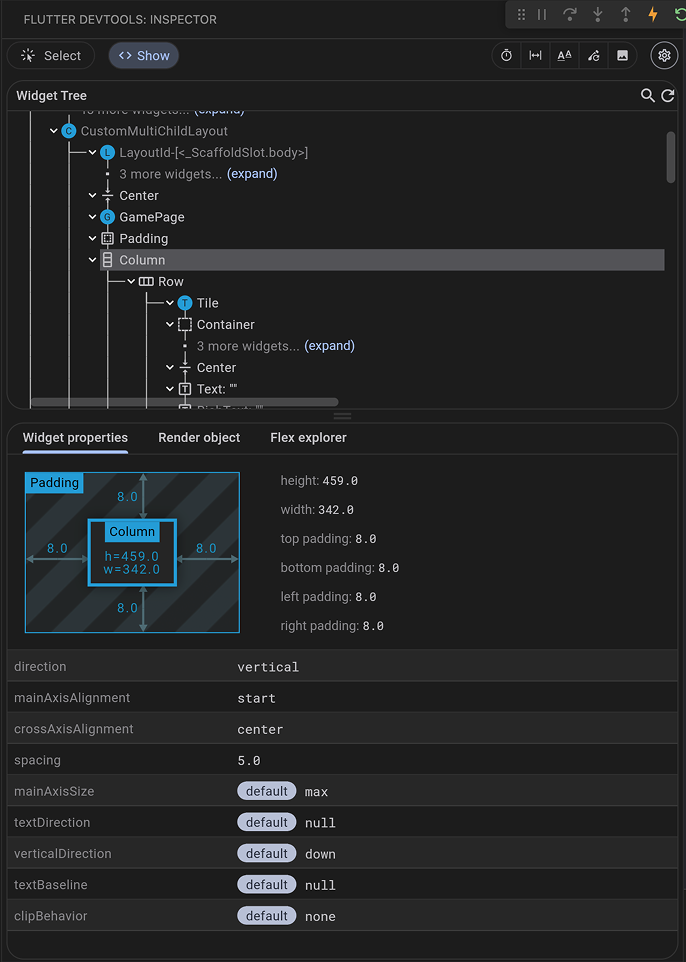
The widget inspector allows you to visualize and explore your widget tree.
It helps you understand the layout of your UI and
identifies which widgets are responsible for different parts of the screen.
Running against the app you've built so far, the inspector looks like this:
 Consider the `GamePage` widget you created in this section:
```dart
class GamePage extends StatelessWidget {
GamePage({super.key});
final Game _game = Game();
@override
Widget build(BuildContext context) {
return Padding(
padding: const EdgeInsets.all(8.0),
child: Column(
spacing: 5.0,
children: [
for (var guess in _game.guesses)
Row(
spacing: 5.0,
children: [
for (var letter in guess) Tile(letter.char, letter.type)
]
),
],
),
);
}
}
```
And how it's used in `MainApp`:
```dart
class MainApp extends StatelessWidget {
const MainApp({super.key});
@override
Widget build(BuildContext context) {
return MaterialApp(
home: Scaffold(
body: Center(child: GamePage()),
),
);
}
}
```
In the widget inspector, you should see a tree of
exactly the same widgets that are in your code:
`MaterialApp` as the root, with `Scaffold` as its `home`,
an `AppBar` as its `appBar`, and so on down the entire tree to
the `Row` widgets with `Tile` children.
You can select any widget in the tree to see its properties and
even jump to its source code in your IDE.
### Debugging layout issues
The widget inspector is perhaps most useful for debugging layout issues.
In certain situations,
a widget's [constraints][] are unbounded, or infinite.
This means that either
the maximum width or the maximum height is set to [`double.infinity`][].
A widget that tries to be as big as possible won't function usefully when
given an unbounded constraint and, in debug mode, throws an exception.
The most common case where a render box ends up with an unbounded
constraint is within a flex box widget ([`Row`][] or [`Column`][]),
and within a scrollable region,
such as a [`ListView`][] or [`ScrollView`][] subclasses.
`ListView`, for example, tries to expand to
fit the space available in its cross-direction. Such as if
it's a vertically scrolling block that tries to be as wide as its parent.
If you nest a vertically scrolling `ListView` inside
a horizontally scrolling `ListView`, the inner list tries to
be as wide as possible, which is infinitely wide, since the
outer one is scrollable in that direction.
Perhaps the most common error you'll run into while
building a Flutter application is due to incorrectly using layout widgets.
This error is referred to as the "unbounded constraints" error.
Watch the following video to get an understanding of how to
spot and resolve this issue.
[constraints]: /ui/layout/constraints
[`double.infinity`]: https://api.flutter.dev/flutter/dart-core/double/infinity-constant.html
[`Column`]: https://api.flutter.dev/flutter/widgets/Column-class.html
[`Row`]: https://api.flutter.dev/flutter/widgets/Row-class.html
[`ListView`]: https://api.flutter.dev/flutter/widgets/ListView-class.html
[`ScrollView`]: https://api.flutter.dev/flutter/widgets/ScrollView-class.html
### The property editor
When you select a widget in the widget inspector,
the property editor displays all the properties of that selected widget.
This is a powerful tool for understanding why a widget looks the way it does and
for experimenting with property value changes in real-time.
Consider the `GamePage` widget you created in this section:
```dart
class GamePage extends StatelessWidget {
GamePage({super.key});
final Game _game = Game();
@override
Widget build(BuildContext context) {
return Padding(
padding: const EdgeInsets.all(8.0),
child: Column(
spacing: 5.0,
children: [
for (var guess in _game.guesses)
Row(
spacing: 5.0,
children: [
for (var letter in guess) Tile(letter.char, letter.type)
]
),
],
),
);
}
}
```
And how it's used in `MainApp`:
```dart
class MainApp extends StatelessWidget {
const MainApp({super.key});
@override
Widget build(BuildContext context) {
return MaterialApp(
home: Scaffold(
body: Center(child: GamePage()),
),
);
}
}
```
In the widget inspector, you should see a tree of
exactly the same widgets that are in your code:
`MaterialApp` as the root, with `Scaffold` as its `home`,
an `AppBar` as its `appBar`, and so on down the entire tree to
the `Row` widgets with `Tile` children.
You can select any widget in the tree to see its properties and
even jump to its source code in your IDE.
### Debugging layout issues
The widget inspector is perhaps most useful for debugging layout issues.
In certain situations,
a widget's [constraints][] are unbounded, or infinite.
This means that either
the maximum width or the maximum height is set to [`double.infinity`][].
A widget that tries to be as big as possible won't function usefully when
given an unbounded constraint and, in debug mode, throws an exception.
The most common case where a render box ends up with an unbounded
constraint is within a flex box widget ([`Row`][] or [`Column`][]),
and within a scrollable region,
such as a [`ListView`][] or [`ScrollView`][] subclasses.
`ListView`, for example, tries to expand to
fit the space available in its cross-direction. Such as if
it's a vertically scrolling block that tries to be as wide as its parent.
If you nest a vertically scrolling `ListView` inside
a horizontally scrolling `ListView`, the inner list tries to
be as wide as possible, which is infinitely wide, since the
outer one is scrollable in that direction.
Perhaps the most common error you'll run into while
building a Flutter application is due to incorrectly using layout widgets.
This error is referred to as the "unbounded constraints" error.
Watch the following video to get an understanding of how to
spot and resolve this issue.
[constraints]: /ui/layout/constraints
[`double.infinity`]: https://api.flutter.dev/flutter/dart-core/double/infinity-constant.html
[`Column`]: https://api.flutter.dev/flutter/widgets/Column-class.html
[`Row`]: https://api.flutter.dev/flutter/widgets/Row-class.html
[`ListView`]: https://api.flutter.dev/flutter/widgets/ListView-class.html
[`ScrollView`]: https://api.flutter.dev/flutter/widgets/ScrollView-class.html
### The property editor
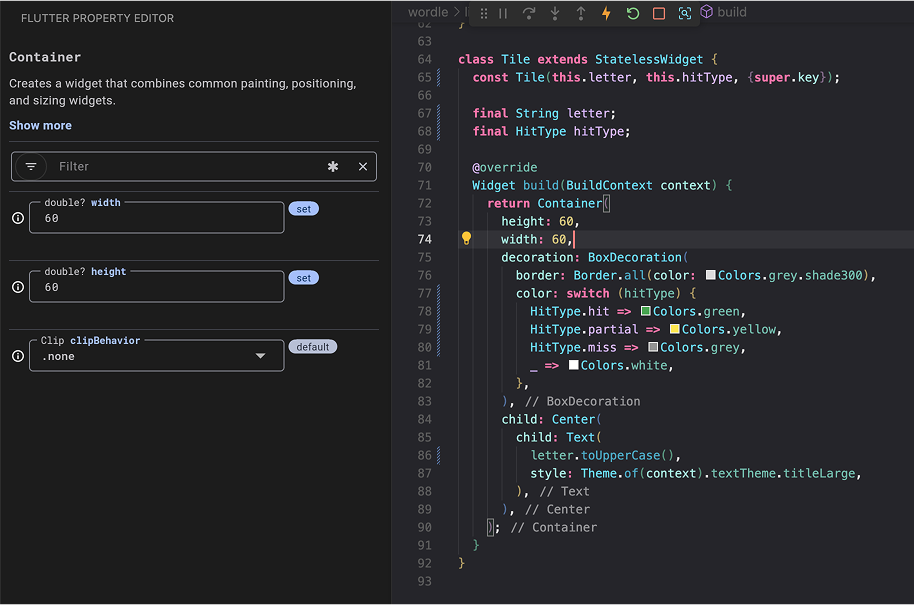
When you select a widget in the widget inspector,
the property editor displays all the properties of that selected widget.
This is a powerful tool for understanding why a widget looks the way it does and
for experimenting with property value changes in real-time.
 Look at the `Tile` widget's `build` method from earlier:
```dart
class Tile extends StatelessWidget {
const Tile(this.letter, this.hitType, {super.key});
final String letter;
final HitType hitType;
@override
Widget build(BuildContext context) {
return Container(
width: 60,
height: 60,
decoration: BoxDecoration(
border: Border.all(color: Colors.grey.shade300),
color: switch (hitType) {
HitType.hit => Colors.green,
HitType.partial => Colors.yellow,
HitType.miss => Colors.grey,
_ => Colors.white,
},
),
);
}
}
```
If you select the `Container` widget inside the `Tile` in the widget inspector,
the property editor shows its `width` (60), `height` (60), and the `decoration`
property.
You could then expand the `BoxDecoration` to see the `border` and `color`
properties.
For many properties, you can even
modify their values directly within the property editor.
For example, to quickly test how a different `width` or `height` would look
for your `Container` in the `Tile` widget,
change the numerical value in the property editor.
The tool writes this update directly back to your `.dart` source file on disk,
allowing you to instantly view the visual update on your running app
upon saving or triggering a hot reload.
This allows for rapid iteration on UI design.
### Review
title: What you accomplished
subtitle: Here's a summary of what you built and learned in this lesson.
completed: true
items:
- title: Explored your app's widget tree with the widget inspector
icon: account_tree
details: >-
The widget inspector lets you visualize your entire widget tree,
select any widget to view its properties, and
jump directly to its source code.
It's an essential tool for understanding your app's structure.
- title: Learned about common layout issues
icon: bug_report
details: >-
You learned about **unbounded constraints**,
one of the most common errors hit in Flutter development.
This happens when widgets like
`Row`, `Column`, or `ListView` receive infinite constraints.
Now you can recognize and fix these issues when they occur.
- title: Experimented with properties in real-time
icon: tune
details: >-
The property editor shows all properties of a selected widget and
lets you modify values directly on disk, allowing you to instantly view
updates upon saving or triggering a hot reload.
This enables rapid iteration when fine-tuning your UI.
### Test yourself
- question: What is a common cause of "unbounded constraints" errors in Flutter?
options:
- text: Using too many StatefulWidgets in the widget tree.
correct: false
explanation: StatefulWidget usage doesn't cause unbounded constraints.
- text: Placing a widget that tries to expand infinitely inside a scrollable or flex container without proper constraints.
correct: true
explanation: Widgets like ListView inside a Row, or nested scrollables, can receive infinite constraints and fail.
- text: Forgetting to call setState after changing data.
correct: false
explanation: Missing setState causes UI not to update, not constraint errors.
- text: Using Container without specifying a color.
correct: false
explanation: Color is optional and unrelated to layout constraints.
- question: What can you do with the Widget Inspector in Flutter DevTools?
options:
- text: Automatically generate unit tests for your widgets.
correct: false
explanation: The Widget Inspector is for visualization and debugging, not test generation.
- text: Visualize your widget tree, select widgets to view their properties, and jump to source code.
correct: true
explanation: The Widget Inspector lets you explore your app's structure, inspect widget properties, and navigate to the corresponding source code.
- text: Deploy your app directly to the app store.
correct: false
explanation: Deployment is handled separately; the Widget Inspector is for debugging.
- text: Edit your app's theme colors and typography.
correct: false
explanation: Theme editing requires code changes; the Widget Inspector is for inspecting the current state.
Look at the `Tile` widget's `build` method from earlier:
```dart
class Tile extends StatelessWidget {
const Tile(this.letter, this.hitType, {super.key});
final String letter;
final HitType hitType;
@override
Widget build(BuildContext context) {
return Container(
width: 60,
height: 60,
decoration: BoxDecoration(
border: Border.all(color: Colors.grey.shade300),
color: switch (hitType) {
HitType.hit => Colors.green,
HitType.partial => Colors.yellow,
HitType.miss => Colors.grey,
_ => Colors.white,
},
),
);
}
}
```
If you select the `Container` widget inside the `Tile` in the widget inspector,
the property editor shows its `width` (60), `height` (60), and the `decoration`
property.
You could then expand the `BoxDecoration` to see the `border` and `color`
properties.
For many properties, you can even
modify their values directly within the property editor.
For example, to quickly test how a different `width` or `height` would look
for your `Container` in the `Tile` widget,
change the numerical value in the property editor.
The tool writes this update directly back to your `.dart` source file on disk,
allowing you to instantly view the visual update on your running app
upon saving or triggering a hot reload.
This allows for rapid iteration on UI design.
### Review
title: What you accomplished
subtitle: Here's a summary of what you built and learned in this lesson.
completed: true
items:
- title: Explored your app's widget tree with the widget inspector
icon: account_tree
details: >-
The widget inspector lets you visualize your entire widget tree,
select any widget to view its properties, and
jump directly to its source code.
It's an essential tool for understanding your app's structure.
- title: Learned about common layout issues
icon: bug_report
details: >-
You learned about **unbounded constraints**,
one of the most common errors hit in Flutter development.
This happens when widgets like
`Row`, `Column`, or `ListView` receive infinite constraints.
Now you can recognize and fix these issues when they occur.
- title: Experimented with properties in real-time
icon: tune
details: >-
The property editor shows all properties of a selected widget and
lets you modify values directly on disk, allowing you to instantly view
updates upon saving or triggering a hot reload.
This enables rapid iteration when fine-tuning your UI.
### Test yourself
- question: What is a common cause of "unbounded constraints" errors in Flutter?
options:
- text: Using too many StatefulWidgets in the widget tree.
correct: false
explanation: StatefulWidget usage doesn't cause unbounded constraints.
- text: Placing a widget that tries to expand infinitely inside a scrollable or flex container without proper constraints.
correct: true
explanation: Widgets like ListView inside a Row, or nested scrollables, can receive infinite constraints and fail.
- text: Forgetting to call setState after changing data.
correct: false
explanation: Missing setState causes UI not to update, not constraint errors.
- text: Using Container without specifying a color.
correct: false
explanation: Color is optional and unrelated to layout constraints.
- question: What can you do with the Widget Inspector in Flutter DevTools?
options:
- text: Automatically generate unit tests for your widgets.
correct: false
explanation: The Widget Inspector is for visualization and debugging, not test generation.
- text: Visualize your widget tree, select widgets to view their properties, and jump to source code.
correct: true
explanation: The Widget Inspector lets you explore your app's structure, inspect widget properties, and navigate to the corresponding source code.
- text: Deploy your app directly to the app store.
correct: false
explanation: Deployment is handled separately; the Widget Inspector is for debugging.
- text: Edit your app's theme colors and typography.
correct: false
explanation: Theme editing requires code changes; the Widget Inspector is for inspecting the current state.