# Layout
> Learn about common layout widgets in Flutter.
Learn how to build layouts with common widgets like Scaffold, AppBar, Column, and Row.
title: What you'll accomplish
items:
- title: Structure an app with Scaffold and AppBar
icon: web_asset
- title: Arrange widgets using Column and Row
icon: view_column
- title: Generate widgets dynamically from data
icon: repeat
- title: Build a grid layout for the game board
icon: grid_view
---
### Introduction
Given that Flutter is a UI toolkit,
you'll spend a lot of time creating layouts with Flutter widgets.
In this section, you'll learn how to build layouts with
some of the most common layout widgets.
This includes high-level widgets like
[`Scaffold`][] and [`AppBar`][], which lay out the structure of a screen,
as well as lower-level widgets like [`Column`][] or [`Row`][] that
lay out widgets vertically or horizontally.
[`Scaffold`]: https://api.flutter.dev/flutter/material/Scaffold-class.html
[`AppBar`]: https://api.flutter.dev/flutter/material/AppBar-class.html
[`Column`]: https://api.flutter.dev/flutter/widgets/Column-class.html
[`Row`]: https://api.flutter.dev/flutter/widgets/Row-class.html
### `Scaffold` and `AppBar`
Mobile applications often have a bar at the top called an "app bar" that can
display a title, navigation controls, and/or actions.
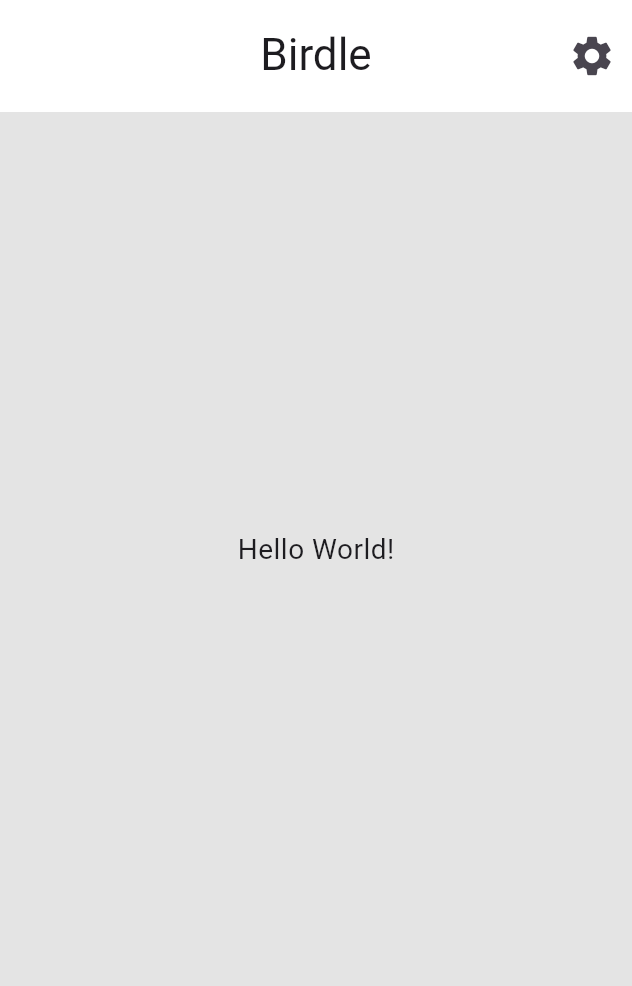 The simplest way to add an app bar to your app is by using two widgets:
`Scaffold` and `AppBar`.
`Scaffold` is a convenience widget that provides a Material-style page layout,
making it simple to add an app bar, drawer, navigation bar, and more to a page of
your app. `AppBar` is, of course, the app bar.
The code generated from the `flutter create --empty` command already
contains an `AppBar` widget and a `Scaffold` widget.
The following code updates it to use an additional layout widget: [`Align`][].
This positions the title to the left, which would be centered by default.
The `Text` widget contains the title itself.
Modify the `Scaffold` within your `MainApp` widget's `build` method.
Passing an enum or static property directly (like `Alignment.centerLeft`)
can also be shortened using [Dart's dot shorthands][] syntax,
which you can read more about on both the official Dart documentation
and the [Flutter shorthands overview][].
[Dart's dot shorthands]: https://dart.dev/language/dot-shorthands
[Flutter shorthands overview]: /ui/dot-shorthands
```dart
class MainApp extends StatelessWidget {
const MainApp({super.key});
@override
Widget build(BuildContext context) {
return MaterialApp(
home: Scaffold(
appBar: AppBar(
title: Align(
alignment: Alignment.centerLeft,
child: Text('Birdle'),
),
),
body: Center(child: Text('Hello World!')),
),
);
}
}
```
[`Align`]: https://api.flutter.dev/flutter/widgets/Align-class.html
#### An updated widget tree
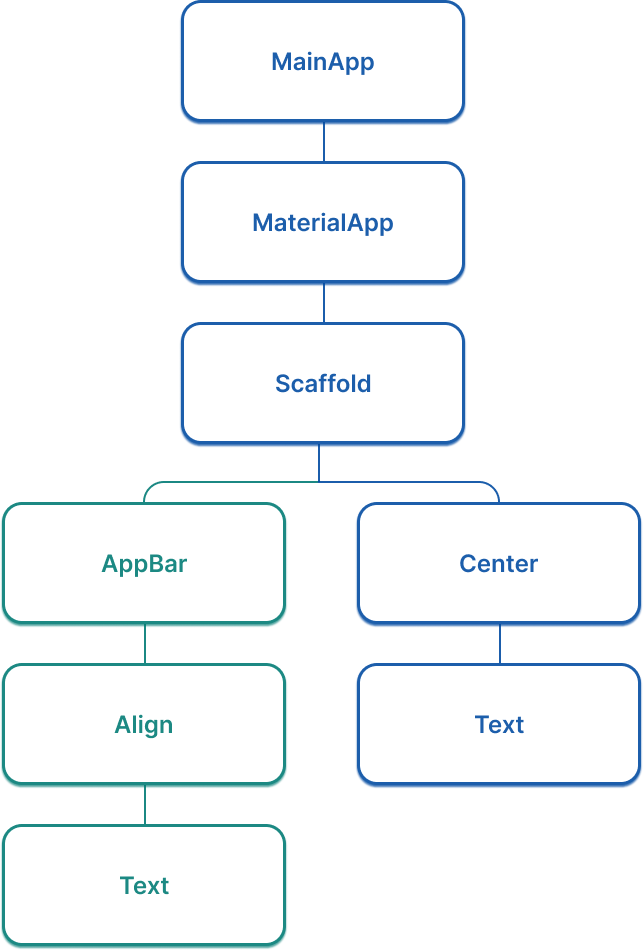
Considering your app's widget tree gets more important as your app grows.
At this point, there's a "branch" in the widget tree for the first time,
and it now looks like the following figure:
The simplest way to add an app bar to your app is by using two widgets:
`Scaffold` and `AppBar`.
`Scaffold` is a convenience widget that provides a Material-style page layout,
making it simple to add an app bar, drawer, navigation bar, and more to a page of
your app. `AppBar` is, of course, the app bar.
The code generated from the `flutter create --empty` command already
contains an `AppBar` widget and a `Scaffold` widget.
The following code updates it to use an additional layout widget: [`Align`][].
This positions the title to the left, which would be centered by default.
The `Text` widget contains the title itself.
Modify the `Scaffold` within your `MainApp` widget's `build` method.
Passing an enum or static property directly (like `Alignment.centerLeft`)
can also be shortened using [Dart's dot shorthands][] syntax,
which you can read more about on both the official Dart documentation
and the [Flutter shorthands overview][].
[Dart's dot shorthands]: https://dart.dev/language/dot-shorthands
[Flutter shorthands overview]: /ui/dot-shorthands
```dart
class MainApp extends StatelessWidget {
const MainApp({super.key});
@override
Widget build(BuildContext context) {
return MaterialApp(
home: Scaffold(
appBar: AppBar(
title: Align(
alignment: Alignment.centerLeft,
child: Text('Birdle'),
),
),
body: Center(child: Text('Hello World!')),
),
);
}
}
```
[`Align`]: https://api.flutter.dev/flutter/widgets/Align-class.html
#### An updated widget tree
Considering your app's widget tree gets more important as your app grows.
At this point, there's a "branch" in the widget tree for the first time,
and it now looks like the following figure:
 ### Create a widget for the game page layout
Add the following code for a new widget,
called `GamePage`, to your `main.dart` file.
This widget will eventually display the UI elements needed for the game itself.
```dart title="lib/main.dart"
class GamePage extends StatelessWidget {
GamePage({super.key});
// This object is part of the game.dart file.
// It manages wordle logic, and is outside the scope of this tutorial.
final Game _game = Game();
@override
Widget build(BuildContext context) {
// TODO: Replace with screen contents
return Container();
}
}
```
Then update your `MainApp` widget to create and
display a `GamePage` widget instead of "Hello World!".
```dart highlightLines=14
class MainApp extends StatelessWidget {
const MainApp({super.key});
@override
Widget build(BuildContext context) {
return MaterialApp(
home: Scaffold(
appBar: AppBar(
title: const Align(
alignment: Alignment.centerLeft,
child: Text('Birdle'),
),
),
body: Center(child: GamePage()),
),
);
}
}
```
### Arrange widgets with `Column` and `Row`
The `GamePage` layout contains the grid of tiles that display a user's guesses.
### Create a widget for the game page layout
Add the following code for a new widget,
called `GamePage`, to your `main.dart` file.
This widget will eventually display the UI elements needed for the game itself.
```dart title="lib/main.dart"
class GamePage extends StatelessWidget {
GamePage({super.key});
// This object is part of the game.dart file.
// It manages wordle logic, and is outside the scope of this tutorial.
final Game _game = Game();
@override
Widget build(BuildContext context) {
// TODO: Replace with screen contents
return Container();
}
}
```
Then update your `MainApp` widget to create and
display a `GamePage` widget instead of "Hello World!".
```dart highlightLines=14
class MainApp extends StatelessWidget {
const MainApp({super.key});
@override
Widget build(BuildContext context) {
return MaterialApp(
home: Scaffold(
appBar: AppBar(
title: const Align(
alignment: Alignment.centerLeft,
child: Text('Birdle'),
),
),
body: Center(child: GamePage()),
),
);
}
}
```
### Arrange widgets with `Column` and `Row`
The `GamePage` layout contains the grid of tiles that display a user's guesses.
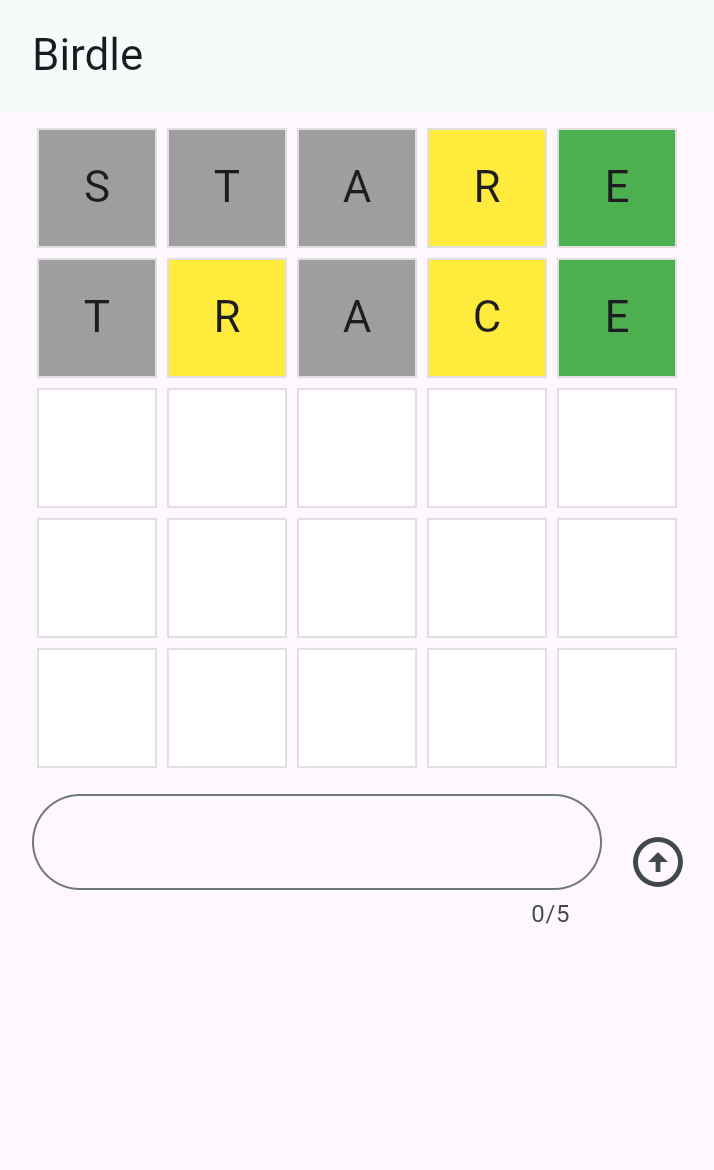 There are a number of ways you can build this layout.
The simplest is with the `Column` and `Row` widgets.
Each row contains five tiles that represent the five letters in a guess,
with five rows total.
So you'll need a single `Column` with five `Row` widgets as children,
where each row contains five children.
To get started, replace the `Container` in `GamePage.build` with a
`Padding` widget with a `Column` widget as its child:
```dart
class GamePage extends StatelessWidget {
GamePage({super.key});
// This manages game logic, and is out of scope for this lesson.
final Game _game = Game();
@override
Widget build(BuildContext context) {
return Padding(
padding: const EdgeInsets.all(8.0),
child: Column(
spacing: 5.0,
children: [
// Add children next.
],
),
);
}
}
```
The `spacing` property puts five pixels between each element on the main axis.
Within `Column.children`, for each element in the `_game.guesses` list,
add a `Row` widget as a child.
:::note
This `guesses` list is a **fixed-size** list, starting with five
elements, one for each *potential* guess.
The list will always contain exactly five elements,
and therefore will always render five rows.
:::
```dart
class GamePage extends StatelessWidget {
GamePage({super.key});
// This manages game logic, and is out of scope for this lesson.
final Game _game = Game();
@override
Widget build(BuildContext context) {
return Padding(
padding: const EdgeInsets.all(8.0),
child: Column(
spacing: 5.0,
children: [
for (final guess in _game.guesses)
Row(
spacing: 5.0,
children: [
// We'll add the tiles here later.
],
),
],
),
);
}
}
```
The `for` loop in the `children` list is called a [collection for element][],
a Dart syntax that allows you to iteratively add items to a collection
when it is built at runtime.
This syntactic sugar makes it easier for you to work
with collections of widgets,
providing a declarative alternative to the following:
```dart
[..._game.guesses.map((guess) => Row(/* ... */))],
```
In this case, it adds five `Row` widgets to the column,
one for each guess on the `Game` object.
[collection for element]: https://dart.dev/language/collections#for-element
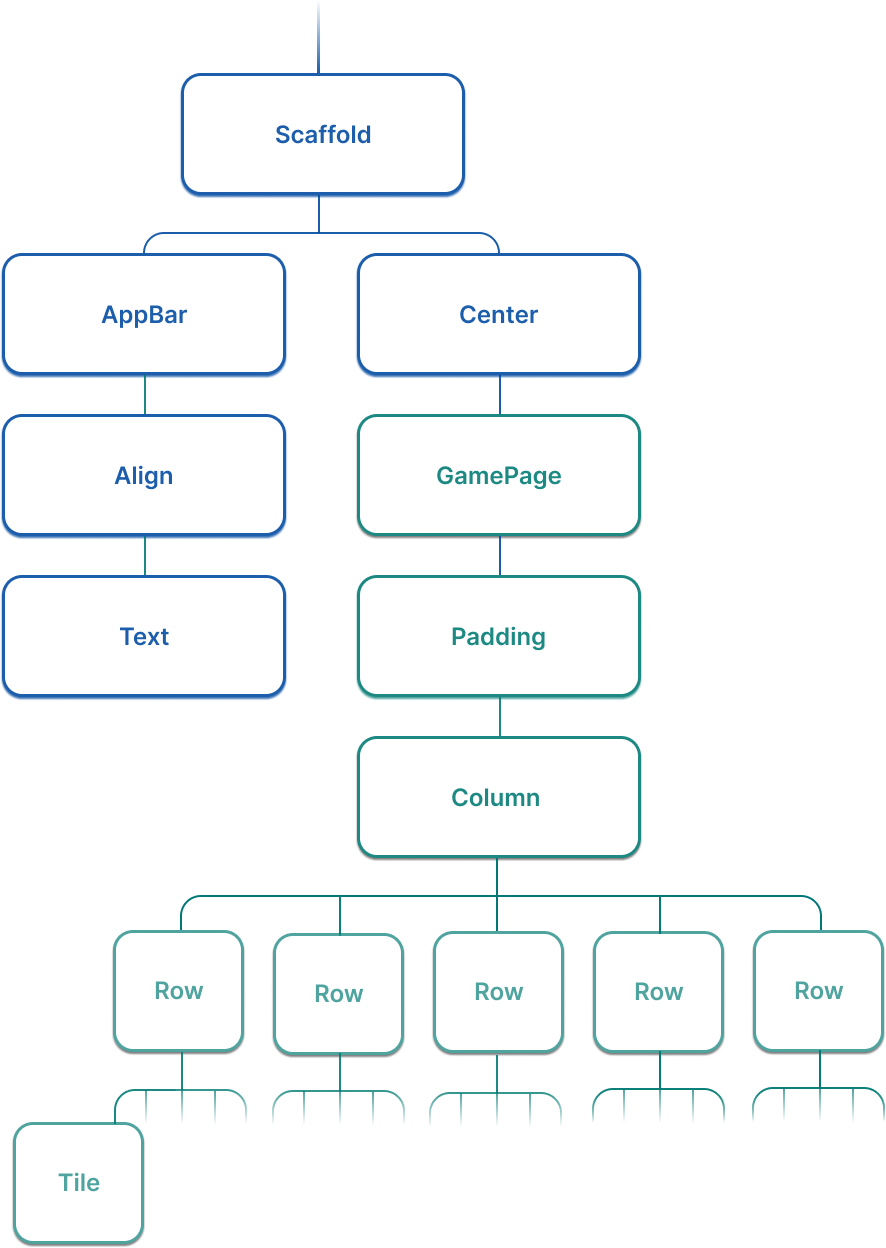
#### An updated widget tree
The widget tree for this app has expanded significantly in this lesson.
Now, it looks more like the following (abridged) figure:
There are a number of ways you can build this layout.
The simplest is with the `Column` and `Row` widgets.
Each row contains five tiles that represent the five letters in a guess,
with five rows total.
So you'll need a single `Column` with five `Row` widgets as children,
where each row contains five children.
To get started, replace the `Container` in `GamePage.build` with a
`Padding` widget with a `Column` widget as its child:
```dart
class GamePage extends StatelessWidget {
GamePage({super.key});
// This manages game logic, and is out of scope for this lesson.
final Game _game = Game();
@override
Widget build(BuildContext context) {
return Padding(
padding: const EdgeInsets.all(8.0),
child: Column(
spacing: 5.0,
children: [
// Add children next.
],
),
);
}
}
```
The `spacing` property puts five pixels between each element on the main axis.
Within `Column.children`, for each element in the `_game.guesses` list,
add a `Row` widget as a child.
:::note
This `guesses` list is a **fixed-size** list, starting with five
elements, one for each *potential* guess.
The list will always contain exactly five elements,
and therefore will always render five rows.
:::
```dart
class GamePage extends StatelessWidget {
GamePage({super.key});
// This manages game logic, and is out of scope for this lesson.
final Game _game = Game();
@override
Widget build(BuildContext context) {
return Padding(
padding: const EdgeInsets.all(8.0),
child: Column(
spacing: 5.0,
children: [
for (final guess in _game.guesses)
Row(
spacing: 5.0,
children: [
// We'll add the tiles here later.
],
),
],
),
);
}
}
```
The `for` loop in the `children` list is called a [collection for element][],
a Dart syntax that allows you to iteratively add items to a collection
when it is built at runtime.
This syntactic sugar makes it easier for you to work
with collections of widgets,
providing a declarative alternative to the following:
```dart
[..._game.guesses.map((guess) => Row(/* ... */))],
```
In this case, it adds five `Row` widgets to the column,
one for each guess on the `Game` object.
[collection for element]: https://dart.dev/language/collections#for-element
#### An updated widget tree
The widget tree for this app has expanded significantly in this lesson.
Now, it looks more like the following (abridged) figure:
 :::note Challenge
Add a `Tile` to each row for each letter allowed in the guess.
Each element in `guess` is a [record][] with the type
`({String char, HitType type})`.
Use a nested loop to iterate over the letters in each guess.
**Solution:**
```dart title="lib/main.dart" collapsed
class GamePage extends StatelessWidget {
GamePage({super.key});
// This manages game logic, and is out of scope for this lesson.
final Game _game = Game();
@override
Widget build(BuildContext context) {
return Padding(
padding: const EdgeInsets.all(8.0),
child: Column(
spacing: 5.0,
children: [
for (final guess in _game.guesses)
Row(
spacing: 5.0,
children: [
for (final letter in guess) Tile(letter.char, letter.type),
],
),
],
),
);
}
}
```
:::
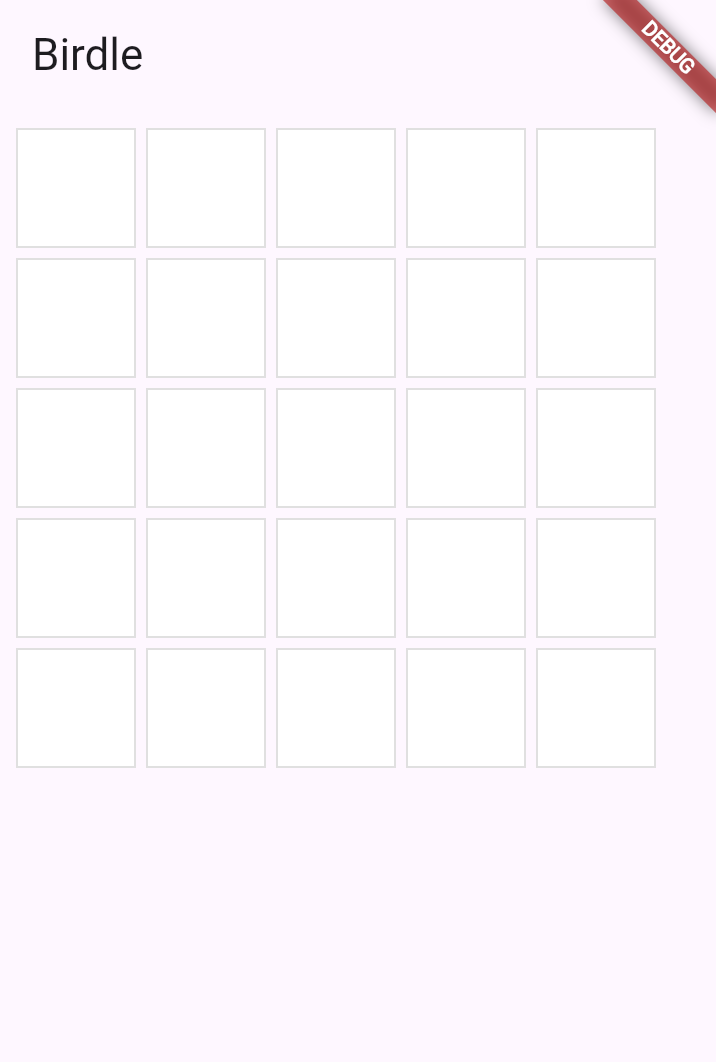
When you reload your app, you should see a 5x5 grid of white squares.
:::note Challenge
Add a `Tile` to each row for each letter allowed in the guess.
Each element in `guess` is a [record][] with the type
`({String char, HitType type})`.
Use a nested loop to iterate over the letters in each guess.
**Solution:**
```dart title="lib/main.dart" collapsed
class GamePage extends StatelessWidget {
GamePage({super.key});
// This manages game logic, and is out of scope for this lesson.
final Game _game = Game();
@override
Widget build(BuildContext context) {
return Padding(
padding: const EdgeInsets.all(8.0),
child: Column(
spacing: 5.0,
children: [
for (final guess in _game.guesses)
Row(
spacing: 5.0,
children: [
for (final letter in guess) Tile(letter.char, letter.type),
],
),
],
),
);
}
}
```
:::
When you reload your app, you should see a 5x5 grid of white squares.
 [record]: https://dart.dev/language/records
### Review
title: What you accomplished
subtitle: Here's a summary of what you built and learned in this lesson.
completed: true
items:
- title: Structured your app with Scaffold and AppBar
icon: web_asset
details: >-
You used `Scaffold` to provide a Material-style page layout and
`AppBar` to add a title bar at the top of your app.
These high-level widgets give your app a standard, yet polished structure.
- title: Arranged widgets using Column and Row
icon: view_column
details: >-
`Column` arranges widgets vertically and `Row` arranges them horizontally.
These are fundamental layout widgets you'll use constantly in Flutter.
The `spacing` property adds consistent gaps between children.
- title: Generated widgets dynamically from data
icon: repeat
details: >-
You used a collection for element to build widgets from a list.
This declarative approach lets you build user interfaces that
automatically and visually reflect your data,
a pattern central to Flutter development.
- title: Built the game board grid
icon: grid_view
details: >-
By nesting `Row` widgets inside a `Column` and using nested loops,
you created a 5x5 grid of `Tile` widgets.
Your app now displays the complete game board layout!
### Test yourself
- question: What is the primary difference between a Column and a Row widget?
options:
- text: Column is for scrolling content; Row is for static content.
correct: false
explanation: Both Column and Row are for layout, not scrolling. Use ListView or SingleChildScrollView for scrolling.
- text: Column arranges children vertically; Row arranges children horizontally.
correct: true
explanation: Column lays out its children along the vertical axis, while Row uses the horizontal axis.
- text: Column can have unlimited children; Row is limited to two.
correct: false
explanation: Both widgets can have any number of children.
- text: Column requires a Scaffold parent; Row does not.
correct: false
explanation: Neither widget requires a Scaffold as a parent.
- question: What does the Scaffold widget provide in a Flutter app?
options:
- text: Only a background color for the page.
correct: false
explanation: Scaffold provides much more, including structure for app bars, drawers, and more.
- text: A Material-style page layout with slots for app bar, body, drawer, and more.
correct: true
explanation: Scaffold is a convenience widget that provides a standard Material page structure.
- text: A way to navigate between different pages.
correct: false
explanation: Navigation is handled by Navigator, not Scaffold.
- text: Automatic state management for the page.
correct: false
explanation: Scaffold doesn't manage state; you use StatefulWidget or state management solutions for that.
[record]: https://dart.dev/language/records
### Review
title: What you accomplished
subtitle: Here's a summary of what you built and learned in this lesson.
completed: true
items:
- title: Structured your app with Scaffold and AppBar
icon: web_asset
details: >-
You used `Scaffold` to provide a Material-style page layout and
`AppBar` to add a title bar at the top of your app.
These high-level widgets give your app a standard, yet polished structure.
- title: Arranged widgets using Column and Row
icon: view_column
details: >-
`Column` arranges widgets vertically and `Row` arranges them horizontally.
These are fundamental layout widgets you'll use constantly in Flutter.
The `spacing` property adds consistent gaps between children.
- title: Generated widgets dynamically from data
icon: repeat
details: >-
You used a collection for element to build widgets from a list.
This declarative approach lets you build user interfaces that
automatically and visually reflect your data,
a pattern central to Flutter development.
- title: Built the game board grid
icon: grid_view
details: >-
By nesting `Row` widgets inside a `Column` and using nested loops,
you created a 5x5 grid of `Tile` widgets.
Your app now displays the complete game board layout!
### Test yourself
- question: What is the primary difference between a Column and a Row widget?
options:
- text: Column is for scrolling content; Row is for static content.
correct: false
explanation: Both Column and Row are for layout, not scrolling. Use ListView or SingleChildScrollView for scrolling.
- text: Column arranges children vertically; Row arranges children horizontally.
correct: true
explanation: Column lays out its children along the vertical axis, while Row uses the horizontal axis.
- text: Column can have unlimited children; Row is limited to two.
correct: false
explanation: Both widgets can have any number of children.
- text: Column requires a Scaffold parent; Row does not.
correct: false
explanation: Neither widget requires a Scaffold as a parent.
- question: What does the Scaffold widget provide in a Flutter app?
options:
- text: Only a background color for the page.
correct: false
explanation: Scaffold provides much more, including structure for app bars, drawers, and more.
- text: A Material-style page layout with slots for app bar, body, drawer, and more.
correct: true
explanation: Scaffold is a convenience widget that provides a standard Material page structure.
- text: A way to navigate between different pages.
correct: false
explanation: Navigation is handled by Navigator, not Scaffold.
- text: Automatic state management for the page.
correct: false
explanation: Scaffold doesn't manage state; you use StatefulWidget or state management solutions for that.