:::secondary What you'll learn
* The _hero_ refers to the widget that flies between screens.
* Create a hero animation using Flutter's Hero widget.
* Fly the hero from one screen to another.
* Animate the transformation of a hero's shape from circular to
rectangular while flying it from one screen to another.
* The Hero widget in Flutter implements a style of animation
commonly known as _shared element transitions_ or
_shared element animations._
:::
You've probably seen hero animations many times. For example, a screen displays
a list of thumbnails representing items for sale. Selecting an item flies it to
a new screen, containing more details and a "Buy" button. Flying an image from
one screen to another is called a _hero animation_ in Flutter, though the same
motion is sometimes referred to as a _shared element transition_.
You might want to watch this one-minute video introducing the Hero widget:
This guide demonstrates how to build standard hero animations, and hero
animations that transform the image from a circular shape to a square shape
during flight.
:::secondary Examples
This guide provides examples of each hero animation style at
the following links.
* [Standard hero animation code][]
* [Radial hero animation code][]
::
:::secondary New to Flutter?
This page assumes you know how to create a layout
using Flutter's widgets. For more information, see
[Building Layouts in Flutter][].
:::
:::tip Terminology
A [_Route_][] describes a page or screen in a Flutter app.
:::
You can create this animation in Flutter with Hero widgets.
As the hero animates from the source to the destination route,
the destination route (minus the hero) fades into view.
Typically, heroes are small parts of the UI, like images,
that both routes have in common. From the user's perspective
the hero "flies" between the routes. This guide shows how
to create the following hero animations:
**Standard hero animations**
A _standard hero animation_ flies the hero from one route to a new route,
usually landing at a different location and with a different size.
The following video (recorded at slow speed) shows a typical example.
Tapping the flippers in the center of the route flies them to the
upper left corner of a new, blue route, at a smaller size.
Tapping the flippers in the blue route (or using the device's
back-to-previous-route gesture) flies the flippers back to
the original route.
**Radial hero animations**
In _radial hero animation_, as the hero flies between routes
its shape appears to change from circular to rectangular.
The following video (recorded at slow speed),
shows an example of a radial hero animation. At the start, a
row of three circular images appears at the bottom of the route.
Tapping any of the circular images flies that image to a new route
that displays it with a square shape.
Tapping the square image flies the hero back to
the original route, displayed with a circular shape.
Before moving to the sections specific to
[standard](#standard-hero-animations)
or [radial](#radial-hero-animations) hero animations,
read [basic structure of a hero animation](#basic-structure)
to learn how to structure hero animation code,
and [behind the scenes](#behind-the-scenes) to understand
how Flutter performs a hero animation.
## Basic structure of a hero animation
:::secondary What's the point?
* Use two hero widgets in different routes but with matching tags to
implement the animation.
* The Navigator manages a stack containing the app's routes.
* Pushing a route on or popping a route from the Navigator's stack
triggers the animation.
* The Flutter framework calculates a rectangle tween,
[`RectTween`][] that defines the hero's boundary
as it flies from the source to the destination route.
During its flight, the hero is moved to
an application overlay, so that it appears on top of both routes.
:::
:::tip Terminology
If the concept of tweens or tweening is new to you,
check out the [Animations in Flutter tutorial][].
:::
Hero animations are implemented using two [`Hero`][]
widgets: one describing the widget in the source route,
and another describing the widget in the destination route.
From the user's point of view, the hero appears to be shared, and
only the programmer needs to understand this implementation detail.
Hero animation code has the following structure:
1. Define a starting Hero widget, referred to as the _source
hero_. The hero specifies its graphical representation
(typically an image), and an identifying tag, and is in
the currently displayed widget tree as defined by the source route.
1. Define an ending Hero widget, referred to as the _destination hero_.
This hero also specifies its graphical representation,
and the same tag as the source hero.
It's **essential that both hero widgets are created with
the same tag**, typically an object that represents the
underlying data. For best results, the heroes should have
virtually identical widget trees.
1. Create a route that contains the destination hero.
The destination route defines the widget tree that exists
at the end of the animation.
1. Trigger the animation by pushing the destination route on the
Navigator's stack. The Navigator push and pop operations trigger
a hero animation for each pair of heroes with matching tags in
the source and destination routes.
Flutter calculates the tween that animates the Hero's bounds from
the starting point to the endpoint (interpolating size and position),
and performs the animation in an overlay.
The next section describes Flutter's process in greater detail.
## Behind the scenes
The following describes how Flutter performs the
transition from one route to another.
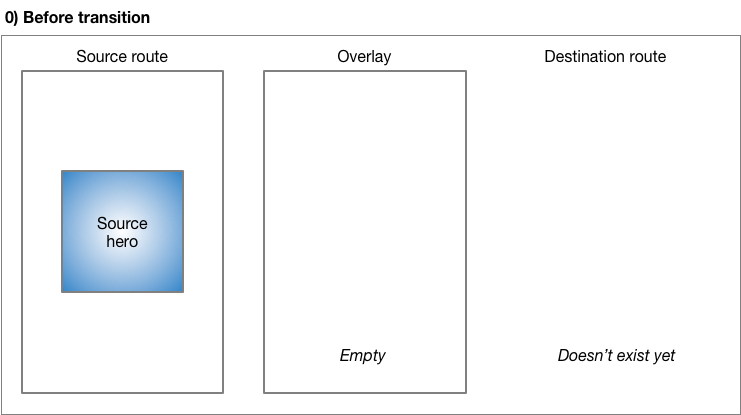
Before transition, the source hero waits in the source
route's widget tree. The destination route does not yet exist,
and the overlay is empty.
---
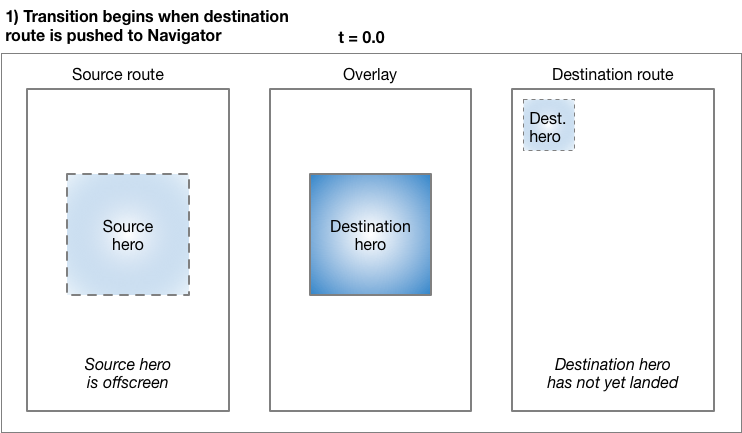
Pushing a route to the `Navigator` triggers the animation.
At `t=0.0`, Flutter does the following:
* Calculates the destination hero's path, offscreen,
using the curved motion as described in the Material
motion spec. Flutter now knows where the hero ends up.
* Places the destination hero in the overlay,
at the same location and size as the _source_ hero.
Adding a hero to the overlay changes its Z-order so that it
appears on top of all routes.
* Moves the source hero offscreen.
---
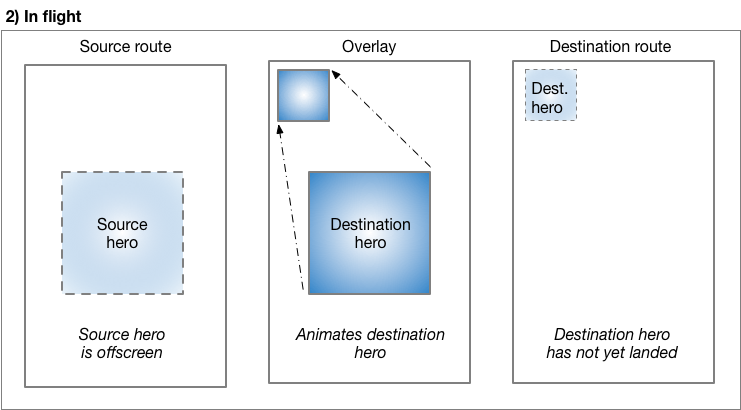
As the hero flies, its rectangular bounds are animated using
[Tween<Rect>][], specified in Hero's
[`createRectTween`][] property.
By default, Flutter uses an instance of
[`MaterialRectArcTween`][], which animates the
rectangle's opposing corners along a curved path.
(See [Radial hero animations][] for an example
that uses a different Tween animation.)
---

When the flight completes:
* Flutter moves the hero widget from the overlay to
the destination route. The overlay is now empty.
* The destination hero appears in its final position
in the destination route.
* The source hero is restored to its route.
---
Popping the route performs the same process,
animating the hero back to its size
and location in the source route.
### Essential classes
The examples in this guide use the following classes to
implement hero animations:
[`Hero`][]
: The widget that flies from the source to the destination route.
Define one Hero for the source route and another for the
destination route, and assign each the same tag.
Flutter animates pairs of heroes with matching tags.
[`InkWell`][]
: Specifies what happens when tapping the hero.
The `InkWell`'s `onTap()` method builds the
new route and pushes it to the `Navigator`'s stack.
[`Navigator`][]
: The `Navigator` manages a stack of routes. Pushing a route on or
popping a route from the `Navigator`'s stack triggers the animation.
[`Route`][]
: Specifies a screen or page. Most apps,
beyond the most basic, have multiple routes.
## Standard hero animations
:::secondary What's the point?
* Specify a route using `MaterialPageRoute`, `CupertinoPageRoute`,
or build a custom route using `PageRouteBuilder`.
The examples in this section use MaterialPageRoute.
* Change the size of the image at the end of the transition by
wrapping the destination's image in a `SizedBox`.
* Change the location of the image by placing the destination's
image in a layout widget. These examples use `Container`.
:::
:::secondary Standard hero animation code
Each of the following examples demonstrates flying an image from one
route to another. This guide describes the first example.
[hero_animation][]
: Encapsulates the hero code in a custom `PhotoHero` widget.
Animates the hero's motion along a curved path,
as described in the Material motion spec.
[basic_hero_animation][]
: Uses the hero widget directly.
This more basic example, provided for your reference, isn't
described in this guide.
:::
### What's going on?
Flying an image from one route to another is easy to implement
using Flutter's hero widget. When using `MaterialPageRoute`
to specify the new route, the image flies along a curved path,
as described by the [Material Design motion spec][].
[Create a new Flutter app][] and
update it using the files from the [hero_animation][].
To run the example:
* Tap on the home route's photo to fly the image to a new route
showing the same photo at a different location and scale.
* Return to the previous route by tapping the image, or by using the
device's back-to-the-previous-route gesture.
* You can slow the transition further using the `timeDilation`
property.
### PhotoHero class
The custom PhotoHero class maintains the hero,
and its size, image, and behavior when tapped.
The PhotoHero builds the following widget tree:
Here's the code:
```dart
class PhotoHero extends StatelessWidget {
const PhotoHero({
super.key,
required this.photo,
this.onTap,
required this.width,
});
final String photo;
final VoidCallback? onTap;
final double width;
@override
Widget build(BuildContext context) {
return SizedBox(
width: width,
child: Hero(
tag: photo,
child: Material(
color: Colors.transparent,
child: InkWell(
onTap: onTap,
child: Image.asset(
photo,
fit: BoxFit.contain,
),
),
),
),
);
}
}
```
Key information:
* The starting route is implicitly pushed by `MaterialApp` when
`HeroAnimation` is provided as the app's home property.
* An `InkWell` wraps the image, making it trivial to add a tap
gesture to the both the source and destination heroes.
* Defining the Material widget with a transparent color
enables the image to "pop out" of the background as it
flies to its destination.
* The `SizedBox` specifies the hero's size at the start and
end of the animation.
* Setting the Image's `fit` property to `BoxFit.contain`,
ensures that the image is as large as possible during the
transition without changing its aspect ratio.
### HeroAnimation class
The `HeroAnimation` class creates the source and destination
PhotoHeroes, and sets up the transition.
Here's the code:
```dart
class HeroAnimation extends StatelessWidget {
const HeroAnimation({super.key});
Widget build(BuildContext context) {
[!timeDilation = 5.0; // 1.0 means normal animation speed.!]
return Scaffold(
appBar: AppBar(
title: const Text('Basic Hero Animation'),
),
body: Center(
[!child: PhotoHero(!]
photo: 'images/flippers-alpha.png',
width: 300.0,
[!onTap: ()!] {
[!Navigator.of(context).push(MaterialPageRoute(!]
[!builder: (context)!] {
return Scaffold(
appBar: AppBar(
title: const Text('Flippers Page'),
),
body: Container(
// Set background to blue to emphasize that it's a new route.
color: Colors.lightBlueAccent,
padding: const EdgeInsets.all(16),
alignment: Alignment.topLeft,
[!child: PhotoHero(!]
photo: 'images/flippers-alpha.png',
width: 100.0,
[!onTap: ()!] {
[!Navigator.of(context).pop();!]
},
),
),
);
}
));
},
),
),
);
}
}
```
Key information:
* When the user taps the `InkWell` containing the source hero,
the code creates the destination route using `MaterialPageRoute`.
Pushing the destination route to the `Navigator`'s stack triggers
the animation.
* The `Container` positions the `PhotoHero` in the destination
route's top-left corner, below the `AppBar`.
* The `onTap()` method for the destination `PhotoHero`
pops the `Navigator`'s stack, triggering the animation
that flies the `Hero` back to the original route.
* Use the `timeDilation` property to slow the transition
while debugging.
---
## Radial hero animations
:::secondary What's the point?
* A _radial transformation_ animates a circular shape into a square
shape.
* A radial _hero_ animation performs a radial transformation while
flying the hero from the source route to the destination route.
* MaterialRectCenterArcTween defines the tween animation.
* Build the destination route using `PageRouteBuilder`.
:::
Flying a hero from one route to another as it transforms
from a circular shape to a rectangular shape is a slick
effect that you can implement using Hero widgets.
To accomplish this, the code animates the intersection of
two clip shapes: a circle and a square.
Throughout the animation, the circle clip (and the image)
scales from `minRadius` to `maxRadius`, while the square
clip maintains constant size. At the same time,
the image flies from its position in the source route to its
position in the destination route. For visual examples
of this transition, see [Radial transformation][]
in the Material motion spec.
This animation might seem complex (and it is), but you can **customize the
provided example to your needs.** The heavy lifting is done for you.
:::secondary Radial hero animation code
Each of the following examples demonstrates a radial hero animation.
This guide describes the first example.
[radial_hero_animation][]
: A radial hero animation as described in the Material motion spec.
[basic_radial_hero_animation][]
: The simplest example of a radial hero animation. The destination
route has no Scaffold, Card, Column, or Text.
This basic example, provided for your reference, isn't
described in this guide.
[radial_hero_animation_animate_rectclip][]
: Extends radial_hero_animation by also animating the size of the
rectangular clip. This more advanced example,
provided for your reference, isn't described in this guide.
:::
:::tip Pro tip
The radial hero animation involves intersecting a round shape with
a square shape. This can be hard to see, even when slowing
the animation with `timeDilation`, so you might consider enabling
the [`debugPaintSizeEnabled`][] flag during development.
:::
### What's going on?
The following diagram shows the clipped image at the beginning
(`t = 0.0`), and the end (`t = 1.0`) of the animation.

The blue gradient (representing the image), indicates where the clip
shapes intersect. At the beginning of the transition,
the result of the intersection is a circular clip ([`ClipOval`][]).
During the transformation, the `ClipOval` scales from `minRadius`
to `maxRadius` while the [ClipRect][] maintains a constant size.
At the end of the transition the intersection of the circular and
rectangular clips yield a rectangle that's the same size as the hero
widget. In other words, at the end of the transition the image is no
longer clipped.
[Create a new Flutter app][] and
update it using the files from the
[radial_hero_animation][] GitHub directory.
To run the example:
* Tap on one of the three circular thumbnails to animate the image
to a larger square positioned in the middle of a new route that
obscures the original route.
* Return to the previous route by tapping the image, or by using the
device's back-to-the-previous-route gesture.
* You can slow the transition further using the `timeDilation`
property.
### Photo class
The `Photo` class builds the widget tree that holds the image:
```dart
class Photo extends StatelessWidget {
const Photo({super.key, required this.photo, this.color, this.onTap});
final String photo;
final Color? color;
final VoidCallback onTap;
Widget build(BuildContext context) {
return [!Material(!]
// Slightly opaque color appears where the image has transparency.
[!color: Theme.of(context).primaryColor.withValues(alpha: 0.25),!]
child: [!InkWell(!]
onTap: [!onTap,!]
child: [!Image.asset(!]
photo,
fit: BoxFit.contain,
),
),
);
}
}
```
Key information:
* The `InkWell` captures the tap gesture.
The calling function passes the `onTap()` function to the
`Photo`'s constructor.
* During flight, the `InkWell` draws its splash on its first
Material ancestor.
* The Material widget has a slightly opaque color, so the
transparent portions of the image are rendered with color.
This ensures that the circle-to-square transition is easy to see,
even for images with transparency.
* The `Photo` class does not include the `Hero` in its widget tree.
For the animation to work, the hero
wraps the `RadialExpansion` widget.
### RadialExpansion class
The `RadialExpansion` widget, the core of the demo, builds the
widget tree that clips the image during the transition.
The clipped shape results from the intersection of a circular clip
(that grows during flight),
with a rectangular clip (that remains a constant size throughout).
To do this, it builds the following widget tree:
Here's the code:
```dart
class RadialExpansion extends StatelessWidget {
const RadialExpansion({
super.key,
required this.maxRadius,
this.child,
}) : [!clipRectSize = 2.0 * (maxRadius / math.sqrt2);!]
final double maxRadius;
final clipRectSize;
final Widget child;
@override
Widget build(BuildContext context) {
return [!ClipOval(!]
child: [!Center(!]
child: [!SizedBox(!]
width: clipRectSize,
height: clipRectSize,
child: [!ClipRect(!]
child: [!child,!] // Photo
),
),
),
);
}
}
```
Key information:
* The hero wraps the `RadialExpansion` widget.
* As the hero flies, its size changes and,
because it constrains its child's size,
the `RadialExpansion` widget changes size to match.
* The `RadialExpansion` animation is created by two overlapping clips.
* The example defines the tweening interpolation using
[`MaterialRectCenterArcTween`][].
The default flight path for a hero animation
interpolates the tweens using the corners of the heroes.
This approach affects the hero's aspect ratio during
the radial transformation, so the new flight path uses
`MaterialRectCenterArcTween` to interpolate the tweens using the
center point of each hero.
Here's the code:
```dart
static RectTween _createRectTween(Rect? begin, Rect? end) {
return MaterialRectCenterArcTween(begin: begin, end: end);
}
```
The hero's flight path still follows an arc,
but the image's aspect ratio remains constant.
[Animations in Flutter tutorial]: /ui/animations/tutorial
[basic_hero_animation]: https://github.com/flutter/website/tree/main/examples/_animation/basic_hero_animation/
[basic_radial_hero_animation]: https://github.com/flutter/website/tree/main/examples/_animation/basic_radial_hero_animation
[Building Layouts in Flutter]: /ui/layout
[`ClipOval`]: https://api.flutter.dev/flutter/widgets/ClipOval-class.html
[ClipRect]: https://api.flutter.dev/flutter/widgets/ClipRect-class.html
[Create a new Flutter app]: /reference/create-new-app
[`createRectTween`]: https://api.flutter.dev/flutter/widgets/CreateRectTween.html
[`debugPaintSizeEnabled`]: /tools/devtools/inspector#debugging-layout-issues-visually
[`Hero`]: https://api.flutter.dev/flutter/widgets/Hero-class.html
[hero_animation]: https://github.com/flutter/website/tree/main/examples/_animation/hero_animation/
[`InkWell`]: https://api.flutter.dev/flutter/material/InkWell-class.html
[Material Design motion spec]: https://m2.material.io/design/motion/understanding-motion.html#principles
[`MaterialRectArcTween`]: https://api.flutter.dev/flutter/material/MaterialRectArcTween-class.html
[`MaterialRectCenterArcTween`]: https://api.flutter.dev/flutter/material/MaterialRectCenterArcTween-class.html
[`Navigator`]: https://api.flutter.dev/flutter/widgets/Navigator-class.html
[Radial hero animation code]: #radial-hero-animation-code
[radial_hero_animation]: https://github.com/flutter/website/tree/main/examples/_animation/radial_hero_animation
[radial_hero_animation_animate_rectclip]: https://github.com/flutter/website/tree/main/examples/_animation/radial_hero_animation_animate_rectclip
[Radial hero animations]: #radial-hero-animations
[Radial transformation]: https://web.archive.org/web/20180223140424/https://material.io/guidelines/motion/transforming-material.html
[`RectTween`]: https://api.flutter.dev/flutter/animation/RectTween-class.html
[_Route_]: /cookbook/navigation/navigation-basics
[`Route`]: https://api.flutter.dev/flutter/widgets/Route-class.html
[Standard hero animation code]: #standard-hero-animation-code
[Tween<Rect>]: https://api.flutter.dev/flutter/animation/Tween-class.html