- Preliminaries
- Register your app on App Store Connect
- Review Xcode project settings
- Configuring the app's name, bundle identifier and copyright
- Updating the app's version number
- Add an app icon
- Create a build archive with Xcode
- Create a build archive with Codemagic CLI tools
- Release your app on TestFlight
- Distribute to registered devices
- Release your app to the App Store
- Troubleshooting
- Additional resources
Build and release a macOS app
- Preliminaries
- Register your app on App Store Connect
- Review Xcode project settings
- Configuring the app's name, bundle identifier and copyright
- Updating the app's version number
- Add an app icon
- Create a build archive with Xcode
- Create a build archive with Codemagic CLI tools
- Release your app on TestFlight
- Distribute to registered devices
- Release your app to the App Store
- Troubleshooting
- Additional resources
This guide provides a step-by-step walkthrough of releasing a Flutter app to the App Store.
Preliminaries
#Before beginning the process of releasing your app, ensure that it meets Apple's App Review Guidelines.
In order to publish your app to the App Store, you must first enroll in the Apple Developer Program. You can read more about the various membership options in Apple's Choosing a Membership guide.
Register your app on App Store Connect
#Manage your app's life cycle on App Store Connect (formerly iTunes Connect). You define your app name and description, add screenshots, set pricing, and manage releases to the App Store and TestFlight.
Registering your app involves two steps: registering a unique Bundle ID, and creating an application record on App Store Connect.
For a detailed overview of App Store Connect, see the App Store Connect guide.
Register a Bundle ID
#Every macOS application is associated with a Bundle ID, a unique identifier registered with Apple. To register a Bundle ID for your app, follow these steps:
- Open the App IDs page of your developer account.
- Click + to create a new Bundle ID.
- Enter an app name, select Explicit App ID, and enter an ID.
- Select the services your app uses, then click Continue.
- On the next page, confirm the details and click Register to register your Bundle ID.
Create an application record on App Store Connect
#Register your app on App Store Connect:
- Open App Store Connect in your browser.
- On the App Store Connect landing page, click My Apps.
- Click + in the top-left corner of the My Apps page, then select New App.
- Fill in your app details in the form that appears. In the Platforms section, ensure that macOS is checked. Since Flutter does not currently support tvOS, leave that checkbox unchecked. Click Create.
- Navigate to the application details for your app and select App Information from the sidebar.
- In the General Information section, select the Bundle ID you registered in the preceding step.
For a detailed overview, see Add an app to your account.
Review Xcode project settings
#This step covers reviewing the most important settings in the Xcode workspace. For detailed procedures and descriptions, see Prepare for app distribution.
Navigate to your target's settings in Xcode:
- In Xcode, open
Runner.xcworkspacein your app'smacosfolder. - To view your app's settings, select the Runner project in the Xcode project navigator. Then, in the main view sidebar, select the Runner target.
- Select the General tab.
Verify the most important settings.
In the Identity section:
App Category- The app category under which your app will be listed on the Mac App Store. This cannot be none.
Bundle Identifier- The App ID you registered on App Store Connect.
In the Deployment info section:
Deployment Target- The minimum macOS version that your app supports. Flutter supports macOS 10.14 and later.
In the Signing & Capabilities section:
Automatically manage signing- Whether Xcode should automatically manage app signing and provisioning. This is set
trueby default, which should be sufficient for most apps. For more complex scenarios, see the Code Signing Guide. Team- Select the team associated with your registered Apple Developer account. If required, select Add Account..., then update this setting.
The General tab of your project settings should resemble the following:
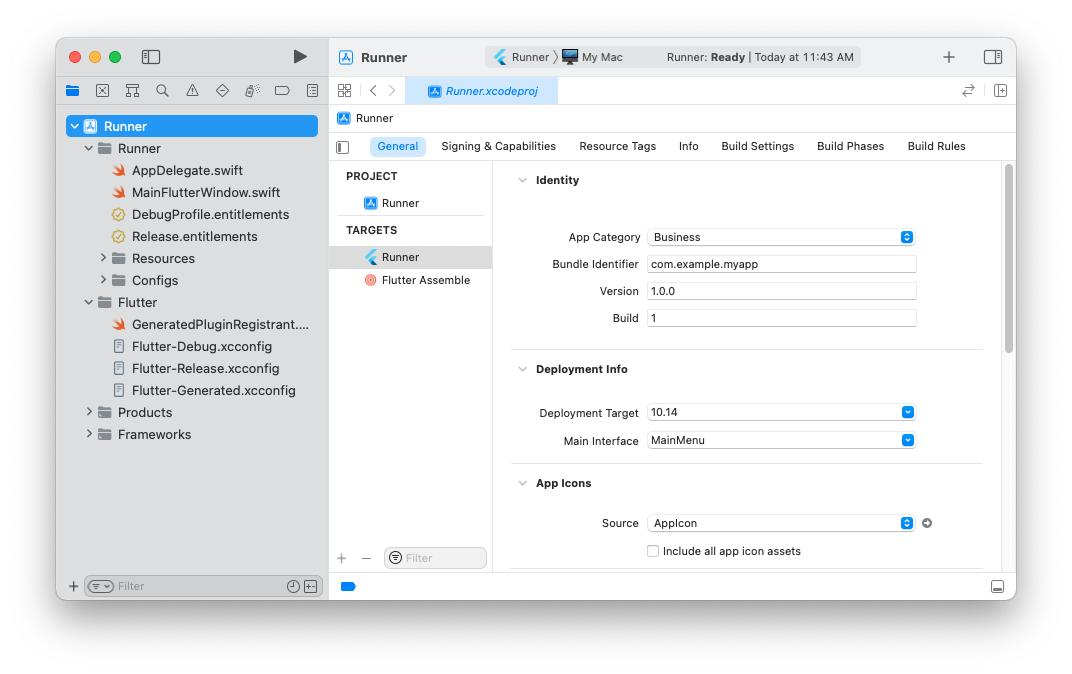
For a detailed overview of app signing, see Create, export, and delete signing certificates.
Configuring the app's name, bundle identifier and copyright
#The configuration for the product identifiers are centralized in macos/Runner/Configs/AppInfo.xcconfig. For the app's name, set PRODUCT_NAME, for the copyright set PRODUCT_COPYRIGHT, and finally set PRODUCT_BUNDLE_IDENTIFIER for the app's bundle identifier.
Updating the app's version number
#The default version number of the app is 1.0.0. To update it, navigate to the pubspec.yaml file and update the following line:
version: 1.0.0+1
The version number is three numbers separated by dots, such as 1.0.0 in the example above, followed by an optional build number such as 1 in the example above, separated by a +.
Both the version and the build number can be overridden in Flutter's build by specifying --build-name and --build-number, respectively.
In macOS, build-name uses CFBundleShortVersionString while build-number uses CFBundleVersion. Read more about iOS versioning at Core Foundation Keys on the Apple Developer's site.
Add an app icon
#When a new Flutter app is created, a placeholder icon set is created. This step covers replacing these placeholder icons with your app's icons:
- Review the macOS App Icon guidelines.
- In the Xcode project navigator, select
Assets.xcassetsin theRunnerfolder. Update the placeholder icons with your own app icons. - Verify the icon has been replaced by running your app using
flutter run -d macos.
Create a build archive with Xcode
#This step covers creating a build archive and uploading your build to App Store Connect using Xcode.
During development, you've been building, debugging, and testing with debug builds. When you're ready to ship your app to users on the App Store or TestFlight, you need to prepare a release build. At this point, you might consider obfuscating your Dart code to make it more difficult to reverse engineer. Obfuscating your code involves adding a couple flags to your build command.
In Xcode, configure the app version and build:
- Open
Runner.xcworkspacein your app'smacosfolder. To do this from the command line, run the following command from the base directory of your application project.open macos/Runner.xcworkspace - Select Runner in the Xcode project navigator, then select the Runner target in the settings view sidebar.
- In the Identity section, update the Version to the user-facing version number you wish to publish.
- In the Identity section, update the Build identifier to a unique build number used to track this build on App Store Connect. Each upload requires a unique build number.
Finally, create a build archive and upload it to App Store Connect:
- Create a release Archive of your application. From the base directory of your application project, run the following.
flutter build macos - Open Xcode and select Product > Archive to open the archive created in the previous step.
- Click the Validate App button. If any issues are reported, address them and produce another build. You can reuse the same build ID until you upload an archive.
- After the archive has been successfully validated, click Distribute App. You can follow the status of your build in the Activities tab of your app's details page on App Store Connect.
You should receive an email within 30 minutes notifying you that your build has been validated and is available to release to testers on TestFlight. At this point you can choose whether to release on TestFlight, or go ahead and release your app to the App Store.
For more details, see Upload an app to App Store Connect.
Create a build archive with Codemagic CLI tools
#This step covers creating a build archive and uploading your build to App Store Connect using Flutter build commands and Codemagic CLI Tools executed in a terminal in the Flutter project directory.
Install the Codemagic CLI tools:
bashpip3 install codemagic-cli-toolsYou'll need to generate an App Store Connect API Key with App Manager access to automate operations with App Store Connect. To make subsequent commands more concise, set the following environment variables from the new key: issuer id, key id, and API key file.
bashexport APP_STORE_CONNECT_ISSUER_ID=aaaaaaaa-bbbb-cccc-dddd-eeeeeeeeeeee export APP_STORE_CONNECT_KEY_IDENTIFIER=ABC1234567 export APP_STORE_CONNECT_PRIVATE_KEY=`cat /path/to/api/key/AuthKey_XXXYYYZZZ.p8`You need to export or create a Mac App Distribution and a Mac Installer Distribution certificate to perform code signing and package a build archive.
If you have existing certificates, you can export the private keys by executing the following command for each certificate:
bashopenssl pkcs12 -in <certificate_name>.p12 -nodes -nocerts | openssl rsa -out cert_keyOr you can create a new private key by executing the following command:
bashssh-keygen -t rsa -b 2048 -m PEM -f cert_key -q -N ""Later, you can have CLI tools automatically create a new Mac App Distribution and Mac Installer Distribution certificate. You can use the same private key for each new certificate.
Fetch the code signing files from App Store Connect:
bashapp-store-connect fetch-signing-files YOUR.APP.BUNDLE_ID \ --platform MAC_OS \ --type MAC_APP_STORE \ --certificate-key=@file:/path/to/cert_key \ --createWhere
cert_keyis either your exported Mac App Distribution certificate private key or a new private key which automatically generates a new certificate.If you do not have a Mac Installer Distribution certificate, you can create a new certificate by executing the following:
bashapp-store-connect create-certificate \ --type MAC_INSTALLER_DISTRIBUTION \ --certificate-key=@file:/path/to/cert_key \ --saveUse
cert_keyof the private key you created earlier.Fetch the Mac Installer Distribution certificates:
bashapp-store-connect list-certificates \ --type MAC_INSTALLER_DISTRIBUTION \ --certificate-key=@file:/path/to/cert_key \ --saveSet up a new temporary keychain to be used for code signing:
bashkeychain initializeNow add the fetched certificates to your keychain:
bashkeychain add-certificatesUpdate the Xcode project settings to use fetched code signing profiles:
bashxcode-project use-profilesInstall Flutter dependencies:
bashflutter packages pub getInstall CocoaPods dependencies:
bashfind . -name "Podfile" -execdir pod install \;Build the Flutter macOS project:
bashflutter build macos --releasePackage the app:
bashAPP_NAME=$(find $(pwd) -name "*.app") PACKAGE_NAME=$(basename "$APP_NAME" .app).pkg xcrun productbuild --component "$APP_NAME" /Applications/ unsigned.pkg INSTALLER_CERT_NAME=$(keychain list-certificates \ | jq '[.[] | select(.common_name | contains("Mac Developer Installer")) | .common_name][0]' \ | xargs) xcrun productsign --sign "$INSTALLER_CERT_NAME" unsigned.pkg "$PACKAGE_NAME" rm -f unsigned.pkgPublish the packaged app to App Store Connect:
bashapp-store-connect publish \ --path "$PACKAGE_NAME"As mentioned earlier, don't forget to set your login keychain as the default to avoid authentication issues with apps on your machine:
bashkeychain use-login
Release your app on TestFlight
#TestFlight allows developers to push their apps to internal and external testers. This optional step covers releasing your build on TestFlight.
- Navigate to the TestFlight tab of your app's application details page on App Store Connect.
- Select Internal Testing in the sidebar.
- Select the build to publish to testers, then click Save.
- Add the email addresses of any internal testers. You can add additional internal users in the Users and Roles page of App Store Connect, available from the dropdown menu at the top of the page.
Distribute to registered devices
#See distribution guide to prepare an archive for distribution to designated Mac computers.
Release your app to the App Store
#When you're ready to release your app to the world, follow these steps to submit your app for review and release to the App Store:
- Select Pricing and Availability from the sidebar of your app's application details page on App Store Connect and complete the required information.
- Select the status from the sidebar. If this is the first release of this app, its status is 1.0 Prepare for Submission. Complete all required fields.
- Click Submit for Review.
Apple notifies you when their app review process is complete. Your app is released according to the instructions you specified in the Version Release section.
For more details, see Distribute an app through the App Store.
Troubleshooting
#The Distribute your app guide provides a detailed overview of the process of releasing an app to the App Store.
Additional resources
#To learn how to package and distribute your Flutter desktop app for macOS the open source way, without using a paid Apple developer account, check out the step-by-step macOS packaging guide.