Integration testing
This page describes how to use the integration_test package to run integration tests. Tests written using this package have the following properties:
- Compatibility with the
flutter drivecommand, for running tests on a physical device or emulator. - The ability to be run on Firebase Test Lab, enabling automated testing on a variety of devices.
- Compatibility with flutter_test APIs, enabling tests to be written in a similar style as widget tests
Overview
#Unit tests, widget tests, and integration tests
There are three types of tests that Flutter supports. A unit test verifies the behavior of a method or class. A widget test verifies the behavior of Flutter widgets without running the app itself. An integration test (also called end-to-end testing or GUI testing) runs the full app.
Hosts and targets
During development, you are probably writing the code on a desktop computer, called the host machine, and running the app on a mobile device, browser, or desktop application, called the target device. (If you are using a web browser or desktop application, the host machine is also the target device.)
integration_test
Tests written with the integration_test package can:
- Run directly on the target device, allowing you to test on multiple Android or iOS devices using Firebase Test Lab.
- Run using
flutter test integration_test. - Use
flutter_testAPIs, making integration tests more like writing widget tests.
Migrating from flutter_driver
Existing projects using flutter_driver can be migrated to integration_test by following the Migrating from flutter_drive guide.
Project setup
#Add integration_test and flutter_test to your pubspec.yaml file:
$ flutter pub add 'dev:flutter_test:{"sdk":"flutter"}'  'dev:integration_test:{"sdk":"flutter"}'
"flutter_test" is already in "dev_dependencies". Will try to update the constraint.
Resolving dependencies...
  collection 1.17.2 (1.18.0 available)
+ file 6.1.4 (7.0.0 available)
+ flutter_driver 0.0.0 from sdk flutter
+ fuchsia_remote_debug_protocol 0.0.0 from sdk flutter
+ integration_test 0.0.0 from sdk flutter
  material_color_utilities 0.5.0 (0.8.0 available)
  meta 1.9.1 (1.10.0 available)
+ platform 3.1.0 (3.1.2 available)
+ process 4.2.4 (5.0.0 available)
  stack_trace 1.11.0 (1.11.1 available)
  stream_channel 2.1.1 (2.1.2 available)
+ sync_http 0.3.1
  test_api 0.6.0 (0.6.1 available)
+ vm_service 11.7.1 (11.10.0 available)
+ webdriver 3.0.2
Changed 9 dependencies!
In your project, create a new directory integration_test with a new file, <name>_test.dart:
import 'package:flutter/material.dart';
import 'package:flutter_test/flutter_test.dart';
import 'package:how_to/main.dart';
import 'package:integration_test/integration_test.dart';

void main() {
  testWidgets('tap on the floating action button, verify counter',
      (tester) async {
    // Load app widget.
    await tester.pumpWidget(const MyApp());

    // Verify the counter starts at 0.
    expect(find.text('0'), findsOneWidget);

    // Finds the floating action button to tap on.
    final fab = find.byKey(const Key('increment'));

    // Emulate a tap on the floating action button.
    await tester.tap(fab);

    // Trigger a frame.
    await tester.pumpAndSettle();

    // Verify the counter increments by 1.
    expect(find.text('0'), findsNothing);
    expect(find.text('1'), findsOneWidget);
  });
}If you are looking for more examples, take a look at the testing_app of the samples repository.
Directory structure
#lib/
...
integration_test/
foo_test.dart
bar_test.dart
test/
# Other unit tests go here.See also:
Running using the flutter command
#These tests can be launched with the flutter test command, where <DEVICE_ID>: is the optional device ID or pattern displayed in the output of the flutter devices command:
$ flutter test integration_test/foo_test.dart -d <DEVICE_ID>This runs the tests in foo_test.dart. To run all tests in this directory on the default device, run:
$ flutter test integration_testRunning in a browser
#Download and install ChromeDriver and run it on port 4444:
$ chromedriver --port=4444To run tests with flutter drive, create a new directory containing a new file, test_driver/integration_test.dart:
import 'package:integration_test/integration_test_driver.dart';

Future<void> main() => integrationDriver();
Then add IntegrationTestWidgetsFlutterBinding.ensureInitialized() in your integration_test/<name>_test.dart file:
import 'package:flutter/material.dart';
import 'package:flutter_test/flutter_test.dart';
import 'package:how_to/main.dart';
import 'package:integration_test/integration_test.dart';

void main() {
  IntegrationTestWidgetsFlutterBinding.ensureInitialized(); // NEW

  testWidgets('tap on the floating action button, verify counter',
      (tester) async {
    // Load app widget.
    await tester.pumpWidget(const MyApp());

    // Verify the counter starts at 0.
    expect(find.text('0'), findsOneWidget);

    // Finds the floating action button to tap on.
    final fab = find.byKey(const Key('increment'));

    // Emulate a tap on the floating action button.
    await tester.tap(fab);

    // Trigger a frame.
    await tester.pumpAndSettle();

    // Verify the counter increments by 1.
    expect(find.text('0'), findsNothing);
    expect(find.text('1'), findsOneWidget);
  });
}
In a separate process, run flutter_drive:
$ flutter drive \
   --driver=test_driver/integration_test.dart \
   --target=integration_test/counter_test.dart \
   -d web-server
To learn more, see the Running Flutter driver tests with web wiki page.
Testing on Firebase Test Lab
#You can use the Firebase Test Lab with both Android and iOS targets.
Android setup
#Follow the instructions in the Android Device Testing section of the README.
iOS setup
#Follow the instructions in the iOS Device Testing section of the README.
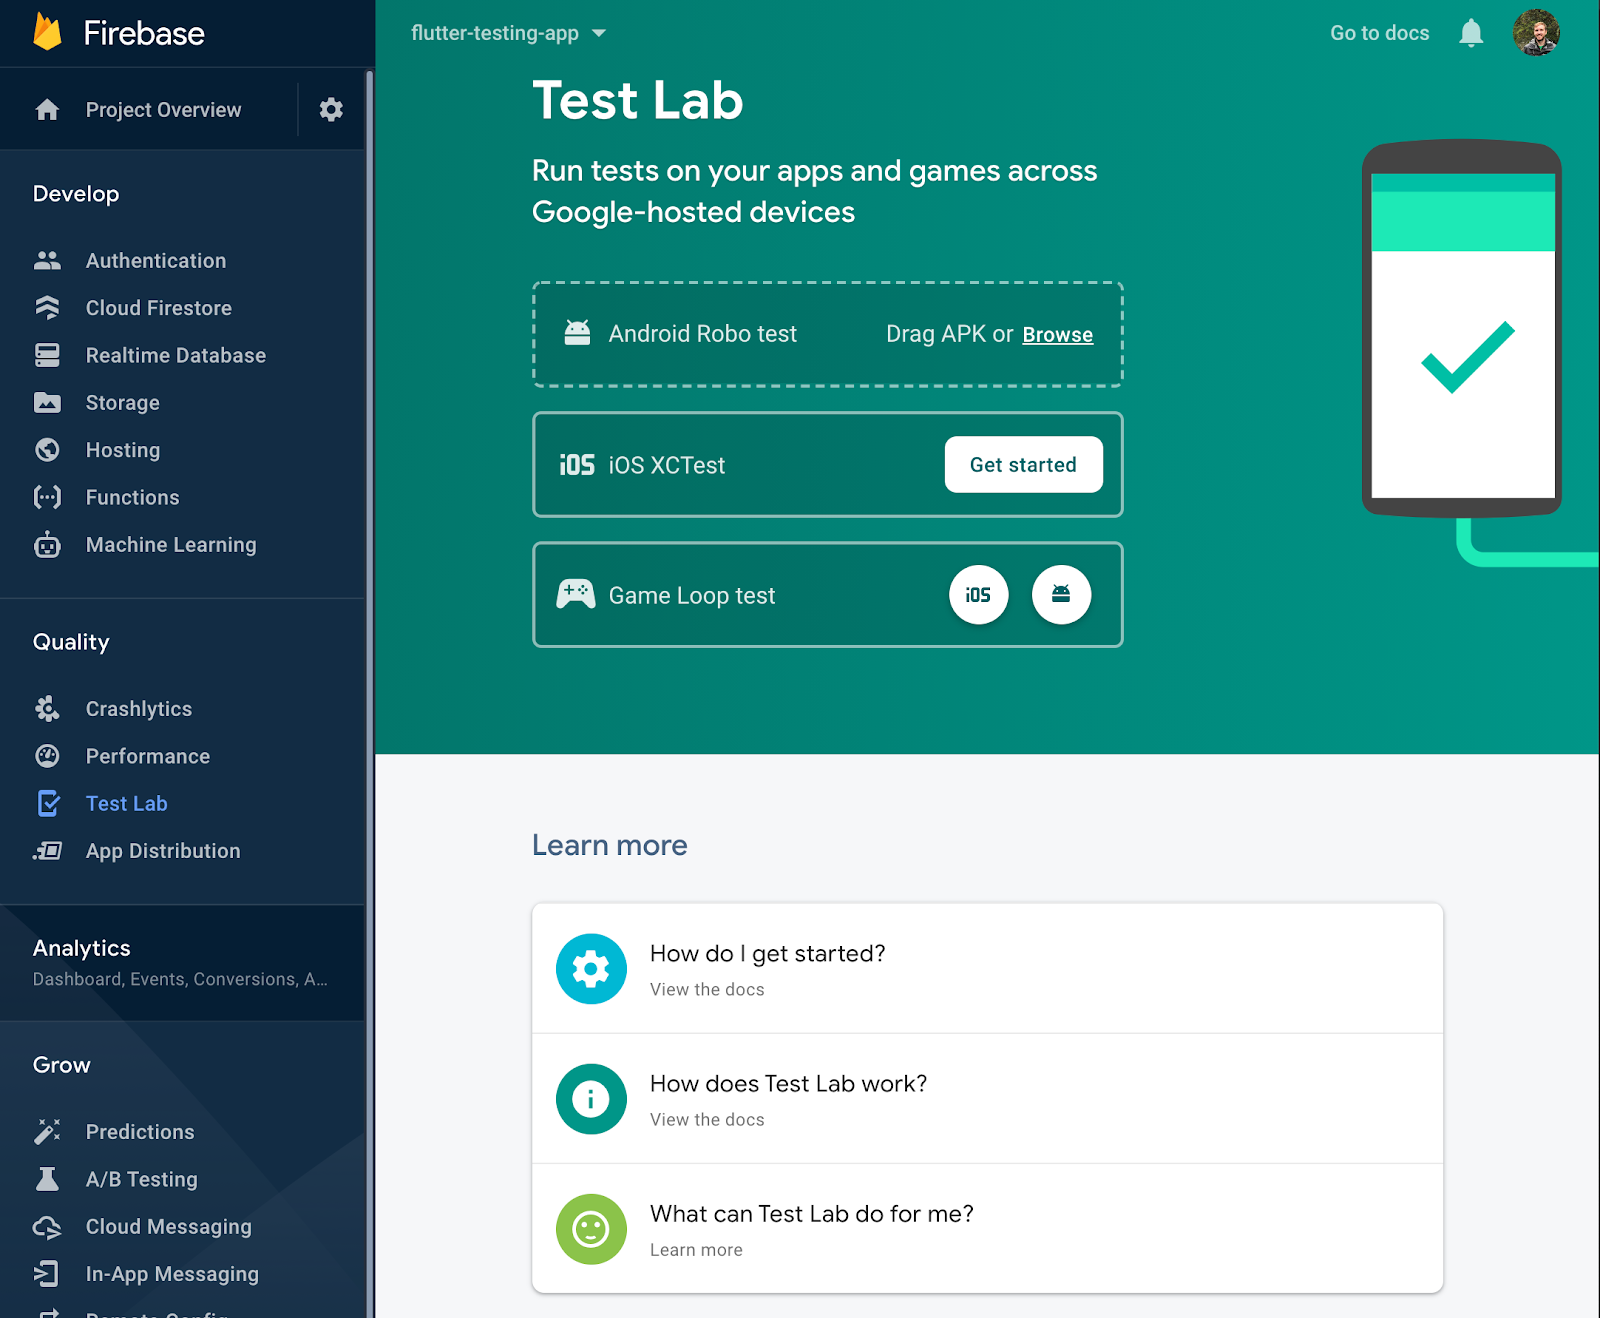
Test Lab project setup
#Go to the Firebase Console, and create a new project if you don't have one already. Then navigate to Quality > Test Lab:
Uploading an Android APK
#Create an APK using Gradle:
$ pushd android
# flutter build generates files in android/ for building the app
flutter build apk
./gradlew app:assembleAndroidTest
./gradlew app:assembleDebug -Ptarget=integration_test/<name>_test.dart
$ popd
Where <name>_test.dart is the file created in the Project Setup section.
Drag the "debug" APK from <flutter_project_directory>/build/app/outputs/apk/debug into the Android Robo Test target on the web page. This starts a Robo test and allows you to run other tests:
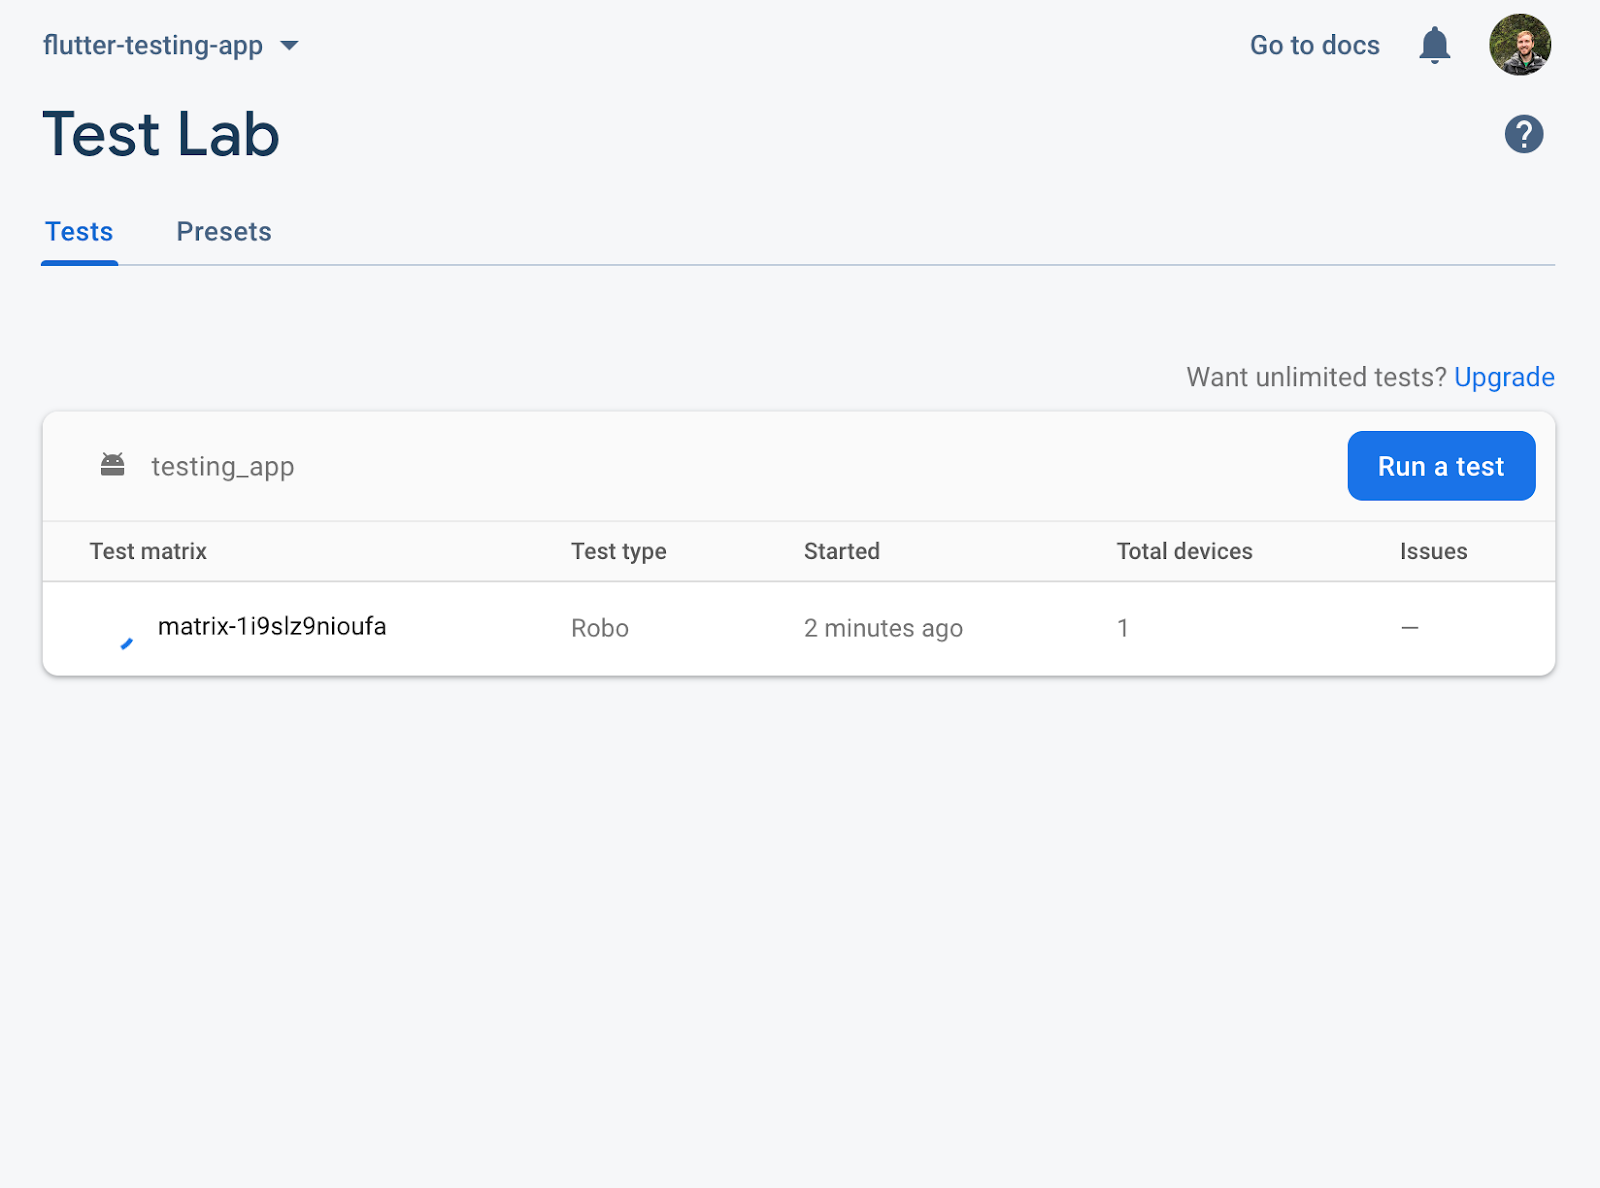
Click Run a test, select the Instrumentation test type and drag the following two files:
<flutter_project_directory>/build/app/outputs/apk/debug/<file>.apk<flutter_project_directory>/build/app/outputs/apk/androidTest/debug/<file>.apk

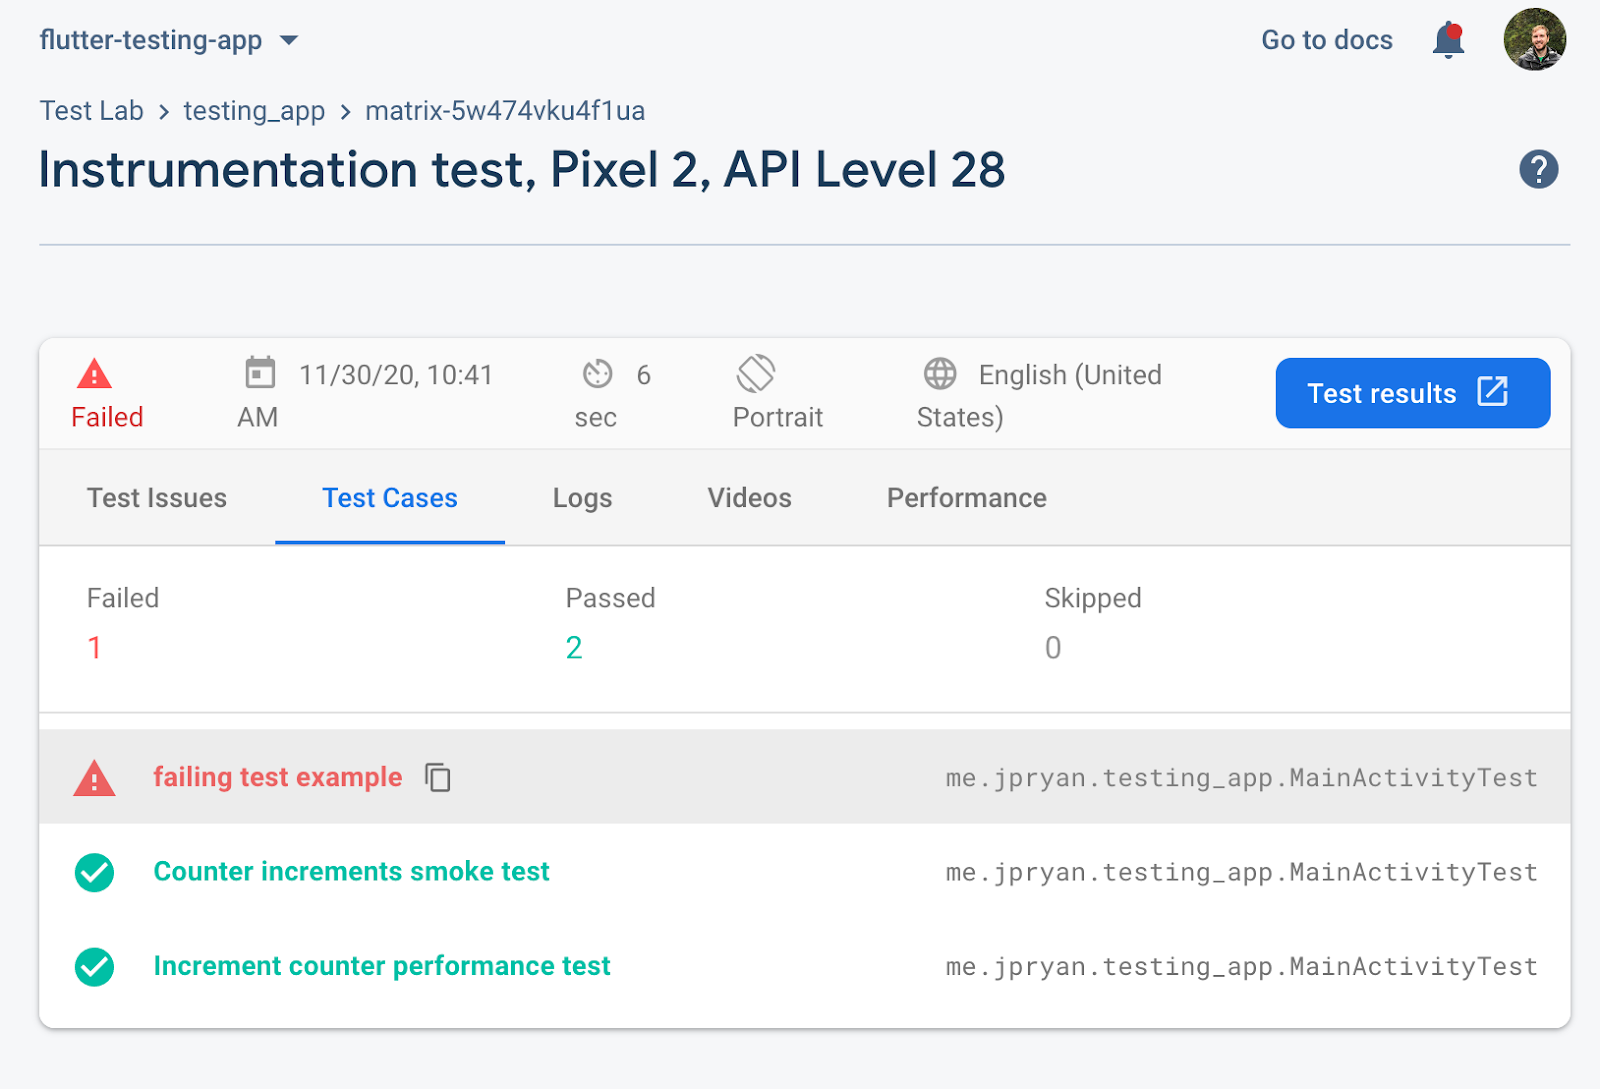
If a failure occurs, you can view the output by selecting the red icon:
Uploading an Android APK from the command line
#See the Firebase Test Lab section of the README for instructions on uploading the APKs from the command line.
Uploading Xcode tests
#See the Firebase TestLab iOS instructions for details on how to upload the .zip file to the Firebase TestLab section of the Firebase Console.
Uploading Xcode tests from the command line
#See the iOS Device Testing section in the README for instructions on how to upload the .zip file from the command line.