Place a floating app bar above a list
How to place a floating app bar or navigation bar above a list.
This guide describes how to place a floating app bar or navigation bar above a list in a Flutter app.
Overview
#To make it easier for users to view a list of items, you might want to minimize the app bar (navigation bar), as the user scrolls down the list.
Moving the app bar into a CustomScrollView
allows you
to create an app bar that can be minimized or scroll
offscreen as you scroll through a list of items contained
inside the CustomScrollView.
This recipe demonstrates how to use a CustomScrollView to
display a list of items with an app bar on top that
minimizes as the user scrolls down the list using the
following steps:
- Create a
CustomScrollView. - Add a floating app bar to
CustomScrollView. - Add a list of items to
CustomScrollView.
1. Create a CustomScrollView
#
To create a floating app bar, place the app bar inside a
CustomScrollView that also contains the list of items.
This synchronizes the scroll position of the app bar and the
list of items. You might think of the CustomScrollView
widget as a ListView that allows you to mix and match
different types of scrollable lists and widgets together.
The scrollable lists and widgets provided to the
CustomScrollView are known as slivers. There are several
types of slivers, such as SliverList, SliverGrid, and
SliverAppBar. In fact, the ListView and GridView
widgets use the SliverList and SliverGrid widgets to
implement scrolling.
For this example, create a CustomScrollView that contains
a SliverList. Also, remove the app bar property from your
code if it exists.
MaterialApp(
  title: 'Floating App Bar',
  home: Scaffold(
    // No app bar property provided yet.
    body: CustomScrollView(
      // Add the app bar and list of items as slivers in the next steps.
      slivers: <Widget>[],
    ),
  ),
);
CupertinoApp(
  title: 'Floating Navigation Bar',
  home: CupertinoPageScaffold(
    // No navigation bar property provided yet.
    child: CustomScrollView(
      // Add the navigation bar and list of items as slivers in the next steps.
      slivers: <Widget>[],
    ),
  ),
);
2. Add a floating app bar
#
Next, add an app bar to the CustomScrollView.
Flutter provides the SliverAppBar
widget which,
much like the normal AppBar widget,
uses the SliverAppBar to display a title,
tabs, images and more.
However, the SliverAppBar also gives you the ability to
create a "floating" app bar that shrinks and floats when
you're not at the top of the page.
To create this effect:
- Start with an app bar that displays only a title.
- Set the
pinnedproperty totrue. -
Add a
flexibleSpacewidget that fills the availableexpandedHeight.
slivers: [
// Add the app bar to the CustomScrollView.
SliverAppBar(
// Provide a standard title.
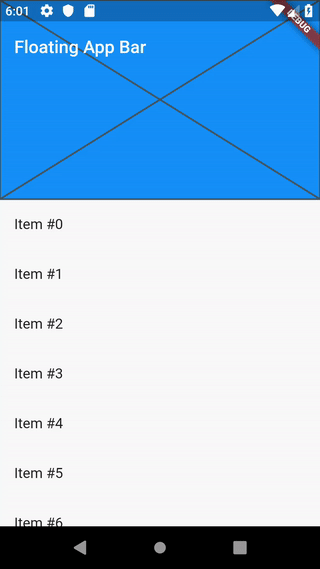
title: Text('Floating App Bar'),
// Pin the app bar when scrolling.
pinned: true,
// Display a placeholder widget to visualize the shrinking size.
flexibleSpace: Placeholder(),
// Make the initial height of the SliverAppBar larger than normal.
expandedHeight: 200,
),
],
Flutter provides the CupertinoSliverNavigationBar
widget, which lets you have a "floating" navigation
bar that shrinks when you scroll down and floats when
you're not at the top of the page.
To create this effect:
-
Add
CupertinoSliverNavigationBartoCustomScrollView. - Start with an app bar that displays only a title.
slivers: [
  // Add the navigation bar to the CustomScrollView.
  CupertinoSliverNavigationBar(
    // Provide a standard title.
    largeTitle: Text('Floating App Bar'),
  ),
],
3. Add a list of items
#
Now that you have the app bar in place, add a list of items
to the CustomScrollView. You have two options: a
SliverList
or a SliverGrid. If you need to
display a list of items one after the other, use the
SliverList widget. If you need to display a grid list, use
the SliverGrid widget.
// Next, create a SliverList
SliverList.builder(
  // The builder function returns a ListTile with a title that
  // displays the index of the current item.
  itemBuilder: (context, index) =>
      ListTile(title: Text('Item #$index')),
  // Builds 50 ListTiles
  itemCount: 50,
)
// Next, create a SliverList
SliverList.builder(
  // The builder function returns a CupertinoListTile with a title
  // that displays the index of the current item.
  itemBuilder: (context, index) =>
      CupertinoListTile(title: Text('Item #$index')),
  // Builds 50 CupertinoListTile
  itemCount: 50,
)
Interactive example
#import 'package:flutter/material.dart';
void main() => runApp(const MyApp());
class MyApp extends StatelessWidget {
const MyApp({super.key});
@override
Widget build(BuildContext context) {
const title = 'Floating App Bar';
return MaterialApp(
title: title,
home: Scaffold(
// No app bar provided to Scaffold, only a body with a
// CustomScrollView.
body: CustomScrollView(
slivers: [
// Add the app bar to the CustomScrollView.
const SliverAppBar(
// Provide a standard title.
title: Text(title),
// Pin the app bar when scrolling
pinned: true,
// Display a placeholder widget to visualize the shrinking size.
flexibleSpace: Placeholder(),
// Make the initial height of the SliverAppBar larger than normal.
expandedHeight: 200,
),
// Next, create a SliverList
SliverList.builder(
// The builder function returns a ListTile with a title that
// displays the index of the current item.
itemBuilder: (context, index) =>
ListTile(title: Text('Item #$index')),
// Builds 50 ListTiles
itemCount: 50,
),
],
),
),
);
}
}
import 'package:flutter/cupertino.dart';

void main() => runApp(const MyApp());

class MyApp extends StatelessWidget {
  const MyApp({super.key});

  @override
  Widget build(BuildContext context) {
    const title = 'Floating Navigation Bar';

    return CupertinoApp(
      title: title,
      home: CupertinoPageScaffold(
        // No navigation bar provided to CupertinoPageScaffold,
        // only a body with a CustomScrollView.
        child: CustomScrollView(
          slivers: [
            // Add the navigation bar to the CustomScrollView.
            const CupertinoSliverNavigationBar(
              // Provide a standard title.
              largeTitle: Text(title),
            ),
            // Next, create a SliverList
            SliverList.builder(
              // The builder function returns a CupertinoListTile with a title
              // that displays the index of the current item.
              itemBuilder: (context, index) =>
                  CupertinoListTile(title: Text('Item #$index')),
              // Builds 50 CupertinoListTile
              itemCount: 50,
            ),
          ],
        ),
      ),
    );
  }
}Unless stated otherwise, the documentation on this site reflects Flutter 3.44.0. Page last updated on 2026-05-05. View source or report an issue.