Integrate a Flutter module into your Android project
Learn how to integrate a Flutter module into your existing Android project.
Flutter can be embedded into your existing Android application piecemeal, as a source code Gradle subproject or as AARs.
The integration flow can be done using the Android Studio IDE with the Flutter plugin or manually.
Integrate your Flutter module
#Integrate with Android Studio
#The Android Studio IDE can help integrate your Flutter module. Using Android Studio, you can edit both your Android and Flutter code in the same IDE.
You can also use IntelliJ Flutter plugin functionality like Dart code completion, hot reload, and widget inspector.
To build your app, the Android Studio plugin configures your Android project to add your Flutter module as a dependency.
Open your Android project in Android Studio.
-
Go to File > New > New Project.... The New Project dialog displays.
Click Flutter.
-
If asked to provide your Flutter SDK path, do so and click Next.
-
Complete the configuration of your Flutter module.
If you have an existing project:
- To choose an existing project, click ... to the right of the Project location box.
- Navigate to your Flutter project directory.
- Click Open.
If you need to create a new Flutter project:
- Complete the configuration dialog.
- In the Project type menu, select Module.
Click Finish.
Integrate without Android Studio
#To integrate a Flutter module with an existing Android app manually, without using Flutter's Android Studio plugin, follow these steps:
Create a Flutter module
#
Assuming that you have an existing Android app at
some/path/MyApp, and that you want your Flutter
project as a sibling, do the following:
cd some/path/
flutter create -t module --org com.example flutter_module
This creates a some/path/flutter_module/ Flutter module project
with some Dart code to get you started and a .android/
hidden subfolder. The .android folder contains an
Android project that can both help you run a barebones
standalone version of your Flutter module with flutter run
and it's also a wrapper that helps bootstrap the Flutter
module an embeddable Android library.
Java version requirement
#Flutter requires your project to declare compatibility with Java 17 or later.
Before attempting to connect your Flutter module project
to your host Android app, ensure that your host Android
app declares the following source compatibility within your
app's build.gradle file, under the android { } block.
android {
    // ...
    compileOptions {
        sourceCompatibility = JavaVersion.VERSION_17 // The minimum value
        targetCompatibility = JavaVersion.VERSION_17 // The minimum value
    }
    // ...
}
Centralize repository settings
#
Starting with Gradle 7, Android recommends using centralized repository
declarations in settings.gradle instead of project or module level
declarations in build.gradle files.
Before attempting to connect your Flutter module project to your host Android app, make the following changes to your host app:
-
Remove the
repositoriesblock in all of your app'sbuild.gradlefiles.groovy// Remove the following block, starting on the next line repositories { google() mavenCentral() } // ...to the previous line -
Add the
dependencyResolutionManagementdisplayed in this step to thesettings.gradlefile.
dependencyResolutionManagement {
    repositoriesMode.set(RepositoriesMode.PREFER_SETTINGS)
    val storageUrl: String = System.getenv("FLUTTER_STORAGE_BASE_URL") ?: "https://storage.googleapis.com"
    repositories {
        google()
        mavenCentral()
        maven("$storageUrl/download.flutter.io")
    }
}
dependencyResolutionManagement {
    repositoriesMode = RepositoriesMode.PREFER_SETTINGS
    String storageUrl = System.env.FLUTTER_STORAGE_BASE_URL ?: "https://storage.googleapis.com"
    repositories {
        google()
        mavenCentral()
        maven {
            url = uri("$storageUrl/download.flutter.io")
        }
    }
}
Add the Flutter module as a dependency
#Add the Flutter module as a dependency of your existing app in Gradle. You can achieve this in two ways.
-
Android archive The AAR mechanism creates generic Android AARs as intermediaries that packages your Flutter module. This is good when your downstream app builders don't want to have the Flutter SDK installed. But, it adds one more build step if you build frequently.
-
Module source code The source code subproject mechanism is a convenient one-click build process, but requires the Flutter SDK. This is the mechanism used by the Android Studio IDE plugin.
Depend on the Android Archive (AAR)
#This option packages your Flutter library as a generic local Maven repository composed of AARs and POMs artifacts. This option allows your team to build the host app without installing the Flutter SDK. You can then distribute the artifacts from a local or remote repository.
Let's assume you built a Flutter module at
some/path/flutter_module, and then run:
cd some/path/flutter_module
flutter build aar
Then, follow the on-screen instructions to integrate.
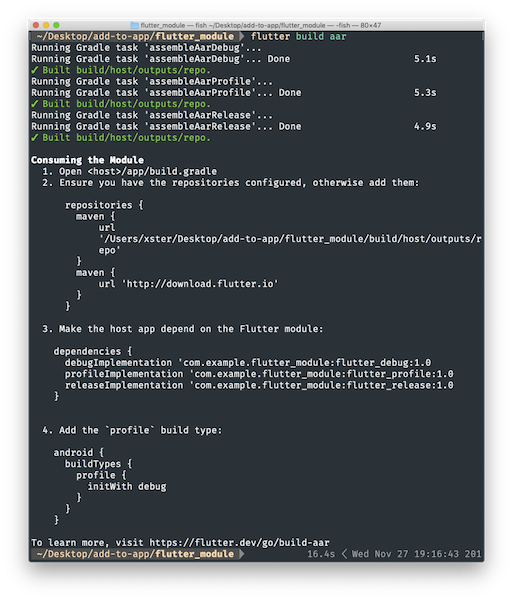
More specifically, this command creates (by default all debug/profile/release modes) a local repository, with the following files:
-
build/host/outputs/repo
com
example
flutter_module
flutter_release
1.0
- flutter_release-1.0.aar
- flutter_release-1.0.aar.md5
- flutter_release-1.0.aar.sha1
- flutter_release-1.0.pom
- flutter_release-1.0.pom.md5
- flutter_release-1.0.pom.sha1
- maven-metadata.xml
- maven-metadata.xml.md5
- maven-metadata.xml.sha1
flutter_profile
- …
flutter_debug
- …
To depend on the AAR, the host app must be able to find these files.
To do that, edit settings.gradle in your host app
so that it includes the local repository and the dependency:
dependencyResolutionManagement {
    repositoriesMode.set(RepositoriesMode.PREFER_SETTINGS)
    repositories {
        google()
        mavenCentral()
        maven("https://storage.googleapis.com/download.flutter.io")
        maven(url = "<some/path/flutter_module>/build/host/outputs/repo")
    }
}
dependencyResolutionManagement {
repositoriesMode = RepositoriesMode.PREFER_SETTINGS
repositories {
google()
mavenCentral()
// Add the new repositories starting on the next line...
maven {
url = uri("<some/path/flutter_module>/build/host/outputs/repo")
// This is relative to the location of the build.gradle file
// if using a relative path.
}
maven {
url = uri("https://storage.googleapis.com/download.flutter.io")
}
// ...to before this line
}
}
Kotlin DSL based Android Project
#
After an aar build of a Kotlin DSL-based Android project,
follow these steps to add the flutter_module.
Include the flutter module as a dependency in
the host app's app/build.gradle file.
android {
buildTypes {
release {
...
}
debug {
...
}
create("profile") {
initWith(getByName("debug"))
}
}
dependencies {
// ...
debugImplementation("com.example.flutter_module:flutter_debug:1.0")
releaseImplementation("com.example.flutter_module:flutter_release:1.0")
add("profileImplementation", "com.example.flutter_module:flutter_profile:1.0")
}
Add the custom profileImplementation dependency configuration to the end
of the same app-level build.gradle file.
configurations {
    getByName("profileImplementation") {
    }
}
Depend on the module's source code
#This option enables a one-step build for both your Android project and Flutter project. This option is convenient when you work on both parts simultaneously and rapidly iterate, but your team must install the Flutter SDK to build the host app.
Updating settings.gradle
#
Include the Flutter module as a subproject in the host app's
settings.gradle. This example assumes flutter_module
and MyApp
exist in the same directory
If you are using Kotlin, apply the following changes:
// Include the host app project. Assumed existing content.
include(":app")
// Replace "flutter_module" with whatever package_name you supplied when you ran:
// `$ flutter create -t module [package_name]
val filePath = settingsDir.parentFile.toString() + "/flutter_module/.android/include_flutter.groovy"
apply(from = File(filePath))
If you are using Groovy, apply the following changes:
// Include the host app project.
include(":app")                                   // assumed existing content
setBinding(new Binding([gradle: this]))           // new
def filePath = settingsDir.parentFile.toString() + "/flutter_module/.android/include_flutter.groovy" // new
apply from: filePath                              // new
The binding and script evaluation allows the Flutter
module to include itself (as :flutter) and any
Flutter plugins used by the module (such as :package_info and :video_player)
in the evaluation context of your settings.gradle.
Updating app/build.gradle
#
Introduce an implementation dependency on the Flutter
module from your app:
dependencies {
    implementation(project(":flutter"))
}
Your app now includes the Flutter module as a dependency.
Continue to the Adding a Flutter screen to an Android app guide.
Unless stated otherwise, the documentation on this site reflects Flutter 3.44.0. Page last updated on 2026-05-05. View source or report an issue.