Add iOS as a target platform from Android start

To add iOS as a Flutter app target for macOS, follow this procedure.

Install Xcode

#
  1. Allocate a minimum of 26 GB of storage for Xcode. Consider allocating 42 GB of storage for an optimal configuration.
  2. Install Xcode 15 to debug and compile native Swift or ObjectiveC code.

Configure iOS development

#

Configure Xcode

#

To develop Flutter apps for iOS, install Xcode to compile to native bytecode.

  1. To configure the command-line tools to use the installed version of Xcode, run the following commands.

    $ sudo sh -c 'xcode-select -s /Applications/Xcode.app/Contents/Developer && xcodebuild -runFirstLaunch'

    To use the latest version of Xcode, use this path. If you need to use a different version, specify that path instead.

  2. Sign the Xcode license agreement.

    $ sudo xcodebuild -license

Try to keep to the current version of Xcode.

Configure your target iOS device

#

With Xcode, you can run Flutter apps on an iOS device or on the simulator.

Configure your iOS simulator

#

To prepare to run and test your Flutter app on the iOS simulator, follow this procedure.

  1. To install the iOS Simulator, run the following command.

    $ xcodebuild -downloadPlatform iOS
  2. To start the Simulator, run the following command:

    $ open -a Simulator
  3. Set your Simulator to use a 64-bit device. This covers the iPhone 5s or later.

    • From Xcode, choose a simulator device type.

      1. Go to Window > Devices and Simulators.

        You can also press Cmd + Shift + 2.

      2. Once the Devices and Simulators dialog opens, click Simulators.

      3. Choose a Simulator from the left-hand list or press + to create a new simulator.

    • From the Simulator app, go to File > Open Simulator > Choose your target iOS device.

    • To check the device version in the Simulator, open the Settings app > General > About.

  4. The simulated high-screen density iOS devices might overflow your screen. If that appears true on your Mac, change the presented size in the Simulator app.

    Display SizeMenu commandKeyboard shortcut
    SmallWindow > Physical SizeCmd + 1
    ModerateWindow > Point AccurateCmd + 2
    HD accurateWindow > Pixel AccurateCmd + 3
    Fit to screenWindow > Fit ScreenCmd + 4

Set up your target physical iOS device

#

To deploy your Flutter app to a physical iPhone or iPad, you need to do the following:

  • Create an Apple Developer account.
  • Set up physical device deployment in Xcode.
  • Create a development provisioning profile to self-sign certificates.
  • Install the third-party CocoaPods dependency manager if your app uses Flutter plugins.
Create your Apple ID and Apple Developer account
#

To test deploying to a physical iOS device, you need an Apple ID.

To distribute your app to the App Store, you must enroll in the Apple Developer Program.

If you only need to test deploying your app, complete the first step and move on to the next section.

  1. If you don't have an Apple ID, create one.

  2. If you haven't enrolled in the Apple Developer program, enroll now.

    To learn more about membership types, check out Choosing a Membership.

Attach your physical iOS device to your Mac
#

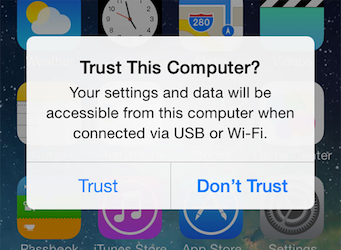
Configure your physical iOS device to connect to Xcode.

  1. Attach your iOS device to the USB port on your Mac.

  2. On first connecting your iOS device to your Mac, your iOS device displays the Trust this computer? dialog.

  3. Click Trust.

    Trust Mac

  4. When prompted, unlock your iOS device.

Enable Developer Mode on iOS 16 or later
#

Starting with iOS 16, Apple requires you to enable Developer Mode to protect against malicious software. Enable Developer Mode before deploying to a device running iOS 16 or later.

  1. Tap on Settings > Privacy & Security > Developer Mode.

  2. Tap to toggle Developer Mode to On.

  3. Tap Restart.

  4. After the iOS device restarts, unlock your iOS device.

  5. When the Turn on Developer Mode? dialog appears, tap Turn On.

    The dialog explains that Developer Mode requires reducing the security of the iOS device.

  6. Unlock your iOS device.

Enable developer code signing certificates
#

To deploy to a physical iOS device, you need to establish trust with your Mac and the iOS device. This requires you to load signed developer certificates to your iOS device. To sign an app in Xcode, you need to create a development provisioning profile.

To provision your project, follow the Xcode signing flow.

  1. Launch Xcode.

  2. Go to Xcode > Settings...

    1. Go to Xcode > Settings...
    2. Click Accounts.
    3. Click +.
    4. Select Apple ID and click Continue.
    5. When prompted, enter your Apple ID and Password.
    6. Close the Settings dialog.

    Development and testing supports any Apple ID.

  3. Go to File > Open...

    You can also press Cmd + O.

  4. Navigate to your Flutter project directory.

  5. Open the default Xcode workspace in your project: ios/Runner.xcworkspace.

  6. Select the physical iOS device you intend to deploy to in the device drop-down menu to the right of the run button.

    It should appear under the iOS devices heading.

  7. In the left navigation panel under Targets, select Runner.

  8. In the Runner settings pane, click Signing & Capabilities.

  9. Select All at the top.

  10. Select Automatically manage signing.

  11. Select a team from the Team dropdown menu.

    Teams are created in the App Store Connect section of your Apple Developer Account page. If you have not created a team, you can choose a personal team.

    The Team dropdown displays that option as Your Name (Personal Team).

    Xcode account add

    After you select a team, Xcode performs the following tasks:

    1. Creates and downloads a Development Certificate
    2. Registers your device with your account,
    3. Creates and downloads a provisioning profile if needed

If automatic signing fails in Xcode, verify that the project's General > Identity > Bundle Identifier value is unique.

Check the app's Bundle ID

Enable trust of your Mac and iOS device
#

When you attach your physical iOS device for the first time, enable trust for both your Mac and the Development Certificate on the iOS device.

You should have enabled trust of your Mac on your iOS device when you attached the device to your Mac.

Enable developer certificate for your iOS devices
#

Enabling certificates varies in different versions of iOS.

  1. Open the Settings app on the iOS device.

  2. Tap on General > Profiles & Device Management.

  3. Tap to toggle your Certificate to Enable

  1. Open the Settings app on the iOS device.

  2. Tap on General > VPN & Device Management.

  3. Tap to toggle your Certificate to Enable.

  1. Open the Settings app on the iOS device.

  2. Tap on General > VPN & Device Management.

  3. Under the Developer App heading, you should find your certificate.

  4. Tap your Certificate.

  5. Tap Trust "<certificate>".

  6. When the dialog displays, tap Trust.

If the codesign wants to access key... dialog displays:

  1. Enter your macOS password.

  2. Tap Always Allow.

Set up wireless debugging on your iOS device (Optional)

#

To debug your device using a Wi-Fi connection, follow this procedure.

  1. Connect your iOS device to the same network as your macOS device.

  2. Set a passcode for your iOS device.

  3. Open Xcode.

  4. Go to Window > Devices and Simulators.

    You can also press Shift + Cmd + 2.

  5. Select your iOS device.

  6. Select Connect via Network.

  7. Once the network icon appears next to the device name, unplug your iOS device from your Mac.

If you don't see your device listed when using flutter run, extend the timeout. The timeout defaults to 10 seconds. To extend the timeout, change the value to an integer greater than 10.

$ flutter run --device-timeout 60

Install CocoaPods

#

If your apps depend on Flutter plugins with native iOS code, install CocoaPods. This program bundles various dependencies across Flutter and iOS code.

To install and set up CocoaPods, run the following commands:

  1. Install cocoapods following the CocoaPods install guide.

    $ sudo gem install cocoapods
  2. Launch your preferred text editor.

  3. Open the Zsh environmental variable file ~/.zshenv in your text editor.

  4. Copy the following line and paste it at the end of your ~/.zshenv file.

    bash
    export PATH=$HOME/.gem/bin:$PATH
  5. Save your ~/.zshenv file.

  6. To apply this change, restart all open terminal sessions.

Check your development setup

#

help Help

Run Flutter doctor

#

The flutter doctor command validates that all components of a complete Flutter development environment for macOS.

  1. Open your Terminal.

  2. To verify your installation of all the components, run the following command.

    $ flutter doctor

As you chose to develop for iOS, you do not need all components. If you followed this guide, the result of your command should resemble:

Running flutter doctor...
Doctor summary (to see all details, run flutter doctor -v):
[✓] Flutter (Channel stable, 3.19.6, on macOS 14.4.0 23E214 darwin-arm64, locale en)
[✓] VS Code (version 1.89)
[✓] Connected device (1 available)
[✓] Network resources


! Doctor found issues in  categories.

Troubleshoot Flutter doctor issues

#

When the flutter doctor command returns an error, it could be for Flutter, VS Code, Xcode, the connected device, or network resources.

If the flutter doctor command returns an error for any of these components, run it again with the verbose flag.

$ flutter doctor -v

Check the output for other software you might need to install or further tasks to perform.

If you change the configuration of your Flutter SDK or its related components, run flutter doctor again to verify the installation.

Start developing iOS on macOS apps with Flutter

#

Congratulations! Now that you have installed all prerequisites and the Flutter SDK, you should be able to start developing Flutter apps for iOS on macOS.