User input
The app will display the user's guesses in the Tile widgets, but it needs a way for the user to input those guesses. In this lesson, build that functionality with two interaction widgets: TextField and IconButton.
Implement callback functions
#To allow users to type in their guesses, you'll create a dedicated widget named GuessInput. First, create the basic structure for your GuessInput widget that requires a callback function as an argument. Name the callback function onSubmitGuess.
Add the following code to your main.dart file.
class GuessInput extends StatelessWidget {
  GuessInput({super.key, required this.onSubmitGuess});

  final void Function(String) onSubmitGuess;

  @override
  Widget build(BuildContext context) {
    // You'll build the UI in the next steps
    return Container(); // Placeholder
  }
}
The line final void Function(String) onSubmitGuess; declares a final member of the class called onSubmitGuess that has the type void Function(String). This function takes a single String argument (the user's guess) and doesn't return any value (denoted by void).
This callback tells us that the logic that actually handles the user's guess will be written elsewhere. It's good practice for interactive widgets to use callback functions to keep the widget that handles interactions reusable and decoupled from any specific functionality.
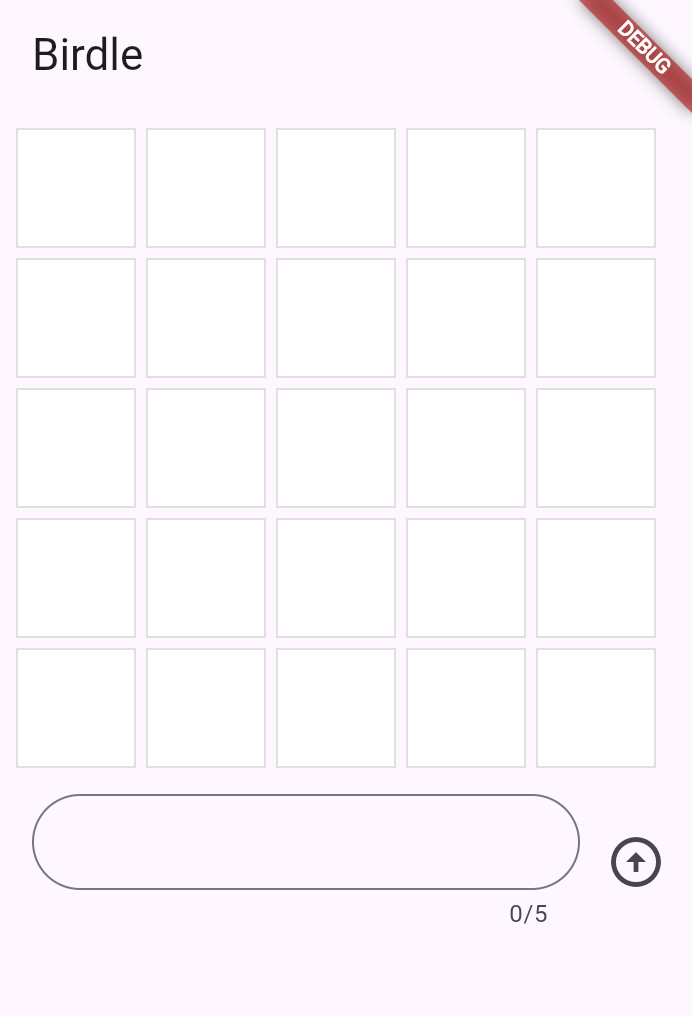
By the end of this lesson, the passed-in onGuessSubmitted function is called when a user enters a guess. First, you'll need to build the visual parts of this widget. This is what the widget will look like.
The TextField widget
#Given that the text field and button are displayed side-by-side, create them as a Row widget. Replace the Container placeholder in your build method with a Row containing an Expanded TextField:
class GuessInput extends StatelessWidget {
  GuessInput({super.key, required this.onSubmitGuess});

  final void Function(String) onSubmitGuess;

  @override
  Widget build(BuildContext context) {
     return Row(
      children: [
        Expanded(
          child: Padding(
            padding: const EdgeInsets.all(8.0),
            child: TextField(
              maxLength: 5,
              decoration: InputDecoration(
                border: OutlineInputBorder(
                  borderRadius: BorderRadius.all(Radius.circular(35)),
                ),
              ),
            ),
          ),
        ),
      ],
    );
  }
}
You have seen some of these widgets in previous lessons: Row and Padding. New, though, is the Expanded widget. When a child of a Row (or Column) is wrapped in Expanded, it tells that child to fill all the available space along the main axis (horizontal for Row, vertical for Column) that hasn't been taken by other children. This makes the TextField stretch to take up all the space except what’s taken by other widgets in the row.
The TextField widget is also new in this lesson and is the star of the show. This is the basic Flutter widget for text input.
Thus far, TextField has the following configuration.
- It’s decorated with a rounded border. Notice that the decoration configuration is very similar to how a
Containerand boxes are decorated. - Its
maxLengthproperty is set to 5 because the game only allows guesses of 5-letter words.
Handle text with TextEditingController
#Next, you need a way to manage the text that the user types into the input field. For this, use a TextEditingController.
class GuessInput extends StatelessWidget {
  GuessInput({super.key, required this.onSubmitGuess});

  final void Function(String) onSubmitGuess;

  // NEW
  final TextEditingController _textEditingController = TextEditingController();

  @override
  Widget build(BuildContext context) {
    return Row(
      children: [
        Expanded(
          child: Padding(
            padding: const EdgeInsets.all(8.0),
            child: TextField(
              maxLength: 5,
              decoration: InputDecoration(
                border: OutlineInputBorder(
                  borderRadius: BorderRadius.all(Radius.circular(35)),
                ),
              ),
            ),
          ),
        ),
        //
      ],
    );
  }
}
A TextEditingController is used to read, clear, and modify the text in a TextField. To use it, pass it into the TextField.
class GuessInput extends StatelessWidget {
  GuessInput({super.key, required this.onSubmitGuess});

  final void Function(String) onSubmitGuess;

  final TextEditingController _textEditingController = TextEditingController();

  @override
  Widget build(BuildContext context) {
    return Row(
      children: [
        Expanded(
          child: Padding(
            padding: const EdgeInsets.all(8.0),
            child: TextField(
              maxLength: 5,
              inputDecoration: InputDecoration(
                border: OutlineInputBorder(
                  borderRadius: BorderRadius.all(Radius.circular(35)),
                ),
              ),
              controller: _textEditingController, // NEW
            ),
          ),
        ),
      ],
    );
  }
}
Now, when a user inputs text, you can capture it with the _textEditingController, but you'll need to know when to capture it. The simplest way to react to input is by using the TextField.onSubmitted argument. This argument accepts a callback, and the callback is triggered whenever the user presses the "Enter" key on the keyboard while the text field has focus.
For now, ensure that this works by adding the following callback to TextField.onSubmitted.
class GuessInput extends StatelessWidget {
  GuessInput({super.key, required this.onSubmitGuess});

  final void Function(String) onSubmitGuess;

  final TextEditingController _textEditingController = TextEditingController();

  @override
  Widget build(BuildContext context) {
    return Row(
      children: [
        Expanded(
          child: Padding(
            padding: const EdgeInsets.all(8.0),
            child: TextField(
              maxLength: 5,
              inputDecoration: InputDecoration(
                border: OutlineInputBorder(
                  borderRadius: BorderRadius.all(Radius.circular(35)),
                ),
              ),
              controller: _textEditingController,
              onSubmitted: (String input) { // NEW
                print(_textEditingController.text); // Temporary
              }
            ),
          ),
        ),
      ],
    );
  }
}
In this case, you could print the input passed to the onSubmitted callback directly, but a better user experience clears the text after each guess: You need a TextEditingController to do that. Update the code as follows:
class GuessInput extends StatelessWidget {
  GuessInput({super.key, required this.onSubmitGuess});

  final void Function(String) onSubmitGuess;

  final TextEditingController _textEditingController = TextEditingController();

  @override
  Widget build(BuildContext context) {
    return Row(
      children: [
        Expanded(
          child: Padding(
            padding: const EdgeInsets.all(8.0),
            child: TextField(
              maxLength: 5,
              inputDecoration: InputDecoration(
                border: OutlineInputBorder(
                  borderRadius: BorderRadius.all(Radius.circular(35)),
                ),
              ),
              controller: _textEditingController,
              onSubmitted: (_) { // UPDATED
                print(_textEditingController.text); // Temporary
                _textEditingController.clear(); // NEW
              }
            ),
          ),
        ),
      ],
    );
  }
}
Gain input focus
#Often, you want a specific input or widget to automatically gain focus without the user taking action. In this app, for example, the only thing a user can do is enter a guess, so the TextField should be focused automatically when the app launches. And after the user enters a guess, the focus should stay in the TextField so they can enter their next guess.
To resolve the first focus issue, set up the autoFocus property on the TextField.
class GuessInput extends StatelessWidget {
  GuessInput({super.key, required this.onSubmitGuess});

  final void Function(String) onSubmitGuess;

  final TextEditingController _textEditingController = TextEditingController();
    @override
  Widget build(BuildContext context) {
    return Row(
      children: [
        Expanded(
          child: Padding(
            padding: const EdgeInsets.all(8.0),
            child: TextField(
		          maxLength: 5,
              inputDecoration: InputDecoration(
                border: OutlineInputBorder(
                  borderRadius: BorderRadius.all(Radius.circular(35)),
                ),
              ),
		          controller: _textEditingController,
		          autoFocus: true // NEW
		          onSubmitted: (String input) {
                print(input); // Temporary
                _textEditingController.clear();
              }
 		        ),
          ),
        ),
      ],
    );
  }
}
The second issue requires you to use a FocusNode to manage the keyboard focus. You can use FocusNode to request that a TextField gain focus (making the keyboard appear on mobile), or to know when a field has focus.
First, create a FocusNode in the GuessInput class:
class GuessInput extends StatelessWidget {
  GuessInput({super.key, required this.onSubmitGuess});

  final void Function(String) onSubmitGuess;

  final TextEditingController _textEditingController = TextEditingController();

  final FocusNode _focusNode = FocusNode(); // NEW

  @override
  Widget build(BuildContext context) {
    // ...
  }
}
Then, use the FocusNode to request focus whenever the TextField is submitted after the controller is cleared:
class GuessInput extends StatelessWidget {
  GuessInput({super.key, required this.onSubmitGuess});

  final void Function(String) onSubmitGuess;

  final TextEditingController _textEditingController = TextEditingController();

  final FocusNode _focusNode = FocusNode();

  @override
  Widget build(BuildContext context) {
    return Row(
      children: [
        Expanded(
          child: Padding(
            padding: const EdgeInsets.all(8.0),
            child: TextField(
              maxLength: 5,
              inputDecoration: InputDecoration(
                border: OutlineInputBorder(
                  borderRadius: BorderRadius.all(Radius.circular(35)),
                ),
              ),
              controller: _textEditingController,
              autoFocus: true
              focusNode: _focusNode, // NEW
              onSubmitted: (String input) {
                print(input); // Temporary
                _textEditingController.clear();
                _focusNode.requestFocus(); // NEW
              }
            ),
          ),
        ),
      ],
    );
  }
}
Now, when you press ‘Enter’ after inputting text, you can continue typing.
Use the input
#Finally, you need to handle the text that the user enters. Recall that the constructor for GuessInput requires a callback called onGuessSubmitted. In GuessInput, you need to use that callback. Replace the print statement with a call to that function.
class GuessInput extends StatelessWidget {
  GuessInput({super.key, required this.onSubmitGuess});

  final void Function(String) onSubmitGuess;

  final TextEditingController _textEditingController = TextEditingController();

  final FocusNode _focusNode = FocusNode();

  @override
  Widget build(BuildContext context) {
    return Row(
      children: [
        Expanded(
          child: Padding(
            padding: const EdgeInsets.all(8.0),
            child: TextField(
              maxLength: 5,
              inputDecoration: InputDecoration(
                border: OutlineInputBorder(
                  borderRadius: BorderRadius.all(Radius.circular(35)),
                ),
              ),
              controller: _textEditingController,
              autoFocus: true
              focusNode: _focusNode,
              onSubmitted: (String input) {
                onSubmitGuess(_textEditionController.text.trim())
                _textEditingController.clear();
                _focusNode.requestFocus();
              }
            ),
          ),
        ),
      ],
    );
  }
}The remaining functionality is handled in the parent widget, GamePage. In the build method of that class, add the GuessInput widget under the Row widgets in the Column’s children.
class GamePage extends StatelessWidget {
  final Game _game = Game();

  @override
  Widget build(BuildContext context) {
    return Padding(
      padding: const EdgeInsets.all(8.0),
      child: Column(
        spacing: 5.0,
        children: [
          for (var guess in _game.guesses)
            Row(
              spacing: 5.0,
              children: [
                for (var letter in guess) Tile(letter),
              ],
            ),
          GuessInput(
            onSubmitGuess: (String guess) {
              // TODO, handle guess
              print(guess); // Temporary
            }
          ),
        ],
      ),
    );
  }
}
For the moment, this only prints the guess to prove that it’s wired up correctly. Submitting the guess requires using the functionality of a StatefulWidget, which you’ll do in the StatefulWidget lesson.
Buttons
#To improve the UX on mobile and reflect well-known UI, there should also be a button that can submit the guess.
There are many button widgets built into Flutter, like TextButton, ElevatedButton, and the button you’ll use now: IconButton. All of these buttons (and many other interaction widgets) require two arguments (in addition to their optional arguments):
- A callback function passed to
onPressed. - A widget that makes up the content of the button (often
Textor anIcon).
Add an icon button to the row widget’s children list in the GuessInput widget, and give it an Icon widget to display. The Icon widget requires configuration; in this case, the padding property sets the padding between the edge of the button and the icon it wraps to zero. This removes the default padding and makes the button smaller.
class GuessInput extends StatelessWidget {
  GuessInput({super.key, required this.onSubmitGuess});

  final void Function(String) onSubmitGuess;

  final TextEditingController _textEditingController = TextEditingController();
  final FocusNode _focusNode = FocusNode();

    @override
  Widget build(BuildContext context) {
    return Row(
      children: [
        Expanded(...),
        IconButton(
          padding: EdgeInsets.zero,
          icon: Icon(Icons.arrow_circle_up),
        ),
      ],
    );
  }
}
The IconButton.onPressed callback should look familiar:
class GuessInput extends StatelessWidget {
  GuessInput({super.key, required this.onSubmitGuess});

  final void Function(String) onSubmitGuess;

  final TextEditingController _textEditingController = TextEditingController();
  final FocusNode _focusNode = FocusNode();

    @override
  Widget build(BuildContext context) {
    return Row(
      children: [
        Expanded(...),
        IconButton(
          padding: EdgeInsets.zero,
          icon: Icon(Icons.arrow_circle_up),
          onPressed: () {
            onSubmitGuess(_textEditingController.text.trim());
            _textEditingController.clear();
            _focusNode.requestFocus();
          },
        ),
      ],
    );
  }
}
This method does the same as the onSubmitted callback on the TextField.
Unless stated otherwise, the documentation on this site reflects the latest stable version of Flutter. Page last updated on 2025-06-06. View source or report an issue.