Adding iOS app extensions
Learn how to add app extensions to your Flutter apps
This guide shows you how to use iOS app extensions with a Flutter app.
Overview
#iOS app extensions allow you to expand functionality outside of your iOS app. Your app could appear as a home screen widget, or you can make portions of your app available within other apps.
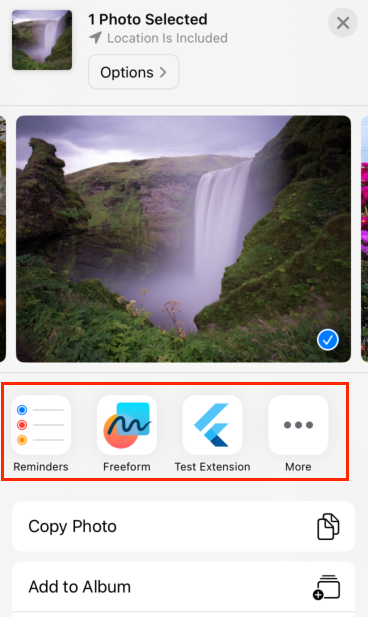
In the following example, when a user selects a
photo to share in the iOS Photo app, a Flutter app called
Example App With Extension is displayed in the
Photo apps share sheet:

Add an iOS app extension to your Flutter app
#
If you want to integrate your Flutter app with
the iOS operating system, you can add iOS app extensions
to your Flutter project. For a seamless workflow, the
following steps show how to add a Share
app extension to a new Flutter app called
example_app_with_extension, but you can always start with
an existing project.
-
In the console, create a new Flutter project called
example_app_with_extension.flutter create example_app_with_extension -
In the console, open the Xcode workspace for the
example_app_with_extensionproject.cd example_app_with_extension && open ios/Runner.xcworkspace -
In Xcode, add an app extension called
Shareand call itShareExtension.In the Xcode menu bar, select File > New > Target.
Add Share Extension.
In the Name field, enter ShareExtension.
Click Finish.
In the Activate … Scheme dialog box that appears, select Activate.
-
In Xcode, change the order of the build process.
Open the project navigator (View > Navigators > Project).
In the project navigator, at the top, select Runner.
In the main window under TARGETS, select Runner.
Open the Build Phases tab.
Drag Embed Foundation Extensions above Run Script.
-
Make sure your Minimum Deployments iOS value is properly set and matches in both Runner and ShareExtension
Open the project navigator (View > Navigators > Project).
In the project navigator, at the top, select Runner.
In the main window under TARGETS, select Runner.
On the General tab check your Minimum Deployments dropdown value to match the one you have on ShareExtension > General tab.
-
In the console, run the following command to rebuild your iOS app:
flutter build ios --config-only
When you add a new app extension, Xcode generates sample code based on the template you selected. For more information about the generated code and WidgetKit, see Apple's app extension documentation.
Test an iOS app extension
#After you've added an app extension to your Flutter project, you can test it, using a simulator or physical device. If you are testing you extension in debug mode, you must use the iOS simulator.
The following steps assume you're using the sample application and Share extension from Adding iOS app extensions.
In Xcode, add an app extension to your project.
-
In the console, use the following command to run your iOS app:
flutter run -
In the simulator, test your app extension.
Launch an app that supports the Share extension, such as the Photos app.
Select a photo, tap the share button, then tap on the share extension icon of your app.
Add an app extension to your project.
-
In the console, run your Flutter app in release mode:
flutter run --release -
On your device, test your app extension.
Launch an app that supports the Share extension, such as the Photos app.
Select a photo, tap the share button, then tap on the share extension icon of your app.
Additional ways to interact with iOS app extensions
#Flutter apps interact with iOS app extensions using the same techniques as UIKit or SwiftUI apps. The containing app and the app extension don't communicate directly. The containing app might not be running while the device user interacts with the extension. The app and your extension can read and write to shared resources or use higher-level APIs to communicate with each other.
Use higher-level APIs
#Some extensions have APIs. For example, the Core Spotlight framework indexes your app, allowing users to search from Spotlight and Safari. The WidgetKit framework can trigger an update of your home screen widget.
To simplify how your app communicates with extensions, Flutter plugins wrap these APIs. To find plugins that wrap extension APIs, check out Leveraging Apple's System APIs and Frameworks or search pub.dev.
Share resources
#
To share resources between your Flutter app
and your app extension, put the Runner app target
and the extension target in the same App Group.
To add a target to an App Group:
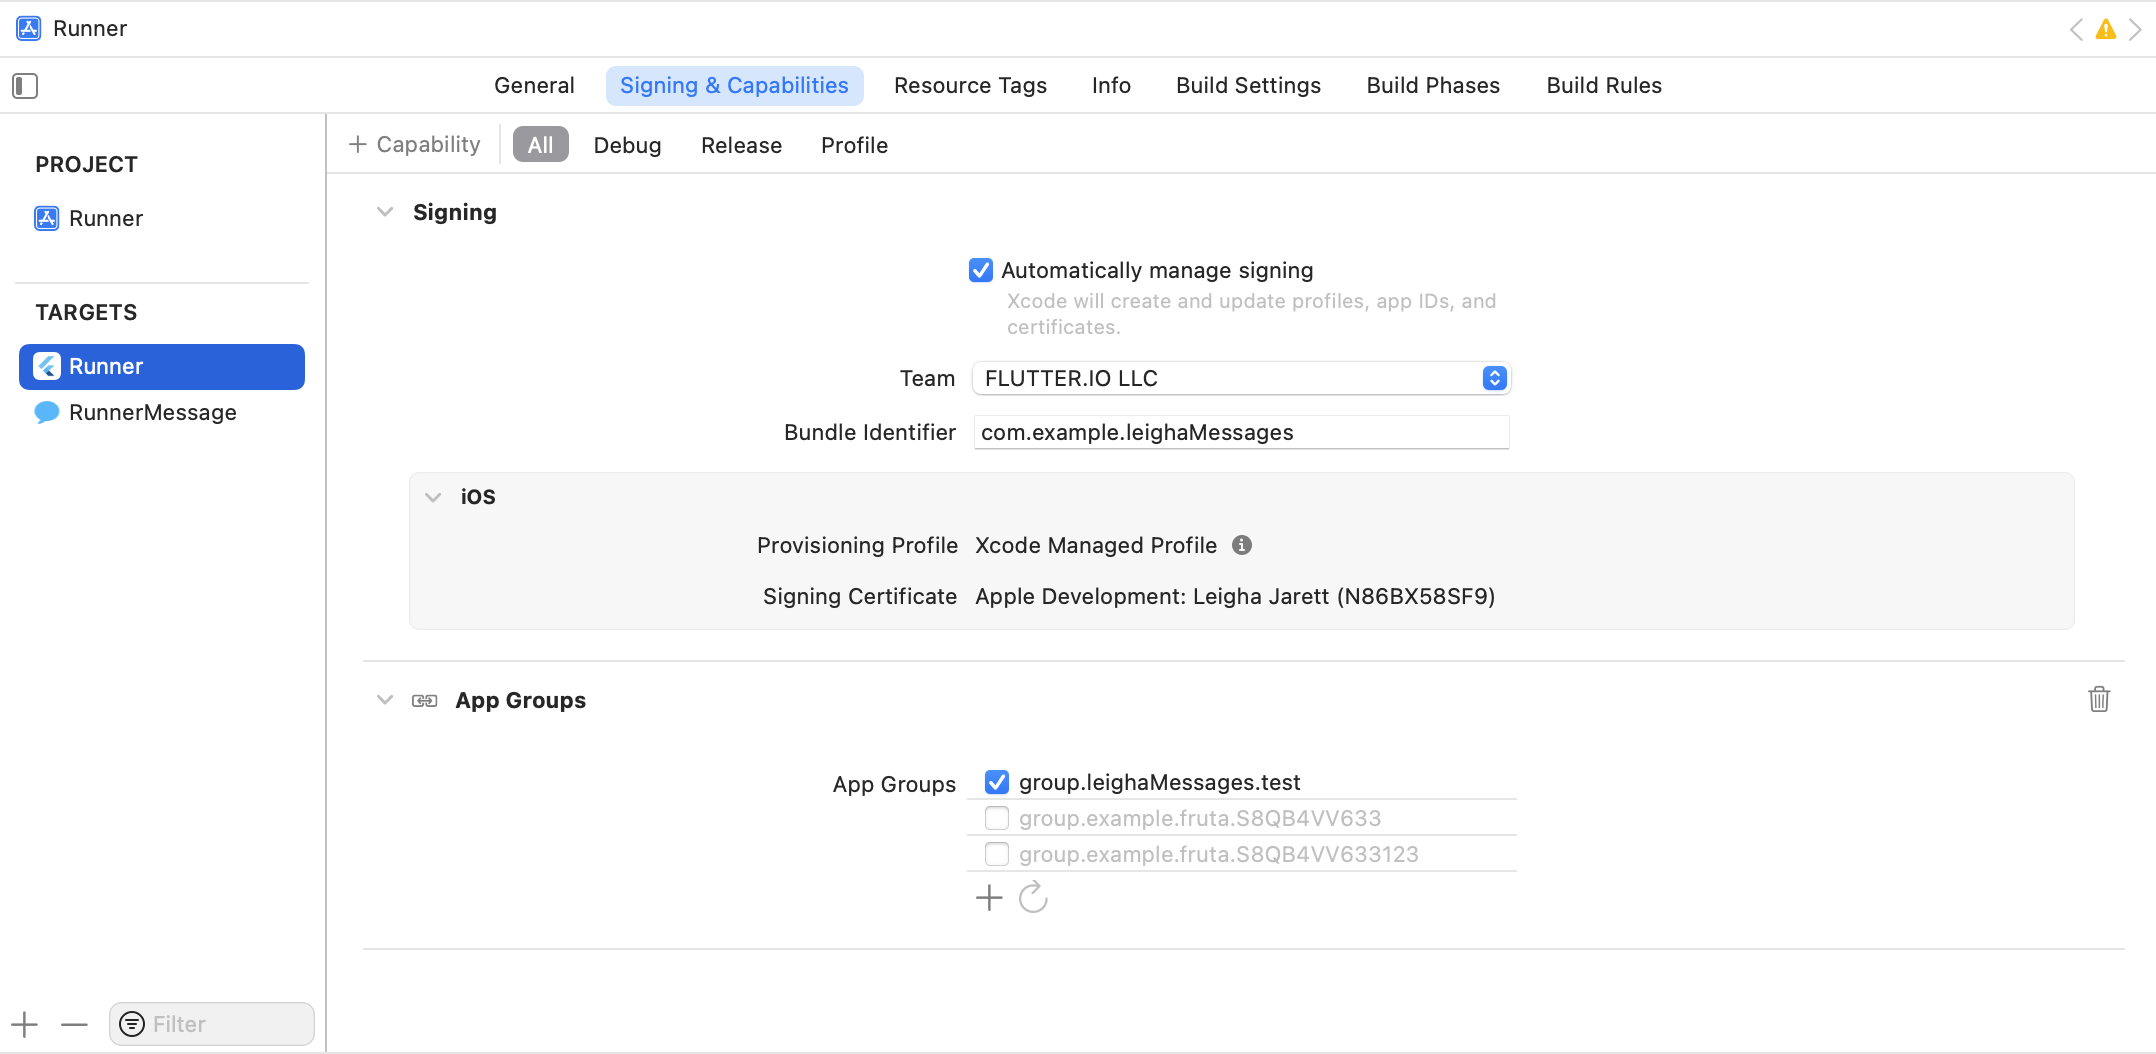
Open the target settings in Xcode.
Navigate to the Signing & Capabilities tab.
Select + Capability then App Groups.
-
Choose which App Group you want to add the target from one of two options:
- Select an App Group from the list.
- Click + to add a new App Group.

When two targets belong to the same App Group, they can read from and write to the same source. Choose one of the following sources for your data.
-
Key/value: Use the
shared_preference_app_groupplugin to read or write toUserDefaultswithin the same App Group. -
File: Use the App Group container path from the
path_providerplugin to read and write files. -
Database: Use the App Group container path from
the
path_providerplugin to create a database with thesqfliteplugin.
Schedule background updates
#Background tasks provide a means to update your extension through code regardless of the status of your app.
To schedule background work from your Flutter app,
use the workmanager
plugin.
Add deep linking
#You might want to direct users from an app extension to a specific page in your Flutter app. To open a specific route in your app, you can use Deep Linking.
Add a scrollable list
#By default, flutter view does not handle scroll gestures in a Share extension. To support a scrollable list in the Share extension, follow the instructions on GitHub.
Open a Flutter app in an iOS app extension
#
You can open your Flutter app directly
in some iOS app extensions, such as the
Share
extension, with a FlutterViewController.
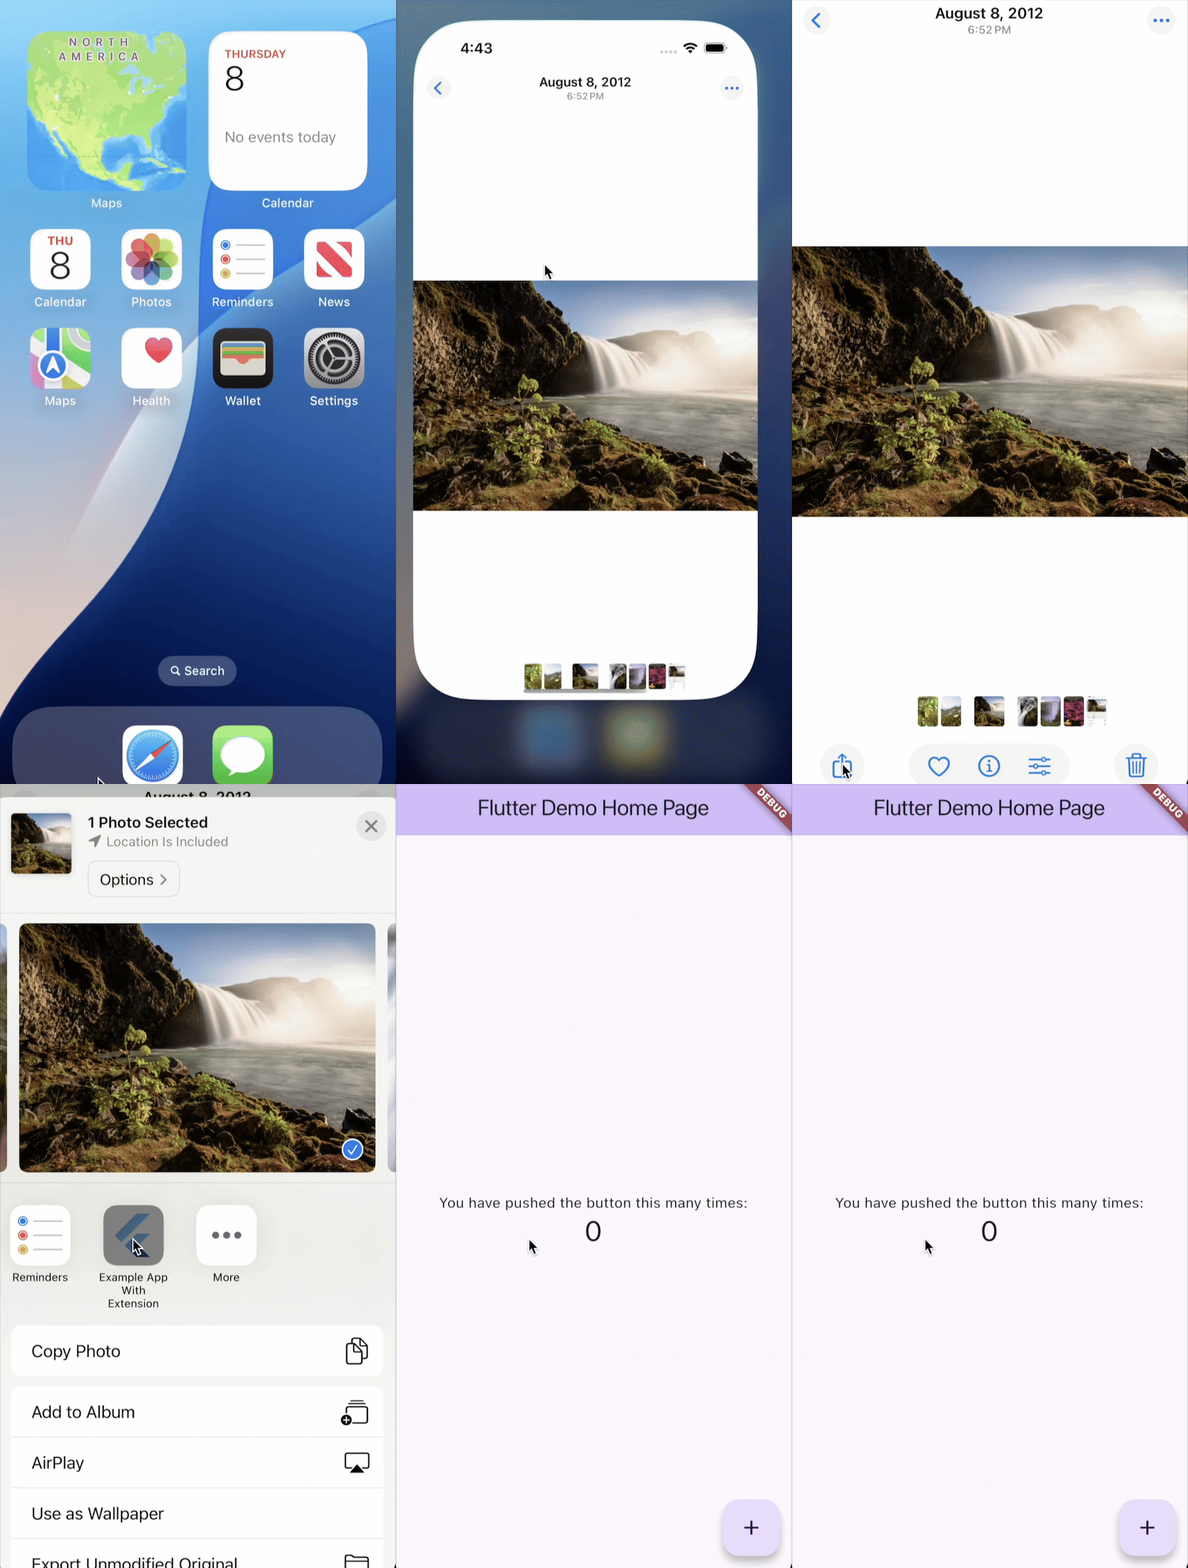
In the following example, a Flutter app called
Example App With Extension is opened in the
Share extension, which lets users share content
between apps:

Use the following steps to display a Flutter app inside of
a Share
app extension. In this example the app extension
scheme is called ShareExtension, the Flutter app scheme is
called Runner, and the Flutter app is called
Example App With Extension:
-
Add an extension to your Flutter app if you haven't already done so.
-
In the console, navigate to your Flutter project directory and then open your project in Xcode with the following command:
open ios/Runner.xcworkspace -
In Xcode, disable user script sandboxing.
Open the project navigator (View > Navigators > Project).
In the main window under TARGETS, select ShareExtension.
Open the Build Settings tab.
Navigate to Build Options.
Set User Script Sandboxing as No.
-
In Xcode, add the pre-action to the
ShareExtensionscheme.Open the Manage Schemes window (Product > Scheme > Manage Schemes).
Select the ShareExtension scheme and edit it.
Expand the Build tab.
Select Pre-actions.
Click + and select New Run Script Action.
In the Provide build settings from drop-down list, select ShareExtension.
In the Shell text field, enter:
/bin/sh "$FLUTTER_ROOT/packages/flutter_tools/bin/xcode_backend.sh" prepareClick Close.
-
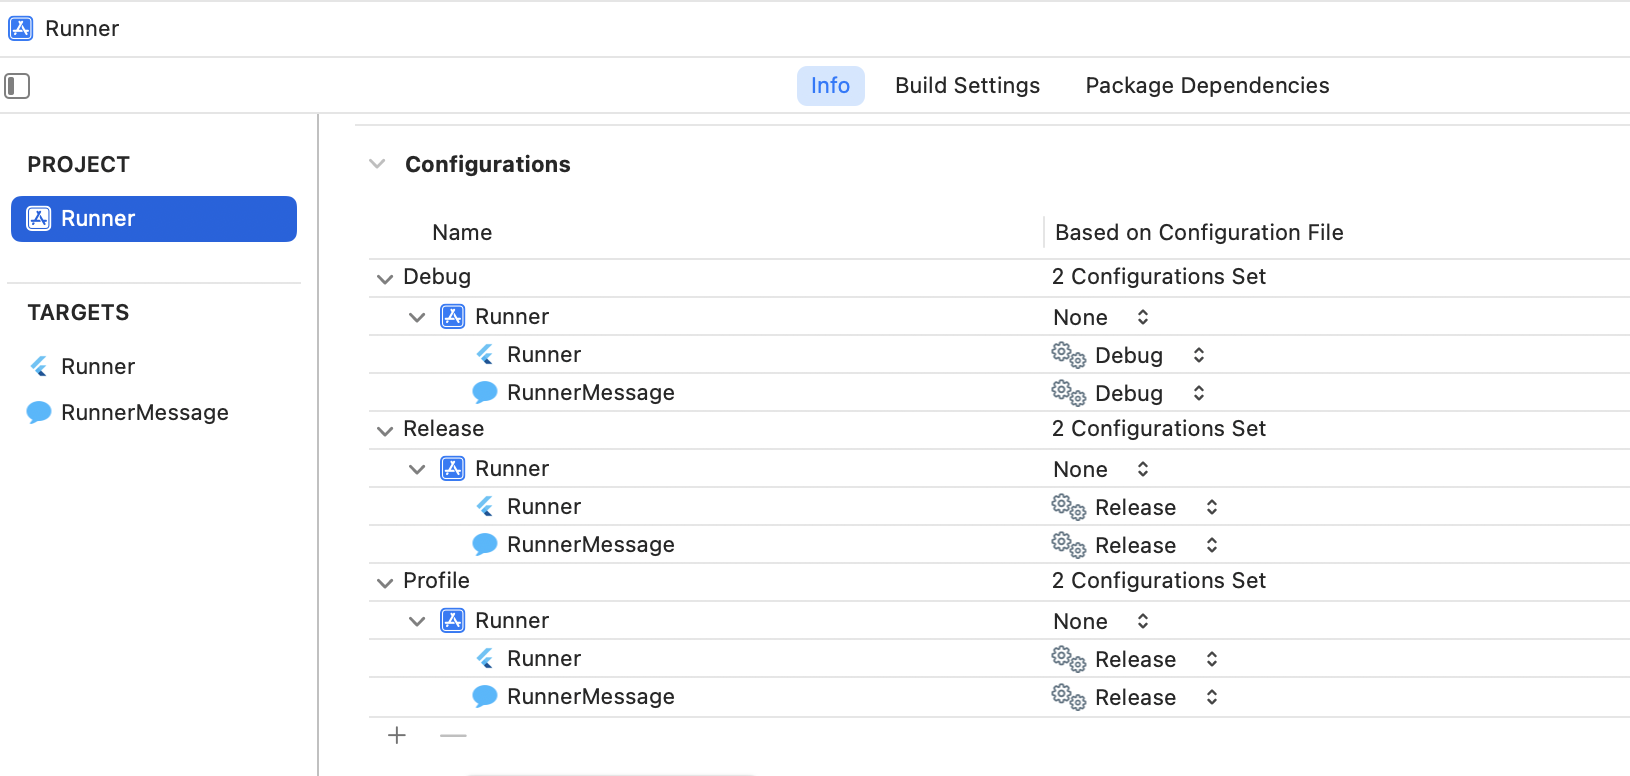
In Xcode, share the build configurations.
Open the project navigator (View > Navigators > Project).
In the main window under PROJECT, select Runner.
Open the Info tab.
Expand Configuration.
Expand Debug and update the value for ShareExtension to match the value for Runner.
Repeat the previous step for Profile, and Release.
When you are finished, make sure that the configurations look similar to the following:

-
(Optional) In Xcode, replace any storyboard files with an extension class, if needed.
Open the project navigator (View > Navigators > Project).
Select Runner > ShareExtension > Info.
Expand Information Property List.
Delete the NSExtensionMainStoryboard key.
Add the NSExtensionPrincipalClass key.
Add one of these values for the
NSExtensionPrincipalClasskey:- (Swift) ShareExtension.ShareViewController
- (Objective-C) ShareViewController
-
In Xcode, update the
ShareViewControllerto use theFlutterViewController.Open the project navigator (View > Navigators > Project).
Select Runner > ShareExtension > ShareViewController.
Update
ShareViewControllerto use theFlutterViewControllerclass:
import UIKit
import Flutter
class ShareViewController: UIViewController {
override func viewDidLoad() {
super.viewDidLoad()
showFlutter()
}
func showFlutter() {
let flutterEngine = FlutterEngine(name: "my flutter engine")
flutterEngine.run()
let flutterViewController = FlutterViewController(engine: flutterEngine, nibName: nil, bundle: nil)
addChild(flutterViewController)
view.addSubview(flutterViewController.view)
flutterViewController.view.frame = view.bounds
}
override func viewDidDisappear(_ animated: Bool) {
super.viewDidDisappear(animated)
self.extensionContext?.cancelRequest(
withError: NSError(domain: Bundle.main.bundleIdentifier!, code: 0))
}
}
@import Flutter;
@import UIKit;
@interface ShareViewController : UIViewController
@end
#import "ShareViewController.h"
@import Flutter;
@implementation ShareViewController
- (void)viewDidLoad {
[super viewDidLoad];
[self showFlutter];
}
- (void)showFlutter {
FlutterEngine *flutterEngine = [[FlutterEngine alloc] initWithName:@"my flutter engine"];
[flutterEngine run];
FlutterViewController *flutterViewController =
[[FlutterViewController alloc] initWithEngine:flutterEngine nibName:nil bundle:nil];
[self addChildViewController:flutterViewController];
[self.view addSubview:flutterViewController.view];
flutterViewController.view.frame = self.view.bounds;
}
- (void)viewDidDisappear:(BOOL)animated {
[super viewDidDisappear:animated];
[self.extensionContext cancelRequestWithError:[NSError errorWithDomain:NSBundle.mainBundle.bundleIdentifier code:0 userInfo:nil]];
}
@end
Register plugins
#
Use the following steps to register plugins for
an app extension. In this example, the app extension
scheme is called ShareExtension, the Flutter app scheme is
called Runner, and the Flutter app is called
Example App With Extension:
-
Add an extension to your Flutter app if you haven't already done so.
-
In Xcode, add
GeneratedPluginRegistrant.mto the app extension target.Open the project navigator (View > Navigators > Project).
In the main window under TARGETS, select ShareExtension.
Open the Build Phases tab.
Expand Compile Sources.
Click +.
From the list in the Choose item to add dialog box, select GeneratedPluginRegistrant.m.
Click Add.
-
(Swift only) In Xcode, update the
SWIFT_OBJC_BRIDGING_HEADERbuild setting.Open the project navigator (View > Navigators > Project).
In the main window under TARGETS, select ShareExtension.
Open the Build Settings tab.
Select the All filter.
Navigate to Swift Compiler - General and change the value for the Objective-C Bridging Header key to Runner/Runner-Bridging-Header.h.
-
In Xcode, update the code for
ShareViewControllerto registerGeneratedPluginRegistrant.h.Open the project navigator (View > Navigators > Project).
Select Runner > ShareExtension > ShareViewController.
Update the
ShareViewControllerfile to use theGeneratedPluginRegistrant.h:
// Add this inside `showFlutter()` at the top
GeneratedPluginRegistrant.register(with: flutterEngine)
// Add this import at the top
#import "GeneratedPluginRegistrant.h"
// Add this after [flutterEngine run]
[GeneratedPluginRegistrant registerWithRegistry:flutterEngine];
- (Xcode) Test your app with the simulator.
Constraints
#-
You must use an iOS simulator to test your extension in debug mode.
-
Flutter doesn't fully support running app extensions in debug mode on physical devices when used to build extension UIs because a physical device might run out of memory.
-
iOS app extensions have limited memory. It is advisable to only modify an app extension's UI if the app extension supports at least 100MB of memory.
Call Dart code / render Flutter content in iOS app extensions
#The home_widget package provides a large amount of functionality, which includes allowing the following:
-
Respond to user input in app extensions using Dart Code.
-
Render Flutter widgets in an app extension as an image.
-
Save and retrieve data from
UserDefaultson iOS.
Other resources
#For step-by-step instruction for using app extensions with your Flutter iOS app, check out the Adding a Home Screen Widget to your Flutter app codelab.
To learn more about the various ways you can add a Flutter Screen to an iOS app, see Adding a Flutter Screen to an iOS app.
Unless stated otherwise, the documentation on this site reflects Flutter 3.38.6. Page last updated on 2025-11-17. View source or report an issue.