Persistent storage architecture: SQL
Save complex application data to a user's device with SQL.
Most Flutter applications, no matter how small or big they are, might require storing data on the user’s device at some point. For example, API keys, user preferences or data that should be available offline.
In this recipe, you will learn how to integrate persistent storage for complex data using SQL in a Flutter application following the Flutter Architecture design pattern.
To learn how to store simpler key-value data, take a look at the Cookbook recipe: Persistent storage architecture: Key-value data.
To read this recipe, you should be familiar with SQL and SQLite. If you need help, you can read the Persist data with SQLite recipe before reading this one.
This example uses sqflite with the sqflite_common_ffi
plugin,
which combined support for mobile and desktop.
Support for web is provided in the experimental plugin
sqflite_common_ffi_web
but it's not included in this example.
Example application: ToDo list application
#The example application consists of a single screen with an app bar at the top, a list of items, and a text field input at the bottom.
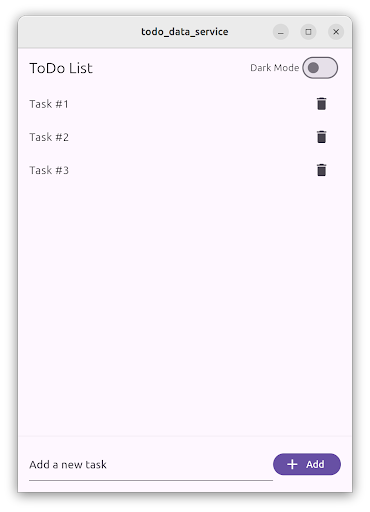
The body of the application contains the TodoListScreen.
This screen contains a ListView of ListTile items,
each one representing a ToDo item.
At the bottom, a TextField allows users to create new ToDo items
by writing the task description and then tapping on the “Add” FilledButton.
Users can tap on the delete IconButton to delete the ToDo item.
The list of ToDo items is stored locally using a database service, and restored when the user starts the application.
Storing complex data with SQL
#This functionality follows the recommended Flutter Architecture design, containing a UI layer and a data layer. Additionally, in the domain layer you will find the data model used.
- UI layer with
TodoListScreenandTodoListViewModel - Domain layer with
Tododata class - Data layer with
TodoRepositoryandDatabaseService
ToDo list presentation layer
#
The TodoListScreen is a Widget that contains the UI in charge of displaying
and creating the ToDo items.
It follows the MVVM pattern
and is accompanied by the TodoListViewModel,
which contains the list of ToDo items
and three commands to load, add, and delete ToDo items.
This screen is divided into two parts,
one containing the list of ToDo items,
implemented using a ListView,
and the other is a TextField
and a Button, used for creating new ToDo items.
The ListView is wrapped by a ListenableBuilder,
which listens to changes in the TodoListViewModel,
and shows a ListTile for each ToDo item.
ListenableBuilder(
  listenable: widget.viewModel,
  builder: (context, child) {
    return ListView.builder(
      itemCount: widget.viewModel.todos.length,
      itemBuilder: (context, index) {
        final todo = widget.viewModel.todos[index];
        return ListTile(
          title: Text(todo.task),
          trailing: IconButton(
            icon: const Icon(Icons.delete),
            onPressed: () => widget.viewModel.delete.execute(todo.id),
          ),
        );
      },
    );
  },
)
The list of ToDo items is defined in the TodoListViewModel,
and loaded by the load command.
This method calls the TodoRepository and fetches the list of ToDo items.
List<Todo> _todos = [];
List<Todo> get todos => _todos;
Future<Result<void>> _load() async {
try {
final result = await _todoRepository.fetchTodos();
switch (result) {
case Ok<List<Todo>>():
_todos = result.value;
return Result.ok(null);
case Error():
return Result.error(result.error);
}
} on Exception catch (e) {
return Result.error(e);
} finally {
notifyListeners();
}
}
Pressing the FilledButton,
executes the add command
and passes in the text controller value.
FilledButton.icon(
  onPressed: () =>
      widget.viewModel.add.execute(_controller.text),
  label: const Text('Add'),
  icon: const Icon(Icons.add),
)
The add command then calls the TodoRepository.createTodo() method
with the task description text and it creates a new ToDo item.
The createTodo() method returns the newly created ToDo,
which is then added to the _todo list in the view model.
ToDo items contain a unique identifier generated by the database.
This is why the view model doesn’t create the ToDo item,
but rather the TodoRepository does.
Future<Result<void>> _add(String task) async {
  try {
    final result = await _todoRepository.createTodo(task);
    switch (result) {
      case Ok<Todo>():
        _todos.add(result.value);
        return Result.ok(null);
      case Error():
        return Result.error(result.error);
    }
  } on Exception catch (e) {
    return Result.error(e);
  } finally {
    notifyListeners();
  }
}
Finally, the TodoListScreen also listens to the result in the add command.
When the action completes, the TextEditingController is cleared.
void _onAdd() {
  // Clear the text field when the add command completes.
  if (widget.viewModel.add.completed) {
    widget.viewModel.add.clearResult();
    _controller.clear();
  }
}
When a user taps on the IconButton in the ListTile, the delete command is executed.
IconButton(
  icon: const Icon(Icons.delete),
  onPressed: () => widget.viewModel.delete.execute(todo.id),
)
Then, the view model calls the TodoRepository.deleteTodo() method,
passing the unique ToDo item identifier.
A correct result removes the ToDo item from the view
model and the screen.
Future<Result<void>> _delete(int id) async {
  try {
    final result = await _todoRepository.deleteTodo(id);
    switch (result) {
      case Ok<void>():
        _todos.removeWhere((todo) => todo.id == id);
        return Result.ok(null);
      case Error():
        return Result.error(result.error);
    }
  } on Exception catch (e) {
    return Result.error(e);
  } finally {
    notifyListeners();
  }
}
Todo list domain layer
#
The domain layer of this example application contains
the Todo item data model.
Items are presented by an immutable data class.
In this case, the application uses the freezed package to generate the code.
The class has two properties, an ID represented by an int,
and a task description, represented by a String.
@freezed
abstract class Todo with _$Todo {
const factory Todo({
/// The unique identifier of the Todo item.
required int id,
/// The task description of the Todo item.
required String task,
}) = _Todo;
}
Todo list data layer
#
The data layer of this functionality is composed of two classes,
the TodoRepository and the DatabaseService.
The TodoRepository acts as the source of truth for all the ToDo items.
View models must use this repository to access to the ToDo list,
and it should not expose any implementation details on how they are stored.
Internally, the TodoRepository uses the DatabaseService,
which implements the access to the SQL database using the sqflite package.
You can implement the same DatabaseService using other storage packages
like sqlite3, drift or even cloud storage solutions like
firebase_database.
The TodoRepository checks if the database is open
before every request and opens it if necessary.
It implements the fetchTodos(), createTodo(), and deleteTodo()
methods.
class TodoRepository {
TodoRepository({required this._database});
final DatabaseService _database;
Future<Result<List<Todo>>> fetchTodos() async {
if (!_database.isOpen()) {
await _database.open();
}
return _database.getAll();
}
Future<Result<Todo>> createTodo(String task) async {
if (!_database.isOpen()) {
await _database.open();
}
return _database.insert(task);
}
Future<Result<void>> deleteTodo(int id) async {
if (!_database.isOpen()) {
await _database.open();
}
return _database.delete(id);
}
}
The DatabaseService implements the access to the SQLite database
using the sqflite package.
It’s a good idea to define the table and column names as constants to avoid typos when writing SQL code.
static const String _todoTableName = 'todo';
static const String _idColumnName = '_id';
static const String _taskColumnName = 'task';
The open() method opens the existing database,
or creates a new one if it doesn’t exist.
Future<void> open() async {
  _database = await databaseFactory.openDatabase(
    join(await databaseFactory.getDatabasesPath(), 'app_database.db'),
    options: OpenDatabaseOptions(
      onCreate: (db, version) {
        return db.execute(
          'CREATE TABLE $_todoTableName($_idColumnName INTEGER PRIMARY KEY AUTOINCREMENT, $_taskColumnName TEXT)',
        );
      },
      version: 1,
    ),
  );
}
Note that the column id is set as primary key and autoincrement;
this means that each newly inserted item
is assigned a new value for the id column.
The insert() method creates a new ToDo item in the database,
and returns a newly created Todo instance.
The id is generated as mentioned before.
Future<Result<Todo>> insert(String task) async {
  try {
    final id = await _database!.insert(_todoTableName, {
      _taskColumnName: task,
    });
    return Result.ok(Todo(id: id, task: task));
  } on Exception catch (e) {
    return Result.error(e);
  }
}
All the DatabaseService operations use the Result class to return a value,
as recommended by the Flutter architecture recommendations.
This facilitates handling errors in further steps in the application code.
The getAll() method performs a database query,
obtaining all the values in the id and task columns.
For each entry, it creates a Todo class instance.
Future<Result<List<Todo>>> getAll() async {
  try {
    final entries = await _database!.query(
      _todoTableName,
      columns: [_idColumnName, _taskColumnName],
    );
    final list = entries
        .map(
          (element) => Todo(
            id: element[_idColumnName] as int,
            task: element[_taskColumnName] as String,
          ),
        )
        .toList();
    return Result.ok(list);
  } on Exception catch (e) {
    return Result.error(e);
  }
}
The delete() method performs a database delete operation
based on the ToDo item id.
In this case, if no items were deleted an error is returned, indicating that something went wrong.
Future<Result<void>> delete(int id) async {
  try {
    final rowsDeleted = await _database!.delete(
      _todoTableName,
      where: '$_idColumnName = ?',
      whereArgs: [id],
    );
    if (rowsDeleted == 0) {
      return Result.error(Exception('No todo found with id $id'));
    }
    return Result.ok(null);
  } on Exception catch (e) {
    return Result.error(e);
  }
}
Putting it all together
#
In the main() method of your application,
first initialize the DatabaseService,
which requires different initialization code on different platforms.
Then, pass the newly created DatabaseService into the TodoRepository
which is itself passed into the MainApp as a constructor argument dependency.
void main() {
late DatabaseService databaseService;
if (kIsWeb) {
throw UnsupportedError('Platform not supported');
} else if (Platform.isLinux || Platform.isWindows || Platform.isMacOS) {
// Initialize FFI SQLite
sqfliteFfiInit();
databaseService = DatabaseService(databaseFactory: databaseFactoryFfi);
} else {
// Use default native SQLite
databaseService = DatabaseService(databaseFactory: databaseFactory);
}
runApp(
MainApp(
// ···
todoRepository: TodoRepository(database: databaseService),
),
);
}
Then, when the TodoListScreen is created,
also create the TodoListViewModel
and pass the TodoRepository to it as dependency.
TodoListScreen(
  viewModel: TodoListViewModel(todoRepository: widget.todoRepository),
)
Unless stated otherwise, the documentation on this site reflects Flutter 3.44.7. Page last updated on 2026-05-18. View source or report an issue.